If the MSSQL Server is not needed all the time on the workstation, we can run it in a Docker container. It allows us to easily upgrade the server version and shut it down when it is not used. To set up MSSQL Server in a Docker container we will follow the steps in Nawaz Dhandala’ excellent article at How to Run SQL Server in a Windows Docker Container
Install the Docker Desktop application from https://www.docker.com/products/docker-desktop/
Start the MSSQL Server
We will start the MSSQL server in a Docker container. This script sets up a volume for the database, so when the container is stopped, or destroyed, the data stays on the host’s hard drive. The detached mode keeps the container running in the background. We will use a Linux container, as it has smaller memory and CPU requirements, and runs faster. In the port argument the first number specifies the outside port, the second number the inside port. To run multiple MSSQL server instances on the same host, increment the first number to use a unique number, like 1434. In a terminal execute
docker run -d \
  --name sqlserver \
  -e "ACCEPT_EULA=Y" \
  -e "MSSQL_SA_PASSWORD=TheSA#Databas4ServerPassword" \
  -e "MSSQL_PID=Developer" \
  -p 1433:1433 \
  -v sqlserver-data:/var/opt/mssql \
  mcr.microsoft.com/mssql/server:2022-latest
Test the MSSQL server
To test the server from inside the container we can remote into the container to execute SQL commands from the command line.
# Remote into the MSSQL Server container and start the sqlcmd command line tool
docker exec -it sqlserver opt/mssql-tools18/bin/sqlcmd -S localhost -U sa -P "TheSA#Databas4ServerPassword" -C
To test the server from the workstation, we can connect to it from outside. To test from the command line install the sqlcmd commadn line tool and execute
# Or install sqlcmd locally and connect to the mapped port
sqlcmd -S localhost,1433 -U sa -P "TheSA#Databas4ServerPassword"
Connect to the server
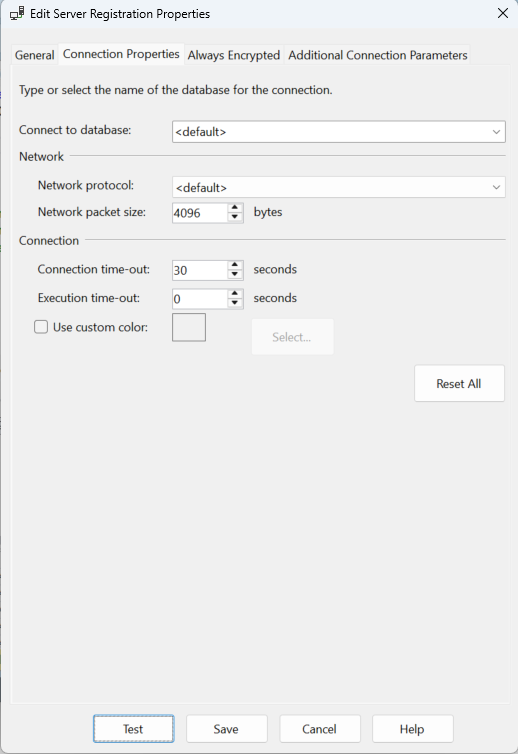
To connect to the server from Microsoft SQL Server Management Studio, use the following settings. This example shows how to specify the port in the server name field using a comma. If we use the default 1433 port, it is not necessary to include it in the server name.

Automated database initialization
If we use the MSSQL server mainly for testing it is very useful to script the database initialization. This way we can always recreate the entire data infrastructure by running a script.
Create a Dockerfile to build a custom image that includes the initialization script
# Dockerfile - to build an MSSQL Server image with automatic database setup
FROM mcr.microsoft.com/mssql/server:2022-latest

# Switch to the root user for file operations
USER root

# Create a directory in the image for the initialization scripts
RUN mkdir -p /docker-entrypoint-initdb

# Copy the SQL initialization scripts from the init-scripts subdirectory of the workstation
COPY ./init-scripts/ /docker-entrypoint-initdb/

# Copy the entrypoint wrapper script from the  current directory of the workstation
COPY ./entrypoint.sh /entrypoint.sh
RUN chmod +x /entrypoint.sh

# Switch back to the mssql user
USER mssql

# Environment variables with defaults
ENV ACCEPT_EULA=Y
ENV MSSQL_PID=Developer

# When the container starts. execute the entrypoint.sh bash script
ENTRYPOINT ["/entrypoint.sh"]
Create the entrypoint.sh bash script in the same directory to execute the initialization scripts
#!/bin/bash
# entrypoint.sh - Start the MSSQL Server and run the init scripts

# Start SQL Server in the background
/opt/mssql/bin/sqlservr &
SQLSERVER_PID=$!

# Wait for SQL Server to become available
echo "Waiting for SQL Server to start..."
for i in {1..60}; do
    /opt/mssql-tools18/bin/sqlcmd -S localhost -U sa -P "$MSSQL_SA_PASSWORD" -C -Q "SELECT 1" > /dev/null 2>&1
    if [ $? -eq 0 ]; then
        echo "SQL Server is ready."
        break
    fi
    sleep 1
done

# Run the initialization scripts in the docker-entrypoint-initdb subdirectory of the container
for script in /docker-entrypoint-initdb/*.sql; do
    if [ -f "$script" ]; then
        echo "Running $script..."
        /opt/mssql-tools18/bin/sqlcmd -S localhost -U sa -P "$MSSQL_SA_PASSWORD" -C -i "$script"
    fi
done

echo "Initialization complete."

# Keep the container running by waiting on the SQL Server process
wait $SQLSERVER_PID
In the init-scripts subdirectory of the workstation create the SQL script to initialize the database and call it create-database.sql
-- init-scripts/01-create-database.sql
-- Create the application database
IF NOT EXISTS (SELECT name FROM sys.databases WHERE name = 'MyDB')
BEGIN
    CREATE DATABASE MyDB;
END
GO

USE MyDB;
GO

-- Create tables
CREATE TABLE Tasks(
    Id INT PRIMARY KEY IDENTITY(1,1),
    TaskName NVARCHAR(50) NOT NULL UNIQUE,
    Description NVARCHAR(100) NOT NULL,
    CreatedAt DATETIME2 DEFAULT GETUTCDATE()
);
GO

CREATE TABLE Data(
    Id INT PRIMARY KEY IDENTITY(1,1),
    TaskId INT FOREIGN KEY REFERENCES Tasks(Id),
    Count INT NOT NULL,
    Status NVARCHAR(20) DEFAULT 'pending',
    CreatedAt DATETIME2 DEFAULT GETUTCDATE()
);
GO
Build the custom MSSQL Server image and run it
Execute the scrip in the directory where the Dockerfile is located
docker build -t myapp-sqlserver .
Run the custom container
docker run -d --name myapp-db -e "MSSQL_SA_PASSWORD=TheSA#Databas4ServerPassword" -p 1433:1433 myapp-sqlserver