Skip to content
Pinter Computing

Knowledge Base for IT Professionals, Teachers, and Astronauts

Pinter Computing

Knowledge Base for IT Professionals, Teachers, and Astronauts

  • Home
  • Programming
  • DevOps
  • Project Management
  • Software and Hardware
  • Miscellaneous
  • Egyebek
  • About
  • Experience
  • Education
  • Contact
  • Home
  • Programming
  • DevOps
  • Project Management
  • Software and Hardware
  • Miscellaneous
  • Egyebek
  • About
  • Experience
  • Education
  • Contact
Close

Search

Home/OS/Windows/How to create a bootable USB drive to install Windows 11
Windows

How to create a bootable USB drive to install Windows 11

By Laszlo Pinter
August 16, 2017 3 Min Read
0

If the computer you want to install Microsoft WIndows on, does not have a DVD drive, you can install Windows from a USB drive. To start the computer from the USB drive, you need to prepare the drive to make it bootable.

Microsoft has a free tool that can download the edition of the Windows operating system you need, format the USB drive, make it bootable, and place the installer file on it.

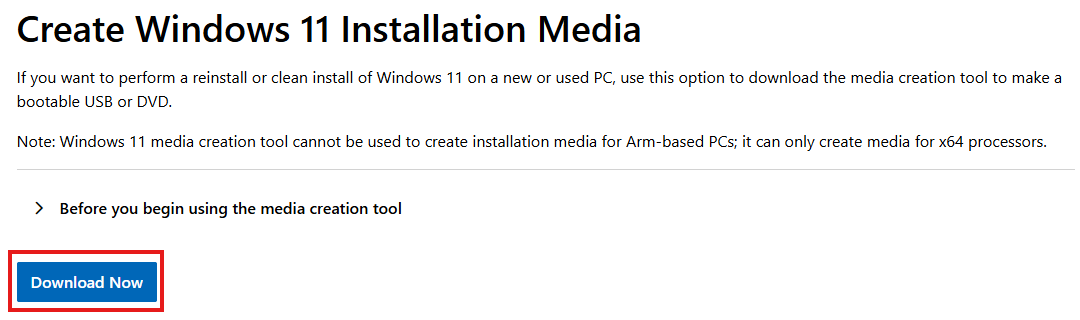
  1. Using a web browser navigate to https://www.microsoft.com/en-us/software-download/windows11
  2. In the Create Windows 11 Installation Media section click the Download now button to install the Microsoft Media Creation Tool,
  3. Start the downloaded MediaCreationTool.exe program and follow the prompts to accept the terms
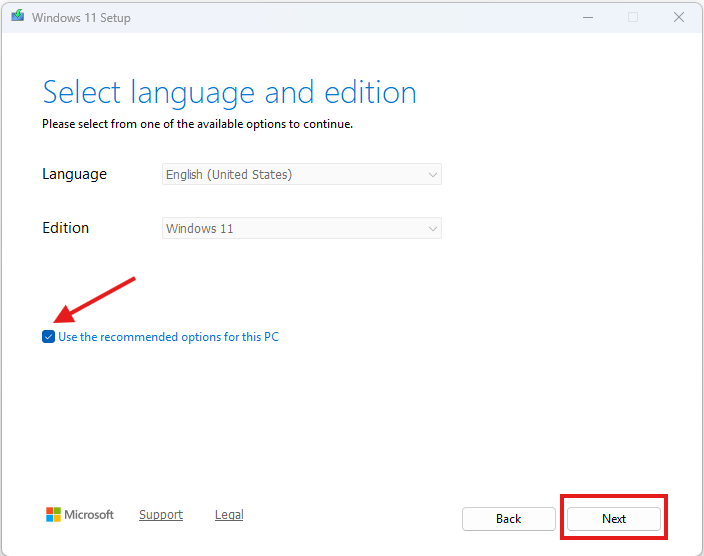
  4. The recommended language and edition is already selected based on the computer you currently use. Uncheck the checkbox to select another language or edition. Click the Next button to continue.
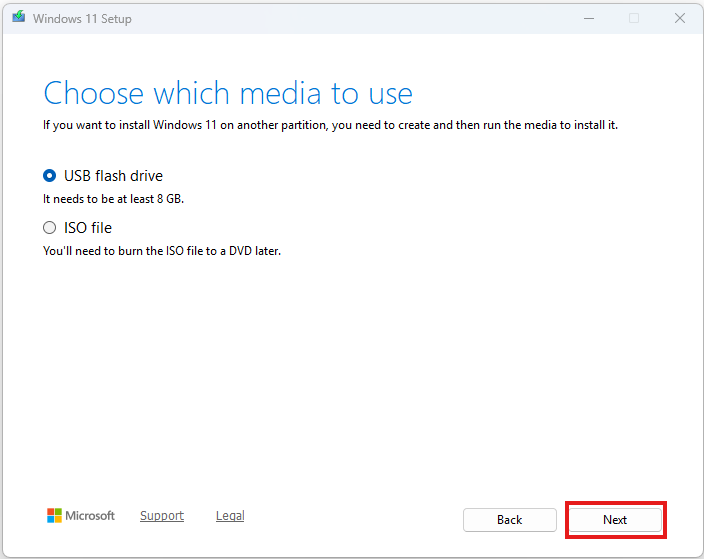
  5. Select the media type and click the Next button. If your computer does not have a CD drive, prepare a USB drive to install Windows. Insert the USB drive into your computer and click the Next button.
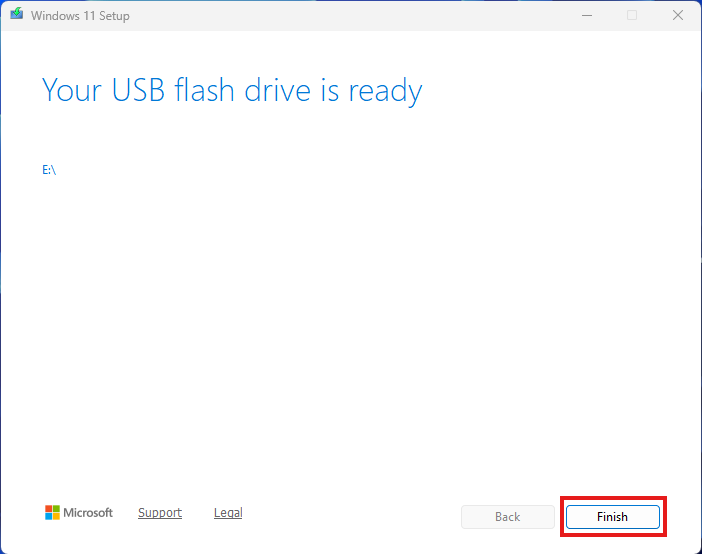
  6. When the USB drive is ready click the Finish button
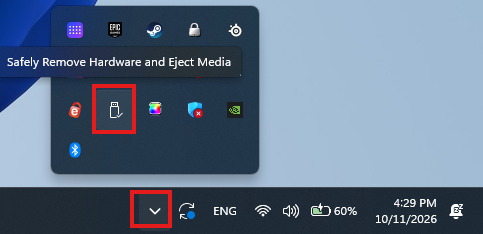
  7. To safely eject the USB drive from the computer click the small down arrow in the lower right corner of the screen and click the Safely Remove Hardware and Eject Media button
  8. It can take a minute to gather the information on all removable drives. Select the drive indicated on the Your USB drive is ready page. In this case Drive E:
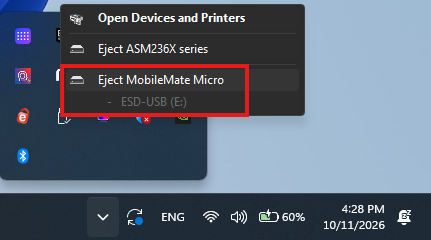
  9. When the drive disappears from the drive list in File Explorer, remove the USB drive.

Install Windows on the new computer

  • Insert the bootable USB drive into the new computer
  • Turn on the computer
  • If the computer does not boot from the inserted USB drive
    • Enter into the BIOS settings of the computer
    • In the boot order section select the USB drive as the device to boot from

When the Windows installation completed

  • If you modified the boot order in the BIOS settings
    • Enter into the BIOS settings of the computer
    • In the boot order section select the hard drive as the first drive to boot from. This prevents accidental boots from a rogue USB drive left plugged into the computer. It can highjack your computer hardware and network.

Tags:

Windows
Author

Laszlo Pinter

Follow Me
Other Articles
Previous

Setup failed: Failed to copy slug dir: lstat /Users: no such file or directory error in Terraform Enterprise

Next

Dynamically set Chef resource attributes

No Comment! Be the first one.

Leave a Reply Cancel reply

Your email address will not be published. Required fields are marked *

Search

Last Changes

  • Building Happy, the AI hardware robot November 12, 2026
  • Happy, the AI hardware robot – speech to text November 12, 2026
  • Happy, the AI hardware robot - the touch - metal plate November 11, 2026
  • Happy, the AI hardware robot – the neck – servo motor November 11, 2026
  • Happy, the AI hardware robot - the ears - microphone November 11, 2026

Tags

.NET .NETcore 3Dprinting AI AWS C# Chef cloud DevOps Docker EntityFramework Games Git Go iOS iPad iPhone iPod Java Kubernetes Linux MacOSX MSSQL MVC MySql Node.js Packer PowerShell Python RDS Ruby security Splunk storage TeamCity Terraform TestKitchen Tomcat Ubuntu Vagrant VirtualBox VisualStudio Windows WordPress Xcode

Recent Comments

  • Laszlo Pinter on Turn off the built in touchpad when a mouse is attached
  • Kenneth Bush on Turn off the built in touchpad when a mouse is attached
  • Zengei László on MyHeritage családfa exportálása és küldése emailben
  • Raúl Castillo on DynDns update error
  • MICHAEL on Windows Media Player 12 cannot find the album information

–

  • Log in
  • Entries feed
  • Comments feed
  • WordPress.org
Copyright 2026 — Pinter Computing. All rights reserved.