Install Visual Studio Code
See https://code.visualstudio.com/docs/setup/mac
On Windows
Select all four checkboxes for maximum integration

On macOS
Move Visual Studio Code to the Applications folder
The official instructions above start Visual Studio Code in the Downloads folder. Move the file into the Applications folder.
Configure Visual Studio Code
Start Visual Studio Code from the command line
This is a very useful feature
On Windows
Add the Visual Studio Code executable location to the System path:
"C:\Users\MY_USER_NAME\AppData\Local\Programs\Microsoft VS Code\AppData\Local\Programs\Microsoft VS Code"- Restart the all terminals for the installation settings to take effect
- Type code in the terminal to start Visual Studio Code
Enable code execution in PowerShell
When the PowerShell terminal starts in Visual Studio Code it tries to load the profiles. If an error message is displayed, enable code execution. Run the command in a PowerShell as Administrator
Set-ExecutionPolicy -ExecutionPolicy RemoteSignedCustomize Visual Studio Code
The Visual Studio Code configuration settings are stored in a JSON file on your workstation. You can edit the file and after restart the settings take effect, or you can set the values in the user interface one-by-one.
To customize Visual Studio Code by editing the settings file
Open the settings.json file. The double quotes are important, as both paths contain spaces.
On Mac: $HOME/Library/Application\ Support/Code/User/settings.json
On Windows: “%APPDATA%\Code\User\settings.json”
Useful settings
- Enable double-click to select the entire word even if it contains a dash (hyphen, minus), as many variables and keywords in modern languages. Remove “-” (dash) from the list in
Terminal -> Integrated: Word Separators
Editor: Word Separators (editor.wordSeparators) - Set the tab size to 2
Editor: Tab size - Insert final new line
Files: Insert Final Newline
My current configuration settings file looks like this:
{
"editor.acceptSuggestionOnEnter": "off",
"workbench.colorTheme": "Visual Studio Dark",
"files.insertFinalNewline": true,
"workbench.startupEditor": "newUntitledFile",
"editor.renderWhitespace": "none",
"editor.wordSeparators": "`~!@#$%^&*()=+[{]}\\|;:'\",.<>/?",
"go.formatTool": "goimports",
"go.useLanguageServer": true,
"workbench.colorCustomizations" : {
"activityBar.activeBackground":"#95968888"
},
"editor.tabSize": 2,
"mssql.connections": [
{
"server": "{{put-server-name-here}}",
"database": "{{put-database-name-here}}",
"user": "{{put-username-here}}",
"password": ""
},
],
"workbench.editorAssociations": {
"*.ipynb": "jupyter-notebook"
},
"notebook.cellToolbarLocation": {
"default": "right",
"jupyter-notebook": "left"
},
"redhat.telemetry.enabled": false,
"editor.minimap.enabled": false,
"go.toolsManagement.autoUpdate": true,
"search.exclude": {
"**/.terraform": true
},
"[yml]": {
"editor.insertSpaces": true,
"editor.tabSize": 2,
"editor.autoIndent": "advanced"
},
"[yaml]": {
"editor.insertSpaces": true,
"editor.tabSize": 2,
"editor.autoIndent": "advanced"
},
"git.openRepositoryInParentFolders": "always",
"[python]": {
"editor.formatOnType": true
},
"editor.inlineSuggest.enabled": true,
"application.shellEnvironmentResolutionTimeout": 60,
"[typescriptreact]": {
"editor.defaultFormatter": "vscode.typescript-language-features"
},
"aws.telemetry": false,
"aws.suppressPrompts": {
"codeWhispererNewWelcomeMessage": true
},
"[jsonc]": {
"editor.defaultFormatter": "vscode.json-language-features"
},
"terminal.integrated.experimentalInlineChat": true,
"prisma.showPrismaDataPlatformNotification": false,
"mssql.enableRichExperiences": true
},
"files.exclude": {
"**/*.js": { "when": "$(basename).ts" },
"**/**.js": { "when": "$(basename).tsx" }
}
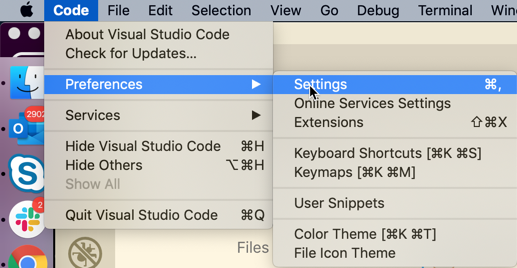
}To customize Visual Studio Code using the UI
- Open the settings page with Command-, (comma)
or
- Start Visual Studio Code
- Open Preferences -> Settings
Only tab should accept the suggestion
To force Visual Studio Code to only insert the suggested word with the Tab key, and configure the Enter key to always insert a new line
- On the settings tab search for tab
- Set the Editor: Accept Suggestion On Enter to off
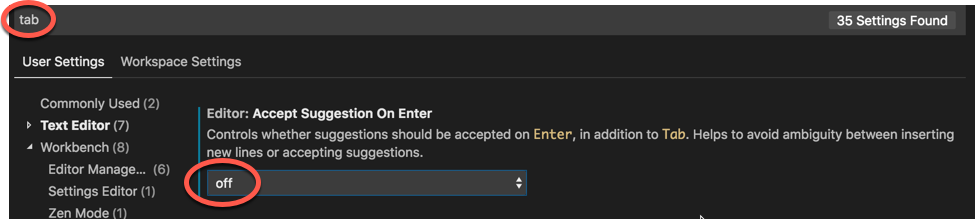
Adds “editor.acceptSuggestionOnEnter”: “off” to the setting.json file
Add trailing newline to every file
- On the settings tab search for insert final newline
- Check the Insert Final Newline checkbox
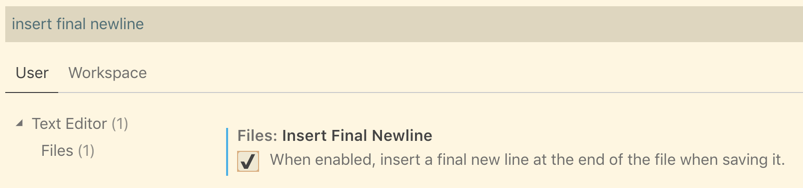
Adds “files.insertFinalNewline”: true, to the settings.json file
Select text with hyphen with double click
To select the entire text–with–hyphen with double click
- On the settings tab search for editor.wordSeparators
- Delete – (hyphen) from the separator characters
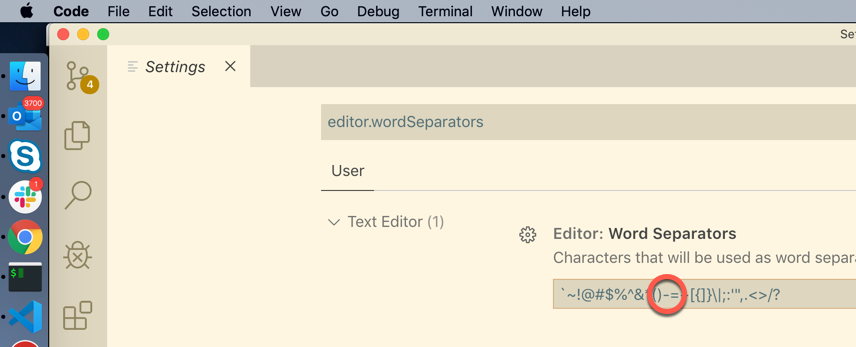
Adds “editor.wordSeparators”: “`~!@#$%^&*()=+[{]}\\|;:’\”,.<>/?” to the settings.json file.
Exclude libraries from search
When we search the source code it can take along time for Visual Studio Code to search through the libraries that only support our application. Exclude the known library folders. Most of them are already included, add the .terraform folder to the list.
- On the settings tab search for search.exclude and click the Add Pattern button
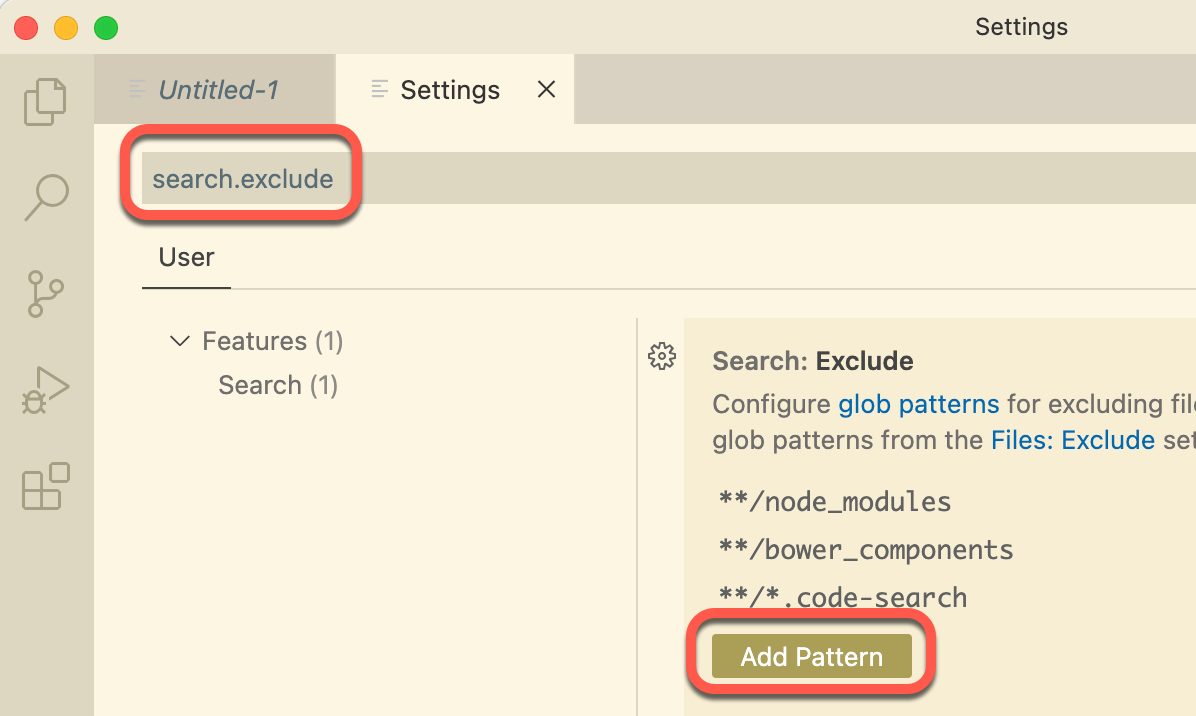
- Enter **/.terraform into the field and click the OK button
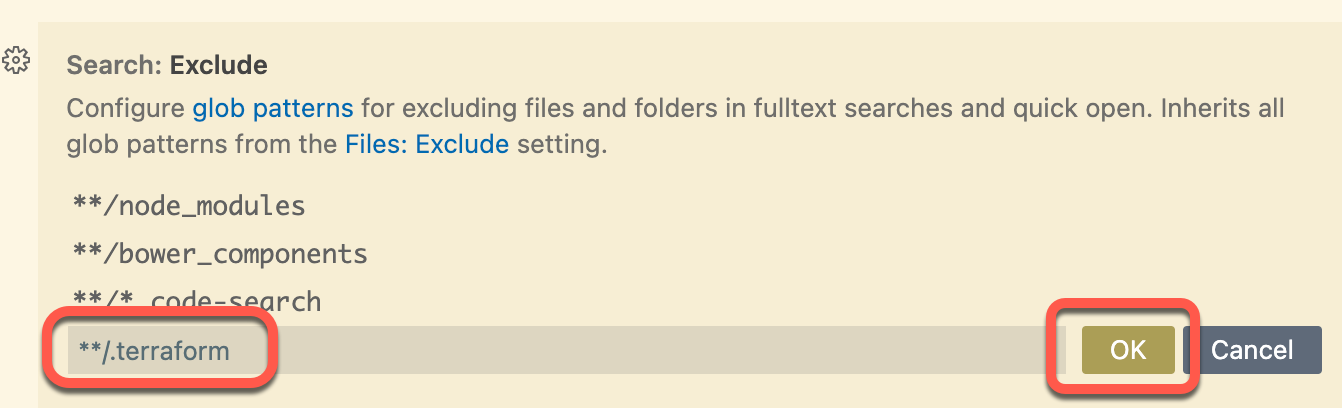
Adds
"search.exclude": {
        "**/.terraform": true
    }
to the settings.json file.
Ignore compiled .js files during search when a .ts file exists with the same name
Add this to the settings.json file
    "files.exclude": {
        "**/*.js": { "when": "$(basename).ts" },
        "**/**.js": { "when": "$(basename).tsx" }
    }
Insert 2 spaces into the .yml and .yaml files when we press the tab key, use tabs in Makefile
- Open the extensions page with Shift-Command-X
- Install the EditorConfig for VS Code plugin
- Save this .editorconfig file in the root of your project files above all projects ( for example in the ~/Git directory)
[Makefile]
indent_style = tab

[*.yml]
indent_style = space
indent_size = 2- Restart Visual Studio Code
Another setting for yml files, (maybe not necessary if the EditorConfig plugin is installed)
- Start Visual Studio Code
- Open the Settings page with Command-,
- Enter yml into the search field and press enter, and click the Edit settings for yaml link
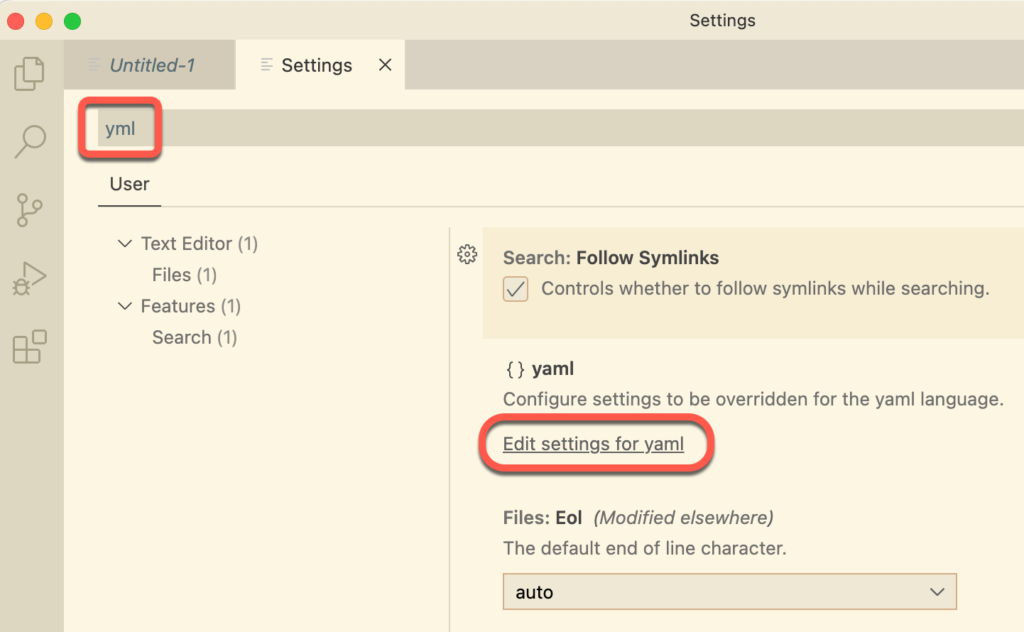
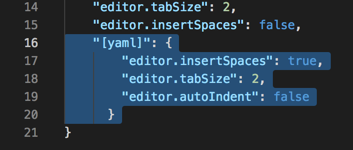
- Enter into the settings.json file
,
"[yml]": {
  "editor.insertSpaces": true,
  "editor.tabSize": 2,
  "editor.autoIndent": false
},
"[yaml]": {
  "editor.insertSpaces": true,
  "editor.tabSize": 2,
  "editor.autoIndent": false
}
Open a Bash terminal in Visual Studio Code
To open a new Bash terminal in Visual Studio Code, install Git Bash and restart Visual Studio Code for the change to take effect. See Install Git on Windows
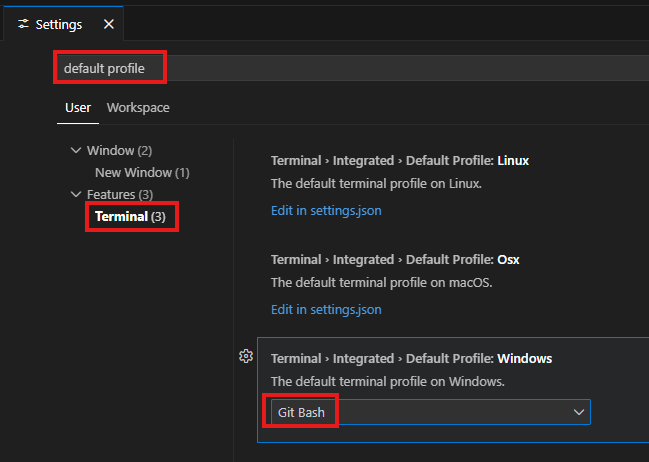
To set Git Bash as the default terminal on Windows
- In VS Code open Settings
- On the settings page search for default profile
- In the Features/Terminal section set the value for Windows to Git Bash
Upgrade Bash on macOS
To be able to debug Bash scripts in Visual Studio Code on macOS, we need to upgrade Bash to at least version 4.0. Even the most modern macOS installs, a more than 15 year old, Bash version 3.2.57 from 2007!!!
bash –version
GNU bash, version 3.2.57(1)-release (x86_64-apple-darwin18)
Copyright (C) 2007 Free Software Foundation, Inc.
To upgrade Bash to the latest version follow the instructions by Daniel Weibel at https://itnext.io/upgrading-bash-on-macos-7138bd1066ba
IMPORTANT!!!
If you use iTerm (zshell) keep /bin/zsh as the last item in the /etc/shells file to make it the default shell when you open iTerm.
...
/usr/local/bin/bash
/bin/zsh
Useful extensions
- EditorConfig for VS Code
- GitLens — Git supercharged
- Dev Containers by Microsoft
- Go ms-vscode.go
- Terraform mauve.terraform
- Bash Debug rogalmic.bash-debug