Many developers have multiple GitHub accounts. One for personal projects, and another one for their work or business. There is a way to access multiple accounts simultaneously from the same computer. Only one account at a time can be configured using the HTTP connection, but we can configure the rest of the accounts using SSH.
There are many great articles on this topic, but most of them only provide partial instructions on how to set up multiple GitHub accounts on the same computer. In this post, I will document all the necessary steps to set up two accounts.
Usually, you don’t have much control over what GitHub connectivity is used for the company account, it can be dictated by the customer or your workplace, but you can always control what to use for your personal account. With SSH you can specify all aspects of your personal account, so you can leave the default SSH or HTTP connection for the business or company account.
In this post, we will set up two accounts with SSH connection. Even if the business account currently uses HTTP, it makes sense to set up SSH for that account too, in case they will switch to SSH at a later time.
Create two keys
-
- Open a terminal window and start the authentication agent to avoid the “Could not open a connection to your authentication agent” error later
eval `ssh-agent -s`
- Create the personal SSH key
ssh-keygen -t rsa -C "MY_PERSONAL_EMAIL@ADDRESS"
when asked for the file name by the “Enter file in which to save the key“prompt, save the key as id_rsa_pers
- Add the personal key to the authentication agent
ssh-add id_rsa_pers
- Create the business SSH key
ssh-keygen -t rsa -C "MY_COMPANY_EMAIL@ADDRESS"
when asked for the file name by the “Enter file in which to save the key“prompt, save the key as id_rsa_COMPANY_NAME
- Add the business key to the authentication agent
ssh-add id_rsa_COMPANY_NAME
- Open a terminal window and start the authentication agent to avoid the “Could not open a connection to your authentication agent” error later
If you want to use existing keys from another location
If you already have the keys at another location or at another user account, copy the ~/.ssh directory to the new home directory. Do the same if you want to use the same keys in sudo mode. In that case switch to sudo mode with
sudo -i
Copy the .ssh directory
cd ~
cp -r /home/OTHER_USER/.ssh .
Set the file permissions
If you have copied the keys from another location, the file permissions may not set correctly. If the key permissions are too open, Linux displays the message:
@@@@@@@@@@@@@@@@@@@@@@@@@@@@@@@@@@@@@@@@@@@@@@@@@@@@@@@@@@@
@ WARNING: UNPROTECTED PRIVATE KEY FILE! @
@@@@@@@@@@@@@@@@@@@@@@@@@@@@@@@@@@@@@@@@@@@@@@@@@@@@@@@@@@@
Permissions 0755 for ‘/home/MY_USER_NAME/.ssh/id_rsa_pers’ are too open.
It is required that your private key files are NOT accessible by others.
This private key will be ignored.
Load key “/home/MY_USER_NAME/.ssh/id_rsa_pers”: bad permissions
git@github.com: Permission denied (publickey).
fatal: Could not read from remote repository.Please make sure you have the correct access rights
and the repository exists.
Set the file permissions. Execute the following statements in a terminal window
- Navigate to the .ssh directory
cd ~/.ssh
- Set the key file permissions
sudo chmod 600 ~/.ssh/id_rsa
sudo chmod 600 ~/.ssh/id_rsa.pub
sudo chmod 600 ~/.ssh/id_rsa_pers
sudo chmod 600 ~/.ssh/id_rsa_pers.pub
sudo chmod 600 ~/.ssh/id_rsa_COMPANY_NAME
sudo chmod 600 ~/.ssh/id_rsa_COMPANY_NAME.pub
- Set the nown_host file permission
sudo chmod 644 ~/.ssh/known_hosts
- Set the directory permission
sudo chmod 755 ~/.ssh
- Start the authentication agent to avoid the “Could not open a connection to your authentication agent” error later
eval `ssh-agent -s`
- Register the keys
ssh-add id_rsa
ssh-add id_rsa_pers
ssh-add id_rsa_COMPANY_NAME
Configure SSH to use the two new keys
- Create the SSH config file
touch ~/.ssh/config
- Open the ~/.ssh/config file with a text editor
- Add the following lines
#Personal GitHub
Host github-pers
  HostName github.com
  User MY_PERSONAL_GITHUB_USERNAME
  IdentityFile ~/.ssh/id_rsa_pers

#Company GitHub
Host github.com
  HostName github.com
  User MY_COMPANY_GITHUB_USERNAME
  IdentityFile ~/.ssh/id_rsa_COMPANY_NAME
Upload the keys to your GitHub accounts
- Log into the GitHub website with your personal credentials
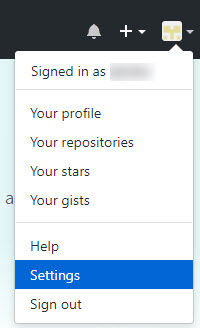
- In the upper right corner click the down arrow next to your icon, and select Settings
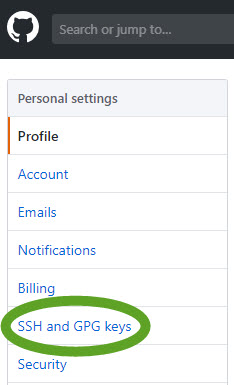
- On the left side select SSH and GPG keys
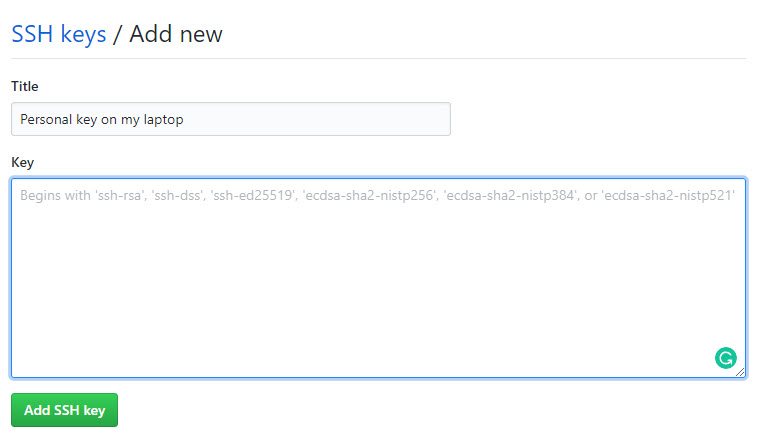
- Click the New SSH key button

- Type a name for the key, paste the contents of the ~/.ssh/id_rsa_pers.pub public key file into the text area, and click the Add SSH key button
- Log into Github with your company credentials
- Upload the id_rsa_COMPANY_NAME.pub public key file as explained above.
Create a personal repository
- Create a new folder, personal-test, and add a file to it on your computer
- Initialize the Git repository in the folder
git init
git add .
git commit -m "Initial commit"
- Log into your personal GitHub account
- Create a new repository, and name it personal-test
- On the confirmation page click the SSH button

- Copy the …or push an existing… code to a text editor

- Edit the origin address to match the “Host” of the personal section in the ~/.ssh/config file, and execute the commands
git remote add origin git@github-pers:MY_PERSONAL_GITHUB_USERNAME/personal-test.git
git push -u origin master
Company repositories
For your company account use the default HTTP or SSH GitHub repository address without any modifications.