To write an application for an Apple device (iPhone, iPod, iPadn, Macintosh) Apple recommends the Ojbective-C language. Xcode, the Apple development environment (IDE) supports the usage of Objective-C. This article summarizes the basics of Objective-C for beginners of that language. It is helpful if you already have some programming experience, otherwise some terms will require additional research or learning.
The following is based on the Apple document:
http://developer.apple.com/library/ios/referencelibrary/GettingStarted/RoadMapiOS/chapters/WriteObjective-CCode/WriteObjective-CCode/WriteObjective-CCode.html
File extensions
| .h |
Header files. Header files contain class, type, function, and constant declarations. |
| .m |
Implementation files. A file with this extension can contain both Objective-C and C code. It is sometimes called a source file. |
| .mm |
Implementation files. An implementation file with this extension can contain C++ code in addition to Objective-C and C code. Use this extension only if you actually refer to C++ classes or features from your Objective-C code. |
To import all the header files of a framework
To import all the header files of a framework import the umbrella header file of the framework. The umbrella header file has the same name as the framework:
#import <MySDK/MySDK.h>
Class definition
Declare the class in the .h file
// Declare the class
@interface MyClass : NSObject
{
// Member variables, visible only within the class
    int       count;
    id        data;
    NSString* name;
}
// Public method declarations visible from outside of the class

// Instance method type (-)
- (id)initWithString: (NSString*) aName;

// Class method type (+)
+ (MyClass*)createMyClassWithString (NSString*) aName;
@end
Place the class implementation in the .m file
// Import the .h header file that declares the public interface
@import "MyClass.h"
// Implement the the class
@implementation MyClass

// Instance method (-). You have to create an instance of the class to execute this method.
- (id)initWithString: (NSString*) aName;
{
    // The code of the method
}

// Class method (+). You don't have to create an instance of the class to execute this method.
+ (MyClass*)createMyClassWithString (NSString*) aName;
{
    // The code of the method
}
@end
Variables
MyClass *myObject1; // Static variable (the data type is specified)
id myObject2; // Dynamic type variable (it can hold any data type)
NSString *myObject3; // Static type string
Put an asterisk (*) in front of the name of the statically typed variables to indicate that those are pointers. The id type implies a pointer, so no asterisk is needed.
Methods and messaging
When you create an application, one of the most important rules is: never type the same code twice. Of course you can use copy and paste, but that is not the point. If you have to type the same line or lines multiple times, it usually makes sense to place the repeated lines in a method at one place, and just call that method from wherever it is necessary. Using this technique if you have to change the lines for any reason in the future you only have to change it at one place and the effect will be visible everywhere it is called from.
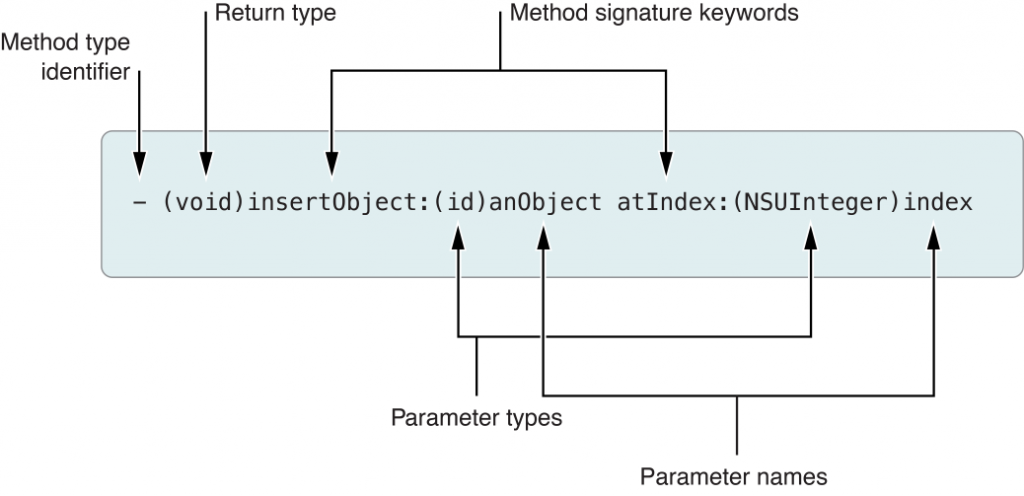
This method’s actual name is insertObject:atIndex: , the concatenation of all signature keywords, and the colon (:) indicates the existence of the parameters. If the method has no parameters, you can omit the colon(:)
Calling a method
In this example we will send the anObject and 0 to the insertObject:atIndex: method of the myArray object
[myArray insertObject:anObject atIndex:0];
The brackets ( [ and ] ) enclose the message expression.
You can nest message expressions to provide objects and arguments to the message expression. In the next example the mArray object and the anObject will be returned by nested message expressions:
[[myAppObject theArray] insertObject:[myAppObject objectToInsert] atIndex:0];
You can use dot notation to invoke accessor methods. The prior example would look like this with dot notation to access theArray and objectToInsert of myAppObject.
[myAppObject.theArray insertObject:myAppObject.objectToInsert atIndex:0];
You can use dot notation for assignment:
myAppObject.theArray = aNewArray;
You can use the dot notation for static type objects only. You cannot use the dot notation to reference dynamically typed objects (id type).
Class methods
Class methods are defined with the plus (+) sign, and can be called without creating an instance of the class.
The following example illustrates how you use a class method as a factory method for a class. In this case, the array method is a class method on the NSArray class—and inherited by NSMutableArray—that allocates and initializes a new instance of the class and returns it to your code.
NSMutableArray *myArray = nil;  // nil is essentially the same as NULL
// Create a new array and assign it to the myArray variable.
myArray = [NSMutableArray array];
Properties and Accessor Methods
Accessor methods set and get the values of properties
Declare public properties in the @interface section of the header file, private properties in the .m source file.
Define the userName string property:
@property (nonatomic, copy) NSString *c;
The compiler automatically creates ( synthesizes ) the _userName private instance variable to store the value of the property.
It also generates two accessor methods to set and get the value of the property.
The getter method’s name mathches the name of the property: userName
The setter method’s name is setUserName (where the first letter of the property name is capitalized)
There are options the you can use during property declaration
@property (copy) MyModelObject *theObject; // Copy the object during assignment.
@property (readonly) NSView *rootView; // Declare only a getter method.
@property (weak) id delegate; // Declare delegate as a weak reference
To specify the name of the instance variable:
@synthesize enabled = _isEnabled;
To specify the name of the getter accessor method:
@property (assign, getter=isEnabled) BOOL enabled; // Assign new value, change name of getter method
Blocks
Use blocks to be able to call methods a simpler way. Blocks hide the complexity of method calls, and provide simple interfaces over complex lines of code.
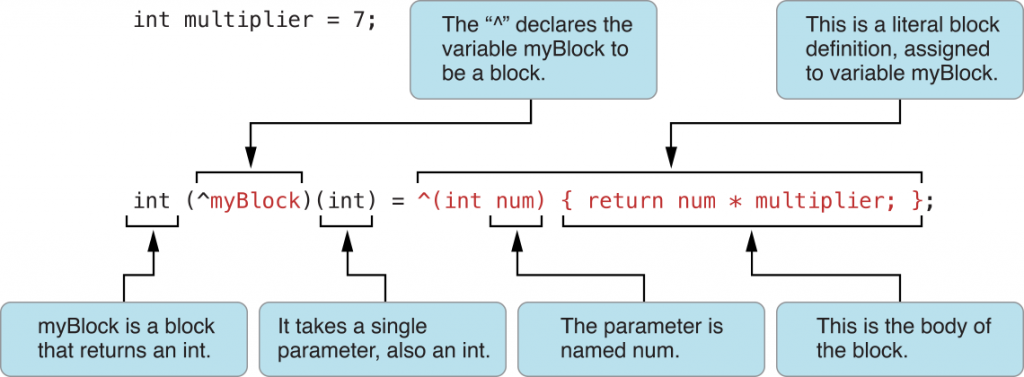
You can call this block with the following code:
int result = myBlock(4); // result is 28
The block has read only access to methods, properties, global, and instance variables in the context it is defined. To grant write access to variables declare them with the __block modifier.
Protocols and Categories
In Objective-C a class can inherit from one parent class only, but using protocols and categories you can implement methods in your class defined in multiple places without inheriting from multiple classes.
Protocols
When you add a protocol to the definition of a class the new class will be able to implement the methods of the protocol. This way multiple classes can implement the same protocol and a class can implement multiple protocols without inheriting from multiple classes.
For example to “teach” the HelloWorldViewController to behave like the UITextFieldDelegate protocol, include the name of the protocol in angle brackets ( < … > ) when you declare the class.
@interface HelloWorldViewController : UIViewController <UITextFieldDelegate> {
Protocol declarations look similar to class declarations, but protocols do not have a parent class and they do not define instance variables, but can have properties and methods. Protocols can define both required and optional methods. The following lines define a protocol with one instance method:
@protocol MyProtocol
 - (void)myProtocolMethod;
 @end
Categories
By referencing categories in the class definition you can also implement functionality in your class without inheriting from other classes. A category provides the way to group related method declarations within the header file.
The following line references a category in the class declaration on parentheses ().
@interface NSDate (NSDateCreation)
Class extension
A class extension is a place to declare private methods and properties in the implementation (.m) file. The class extension uses a special anonymous category (nothing between the parentheses).
@interface MyAppDelegate ()
    @property (strong) MyDataObject *data;
@end
Reserved terms
| self |
Refers to the current object. Equivalent to this in C++ |
| super |
Refers to the super class (the ancestor of the current class) |
To invoke a method implemented by the current class
[self doSomeWork];
To invoke a property accessor in the current class
NSString *theName = self.name;
Defined types
| Type |
Description and literal |
id |
The dynamic object type. The negative literal for both dynamically and statically typed objects is nil. |
Class |
The dynamic class type. Its negative literal is Nil. |
SEL |
The data type (typedef) of a selector; this data type represents a method signature at runtime. Its negative literal is NULL. |
BOOL |
A Boolean type. The literal values are YES and NO. |
Checking for null values
NSDate *dateOfHire = [employee dateOfHire];
if (dateOfHire != nil) {
    // The dateOfHire is not null
// handle this case }
or
NSDate *dateOfHire = [employee dateOfHire];
if (dateOfHire) {
    // The dateOfHire is not null
    // handle this case
}
or if you do not need a reference to the object
if ([employee dateOfHire]) {
    // handle this case
}
Testing boolean values
BOOL equal = [objectA isEqual:objectB];
if (equal == YES) {
    // handle this case
}

