Personalize your workstation
Set up your account in the AWS console
If you are not an AWS account administrator, ask your AWS account administrator to do the following for you
- Create an account in AWS
- Add the account to the appropriate user group
- Generate a password with a request to change it at the first login
- Generate an AWS Access Key ID and Secret Key
- Using your browser log into the AWS console
- In the upper right corner click your user id
- In the drop down list select Security Credentials
- On the left select Users
- In the user list select you account
- Select the Security Credentials tab
- Click the Create Access Key button
AWS Command Line Interface
Install AWS CLI
On Macintosh
- Open a terminal and execute
brew install awscli
- For more instructions visit http://docs.aws.amazon.com/cli/latest/userguide/installing.htm
On Windows
- Open a Command Prompt as administrator
- Execute
choco install awscli
- Close the command prompt and open a new Git Bash to load the updated PATH environment variable.
or
- Download the MSI installer from http://docs.aws.amazon.com/cli/latest/userguide/installing.html#install-msi-on-windows
- Execute the downloaded file.
- Make sure the AWS CLI is in the PATH
- Open the ~/.bashrec file in a text editor
- Add the line if missing
PATH=$PATH:/c/Program Files/AWSCLI/bin
Configuration
If you do not configure the AWS CLI you will get the following error message: ‘NoneType’ object has no attribute ‘get_frozen_credentials’
- Open a new Bash window, so it can find the newly installed AWS CLI
- Execute the following command to save your AWS credentials and default region in the ~.aws ( C:\Users\YOUR_USER_NAME\.aws in Windows ) folder.
aws configure
- Answer the questions
AWS Access Key ID [None]: YOUR AWS KEY
AWS Secret Access Key [None]: YOUR AWS SECRET KEY
Default region name [None]: us-east-1
Default output format [None]: HIT ENTER FOR NONE
Close and reopen all open Bash and Command windows to reload the changed Path environment variable.
The configure command created the .aws folder with two files.
On Macintosh
Your AWS configuration folder is located at ~/.aws
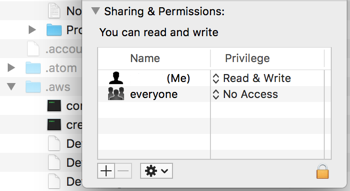
Set the permissions on the folder
- Open a terminal window and execute
chmod -R 700 ~/.aws
- The result should be
On Windows
Your AWS configuration folder is located at C:\Users\YOUR_USER_NAME\.aws
Your credentials file will look like this
[default]
 aws_access_key_id = MY_ACCESS_KEY
 aws_secret_access_key = MY_SECRET_KEY
Test Kitchen will use the keys from the [default] section to connect to AWS when we launch instances.
When you work with multiple AWS accounts you can add all of your keys to the credentials file. To use a specific key, add the profile option to your command line instructions. If you don’t specify the profile in your AWS commands, the AWS Command Line Interface will use the key from the default section.
[aws01]
 aws_access_key_id = MY_ACCESS_KEY_FOR_AWS01
 aws_secret_access_key = MY_SECRET_KEY_FOR_AWS01

[aws02]
 aws_access_key_id = MY_ACCESS_KEY_FOR_AWS02
 aws_secret_access_key = MY_SECRET_KEY_FOR_AWS02

[default]
 aws_access_key_id = MY_ACCESS_KEY_FOR_AWS01
 aws_secret_access_key = MY_SECRET_KEY_FOR_AWS01
The config file will look like this. If you don’t specify the region in the AWS command, the AWS Command Line utility will use the region from this file.
[default]
region = us-east-1
Collect the following information to be able to launch an instance in AWS
- Your IAM user name
- AWS Access Key and Secret Key
- Region (us-east-1)
- Availability zone (b)
- VPC subnet ID
- Security group ID
- AWS key pair file
- AMI ID
Create a folder to store your private keys
Keep your private keys in a folder in your home directory. You will need them to launch servers, and log into Linux servers with SSH, or retrieve the administrator password for Windows servers.
On Macintosh
Create the folder ~/aws_keys
Set the permissions on the folder key folder too
- Open a terminal window and execute
chmod -R 700 ~/aws_keys
- The result should be
If you copy key files to the folder you may get the following error message:
@@@@@@@@@@@@@@@@@@@@@@@@@@@@@@@@@@@@@@@@@@@@@@@@@@@@@@@@@@@ @ WARNING: UNPROTECTED PRIVATE KEY FILE! @ @@@@@@@@@@@@@@@@@@@@@@@@@@@@@@@@@@@@@@@@@@@@@@@@@@@@@@@@@@@ Permissions 0755 for ‘/Users/YOUR_USERNAME/.aws/KEY_FILE_NAME.pem’ are too open. It is required that your private key files are NOT accessible by others. This private key will be ignored. Load key “/Users/YOUR_USERNAME/.aws/KEY_FILE_NAME.pem”: bad permissions USERNAME@SERVER_IP’s password: Permission denied, please try again.
To satisfy the security requirements set the permission on the key files to 700
chmod -R 700 ~/.aws/KEY_FILE_NAME.pem
On Windows
Create the folder C:\Users\YOUR_USER_NAME\aws_keys
Generate an AWS key pair
- Log into the AWS console
- Select EC2
- Under Network & Security select Key Pairs
- In the upper right corner select the region
- Click the Create Key Pair button
Create your key pair with the following naming scheme:
userid_accountname_region
For example: USERID_aws01_us_east_1 - Your browser automatically downloads the .pem private key file. Move it to and save it in the ~aws_keys (C:\Users\YOUR_USER_NAME\aws_keys on Windows) directory you created above during the AWS CLI configuration.
For more info visit Amazon EC2 Key Pairs
Set up your .kitchen.yml file
When you have created your cookbook, Chef already added a .kitchen.yml file that tells Test Kitchen how to launch a server instance on your workstation.
The default .kitchen.yml file only contains driver and provisioner information for Vargrant. To launch a server instance in AWS we need to add AWS specific instructions to the file. First modify the .kitchen.yml file to be ready for other drivers:
---
provisioner:
  name: chef_zero

verifier:
  name: inspec

platforms:
  - name: ubuntu-16.04
    driver:
      name: vagrant

  - name: centos-7.2
    driver:
      name: vagrant

suites:
  - name: default
    run_list:
      - recipe[test::default]
    verifier:
      inspec_tests:
        - test/recipes
    attributes:
Make sure the empty lines are really empty. The .kitchen.yml file should not have white space in a seemingly empty line.
Next:
Connect to the Chef server in Beginner’s Guide to DevOps Engineering part 4.
Back:
to the Tutorials page