In this exercise we will create a Chef cookbook for a corporation. It will be robust and include all the necessary elements to be used in a large enterprise. If your company already has established standards, as you progress with this tutorial, copy the appropriate file from an existing cookbook. If this is the first cookbook in your organization, or you don’t want to follow the current standards, copy the sample files from this page.
Create the cookbook
- Navigate to the C:\Chef\…\cookbooks folder and open a Bash window
- Create an empty cookbook
chef generate cookbook COOKBOOK_NAME
Chef creates a new sub-folder with the name of the cookbook.
- Rename the new folder to cookbook-COOKBOOK_NAME to distinguish it in version control from other repository types.
Update the .gitignore file
- Chef DK has generated a .gitignore file that contains most of the important entries, but we need to add a few important lines:
# Certificates
*.pem

# Unencrypted Data Bags
data_bags_unencrypted/

# Macintosh folder custom attribute file
.DS_Store

# If working in a team, personalized Test Kitchen config file
.kitchen.yml
Update the metadata.rb file
Add your name, email address, and the version of the cookbook to the top of the metadata.rb file
name 'THE_NAME_OF_THE_COOKBOOK'
maintainer 'YOUR_NAME'
maintainer_email 'YOUR_EMAIL_ADDRESS'
license 'All rights reserved'
description 'Installs/Configures THE_NAME_OF_THE_COOKBOOK'
long_description IO.read(File.join(File.dirname(__FILE__), 'README.md'))
version '1.0.0'
The expression in the long_description line refers to the README.md file that GitHub can create when you set up a new repository. Place the cookbook related information into that file, so others who want to use your cookbook can easily find it.
Update the Berksfile
Add the list of cookbooks this cookbook depends on to the Berksfile file. To download all necessary cookbooks execute
berks install
Update the .kitchen.yml file to be able to test your cookbook.
If you want to test your cookbook in the Cloud, copy the following sections from an existing .kitchen.yml file of your organization. To learn Chef and launch instances with Vagrant on your workstation, the automatically created .kitchen.yml file is perfect.
- driver
- provisioner
- platforms
- a suite as an example
If your organization use tags to track instances in the Cloud, update the tags section to reflect the values of the cookbook.
To add multiple recipes to the Chef run list use this syntax:
run_list:
  - recipe[COOKBOOK_NAME1::RECIPE_NAME]
  - recipe[COOKBOOK_NAME2::RECIPE_NAME]
Encrypted Data Bags
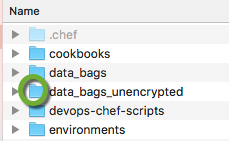
If you want to use encrypted data bags, ask your Chef administrator to send you the key file to encrypt and decrypt data bags. Create the data_bags_unencrypted folder for the data bag secret key on the same level where the cookbook and environment folders are.
This is a chicken and egg paradox. We don’t want to commit secrets into version control, so we need to encrypt them. But how can we place the secret encryption key on the server to decrypt the secrets? We will use Packer to create our own server images that will contain the secret key, so when Chef starts to run on the server, the key is going to be there.
Default recipe
We will place code in the default.rb file that is common to all recipes in the cookbook. All custom recipes will call the default recipe as the first step.
Update the header comments of the default.rb recipe with your name and company information
#
# Cookbook Name:: COOKBOOK_NAME
# Recipe:: default
#
# Author:: YOUR_NAME (<YOUR_EMAIL_ADDRESS>)
# Copyright (c) 2015-2016 COMPANY_NAME, All Rights Reserved.
Attribute file
Create the default attribute file with
chef generate attribute default
Add the necessary attributes to the attribute file to store the AWS tag and other cookbook specific values.
Custom recipe
Use the Chef generate command to create the new recipes. It creates all test files in the corect location.
- Create a new recipe and the test files with
chef generate recipe MY_RECIPE_NAME
- Add the following line under the header to call the default recipe, even if it is currently empty
include_recipe 'COOKBOOK_NAME::default'
Add the cookbook to GitHub
Create the local repository
- In the Bash window execute the following commands
git init
git add .
git commit -m "Initial commit"
Add the repository to GitHub
In your web browser log into your GitHub account and create a new repository
- Click the New Repository button
- Name the repository the same as the name of the folder of the cookbook (cookbook-…)
- Execute the lines in the section …or push an existing repository…. If you work on a Windows workstation make sure HTTPS is selected
git remote add origin https://github.com/....git
git push -u origin master
- In the Collaborators & teams section of Settings select the group who will have access to the new repository
Test the cookbook
In the Bash window launch the instance with Test Kitchen
List the available instances
kitchen list
Launch the instance
kitchen converge STRING_UNIQUE_TO_THE_INSTANCE
If there are multiple suites or platforms in the .kitchen.yml file you need to type the unique part of the name of the instance to identify it.
Start a Remote Desktop connection to a Windows instance
kitchen login STRING_UNIQUE_TO_THE_INSTANCE
If you work on a Macintosh workstation and testing a Windows server, the best way to remote into the server is
- Install Microsoft Remote Desktop for free from the Apple App Store (See the Remote Desktop Client section in Install the DevOps development tools on Macintosh,
- Execute the kitchen login STRING_UNIQUE_TO_THE_INSTANCE command in the terminal window,
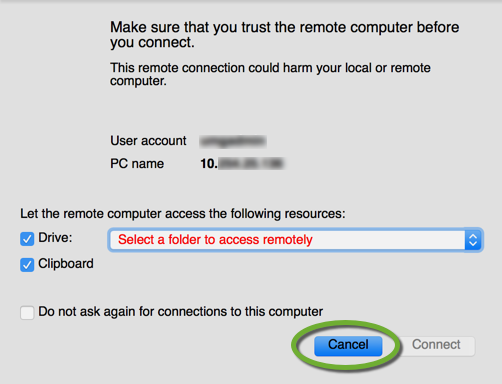
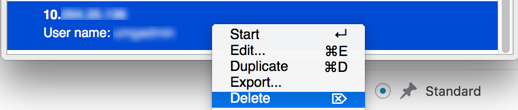
- The Microsoft Remote Desktop window will pop up with the User account name and the IP address. If you click “Connect”, the remote connection opens with the default settings, that are may not optimal for your display. The “login” command already created a new entry in the Microsoft Remote Desktop app with the IP address of the instance. To use custom settings, click Cancel,
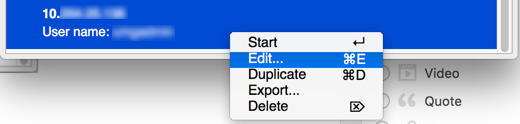
- Open the Microsoft Remote Desktop app, right click the last entry that contains the IP address, select Edit, and copy the IP address to the clipboard,
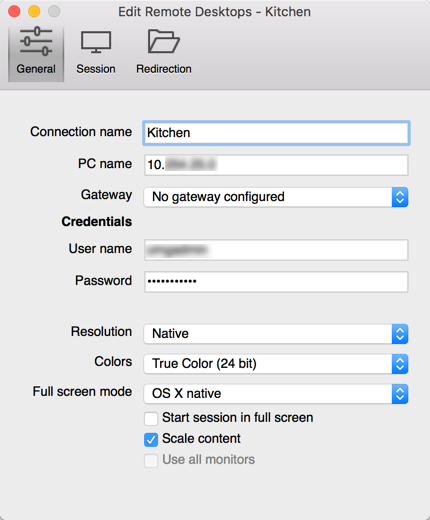
- Create a new connection with custom display settings and paste the IP address there. You can keep this generic connection to access the Test Kitchen instances, just update the IP address.
- Delete the automatically created connection
SSH into a Linux instance
ssh USER_NAME@IP_ADDRESS -i PATH_TO_THE SSH_KEY_FILE
Where
- USER_NAME is the value of username: in the .kitchen.yml file.
- IP_ADDRESS is the IP of the instance. Get it from the “Waiting for SSH service on…” line of the Test Kitchen bash or command window, or from the .yml file in the .kitchen/logs folder of the cookbook.
- PATH_TO_THE_SSH_KEY_FILE is the value of ssh_key: in the .kitchen.yml file.
Terminate the instance
kitchen destroy STRING_UNIQUE_TO_THE_INSTANCE
Upload the cookbook to the Chef server
See Connect to the Chef server in Beginner’s Guide to DevOps Engineering part 4.
Next:
Infrastructure as code in Beginner’s Guide to DevOps Engineering part 6.
Back:
to the Tutorials page