The first step of the Chef Test Kitchen converge operation is to transfer the cookbooks to the instance. If any of the cookbooks contain large files, the operation can take minutes while the terminal displays the message
Transferring files to < … >
Knowledge Base for IT Professionals, Teachers and Astronauts
The first step of the Chef Test Kitchen converge operation is to transfer the cookbooks to the instance. If any of the cookbooks contain large files, the operation can take minutes while the terminal displays the message
Transferring files to < … >
List the Docker Stacks
docker stack lsNAME SERVICES ORCHESTRATOR
syslog-ng_splunk 3 Swarm
List all Docker services
docker service lsList the services of a stack
docker stack ps MY_STACK_NAMEList the services of a stack with the full error message, do not truncate the output
docker stack ps MY_STACK_NAME --no-truncThe stopped Docker containers are still available for troubleshooting. You can create an image of them and run them as new containers to inspect the log files and execute commands in them.
docker logs MY_CONTAINER_IDIf a container exists with an error within a few seconds, it can be beneficial to start a terminal window in it to view the log files and execute commands. We will override the entry point of the container to start a Bash terminal.
Create an image of the stopped container
docker commit MY_STOPPED_CONTAINER_ID MY_NEW_IMAGE NAMERun the saved image as a new container and start a Bash terminal instead of the original entry point
docker run -it --entrypoint bash MY_NEW_IMAGE_NAMETo verify if the forwarding is configured
source /opt/splunkforwarder/bin/setSplunkEnv
splunk list forward-server
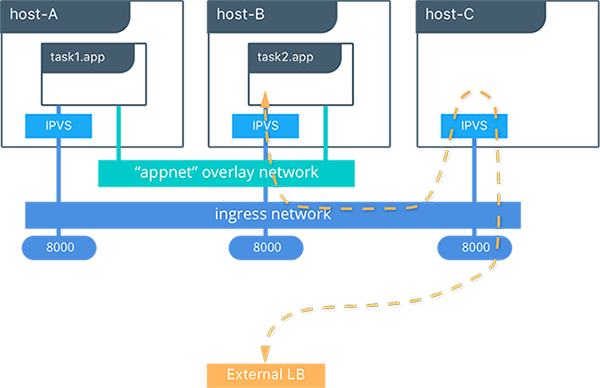
The difference between the service and the stack is like docker run vs. docker compose, but in a Docker Swarm cluster.
Global services will run on every available node once.
The Manager distributes the given number of tasks ( containers and commands to run ) of the replicated services on the nodes based on the desired scale number, that can be one. Once a task is assigned to a node it cannot be moved, it will run on that node until stops or fails.
Uses the host’s network stack without any namespace separation, and sharing all of the host’s interfaces.
Docker-managed Linux bridge on the Docker host. By default, all containers created on the same bridge can talk to each other.
An overlay network that may span over multiple Docker hosts. Uses the gossip protocol to communicate between hosts.
The container’s own network stack and namespace, without any interfaces. It stays isolated from every other network, and even its own host’s network.
Establishes connections between container interfaces and parent host interfaces. They can be used to assign IP addresses that are routable on physical networks to containers.
Internal load balancing is enabled by default. When a container contacts another container in the same Docker Swarm, the internal load balancer routes the request.
To enable the external ingress load balancing, publish the port of the service with the –publish flag. Every node in the cluster starts to listen on the published port to answer incoming requests. If the service does not run a container on the node that received the request, the Routing Mesh will route the request to the node that runs the container on the Ingress Network.
These instructions will pass the login token from your local client to the Docker Swarm nodes, so those are able to log into the registry and pull the image.
# Save the Docker Registry password in the PASSWORD environment variable

# Log into the Docker Registry
echo $PASSWORD | docker login -u [user] registry.my_registry.com --password-stdin

# Create the service
docker service create \
  --with-registry-auth \
  --name my_service \
registry.my_registry.com/my_namespace/my_image:latestSee https://code.visualstudio.com/docs/setup/mac
Select all four checkboxes for maximum integration

The official instructions above start Visual Studio Code in the Downloads folder. Move the file into the Applications folder.
This is a very useful feature
Add the Visual Studio Code executable location to the System path:
"C:\Users\MY_USER_NAME\AppData\Local\Programs\Microsoft VS Code\AppData\Local\Programs\Microsoft VS Code"When the PowerShell terminal starts in Visual Studio Code it tries to load the profiles. If an error message is displayed, enable code execution. Run the command in a PowerShell as Administrator
Set-ExecutionPolicy -ExecutionPolicy RemoteSignedThe Visual Studio Code configuration settings are stored in a JSON file on your workstation. You can edit the file and after restart the settings take effect, or you can set the values in the user interface one-by-one.
Open the settings.json file. The double quotes are important, as both paths contain spaces.
On Mac: $HOME/Library/Application\ Support/Code/User/settings.json
On Windows: “%APPDATA%\Code\User\settings.json”
My current configuration settings file looks like this:
{
"editor.acceptSuggestionOnEnter": "off",
"workbench.colorTheme": "Visual Studio Dark",
"files.insertFinalNewline": true,
"workbench.startupEditor": "newUntitledFile",
"editor.renderWhitespace": "none",
"editor.wordSeparators": "`~!@#$%^&*()=+[{]}\\|;:'\",.<>/?",
"go.formatTool": "goimports",
"go.useLanguageServer": true,
"workbench.colorCustomizations" : {
"activityBar.activeBackground":"#95968888"
},
"editor.tabSize": 2,
"mssql.connections": [
{
"server": "{{put-server-name-here}}",
"database": "{{put-database-name-here}}",
"user": "{{put-username-here}}",
"password": ""
},
],
"workbench.editorAssociations": {
"*.ipynb": "jupyter-notebook"
},
"notebook.cellToolbarLocation": {
"default": "right",
"jupyter-notebook": "left"
},
"redhat.telemetry.enabled": false,
"editor.minimap.enabled": false,
"go.toolsManagement.autoUpdate": true,
"search.exclude": {
"**/.terraform": true
},
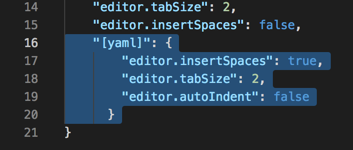
"[yml]": {
"editor.insertSpaces": true,
"editor.tabSize": 2,
"editor.autoIndent": "advanced"
},
"[yaml]": {
"editor.insertSpaces": true,
"editor.tabSize": 2,
"editor.autoIndent": "advanced"
},
"git.openRepositoryInParentFolders": "always",
"[python]": {
"editor.formatOnType": true
},
"editor.inlineSuggest.enabled": true,
"application.shellEnvironmentResolutionTimeout": 60,
"[typescriptreact]": {
"editor.defaultFormatter": "vscode.typescript-language-features"
},
"aws.telemetry": false,
"aws.suppressPrompts": {
"codeWhispererNewWelcomeMessage": true
},
"[jsonc]": {
"editor.defaultFormatter": "vscode.json-language-features"
},
"terminal.integrated.experimentalInlineChat": true,
"prisma.showPrismaDataPlatformNotification": false,
"mssql.enableRichExperiences": true
},
"files.exclude": {
"**/*.js": { "when": "$(basename).ts" },
"**/**.js": { "when": "$(basename).tsx" }
}
}or
To force Visual Studio Code to only insert the suggested word with the Tab key, and configure the Enter key to always insert a new line
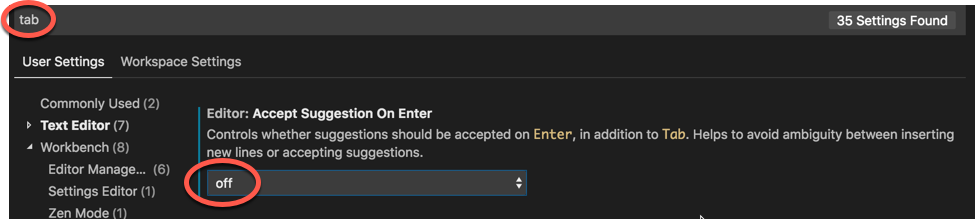
Adds “editor.acceptSuggestionOnEnter”: “off” to the setting.json file
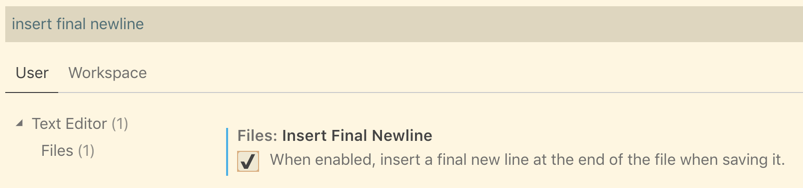
Adds “files.insertFinalNewline”: true, to the settings.json file
To select the entire text–with–hyphen with double click
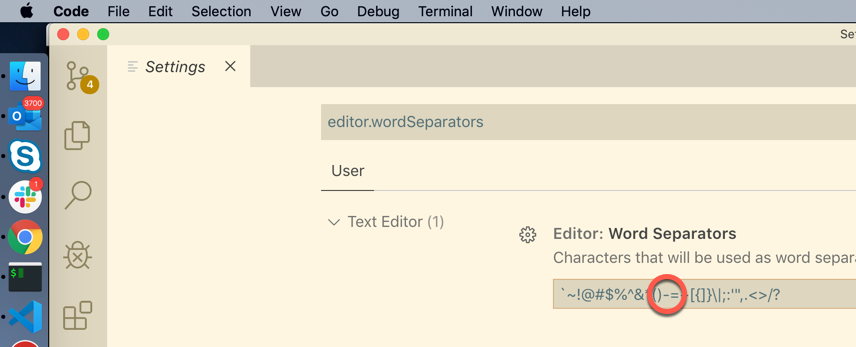
Adds “editor.wordSeparators”: “`~!@#$%^&*()=+[{]}\\|;:’\”,.<>/?” to the settings.json file.
When we search the source code it can take along time for Visual Studio Code to search through the libraries that only support our application. Exclude the known library folders. Most of them are already included, add the .terraform folder to the list.
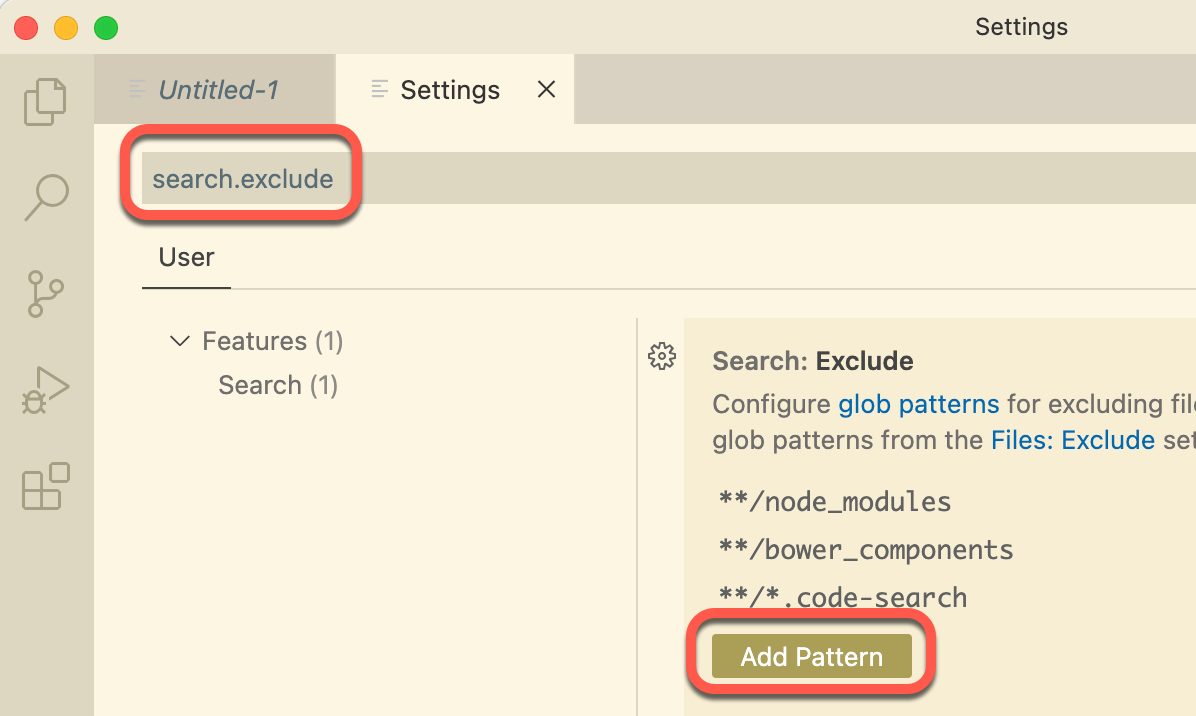
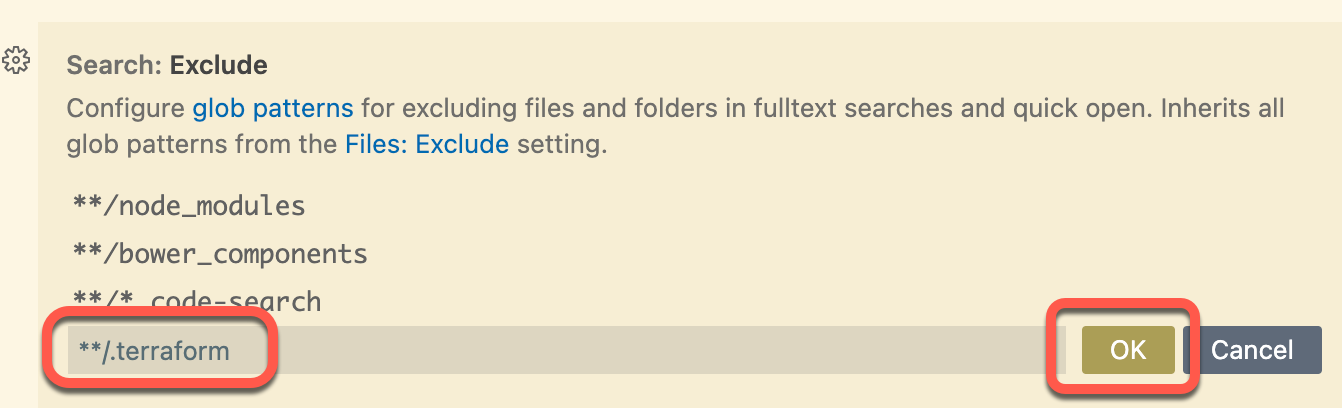
Adds
"search.exclude": {
        "**/.terraform": true
    }
to the settings.json file.
Add this to the settings.json file
    "files.exclude": {
        "**/*.js": { "when": "$(basename).ts" },
        "**/**.js": { "when": "$(basename).tsx" }
}[Makefile]
indent_style = tab
[*.yml]
indent_style = space
indent_size = 2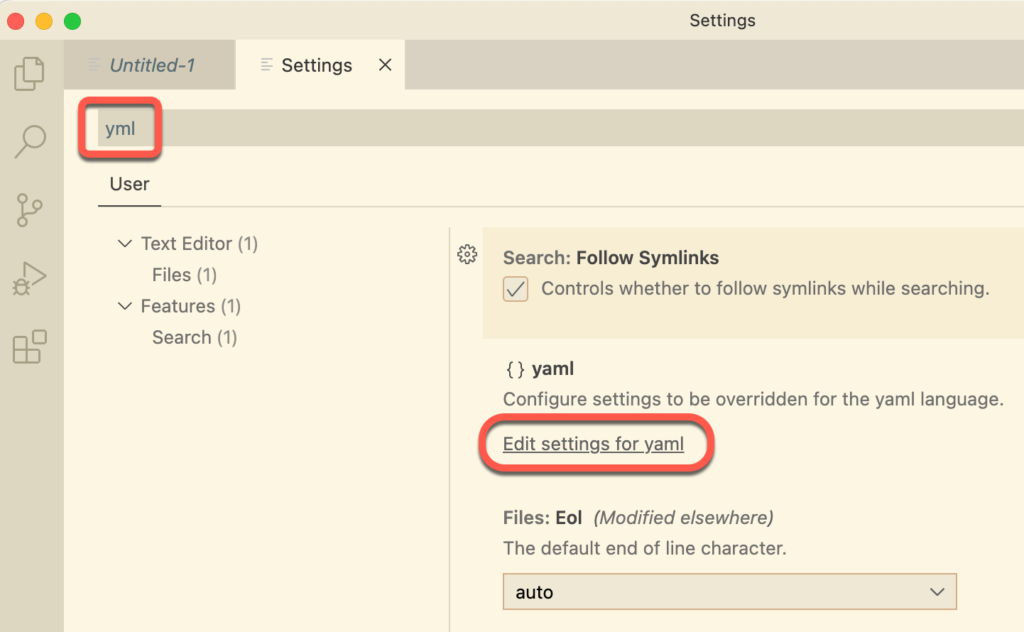
,
"[yml]": {
  "editor.insertSpaces": true,
  "editor.tabSize": 2,
  "editor.autoIndent": false
},
"[yaml]": {
  "editor.insertSpaces": true,
  "editor.tabSize": 2,
  "editor.autoIndent": false
}
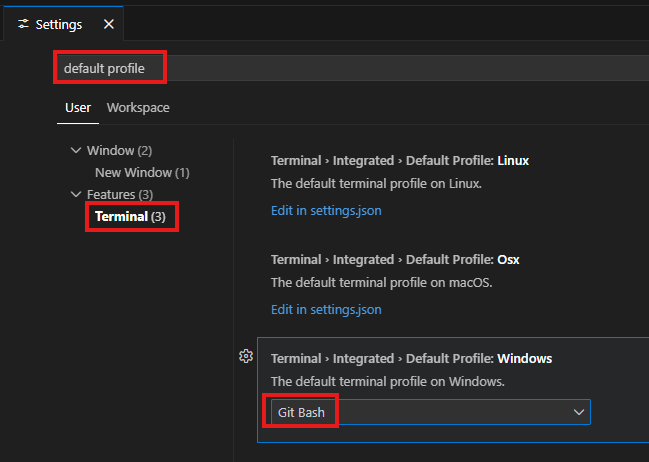
To open a new Bash terminal in Visual Studio Code, install Git Bash and restart Visual Studio Code for the change to take effect. See Install Git on Windows
To be able to debug Bash scripts in Visual Studio Code on macOS, we need to upgrade Bash to at least version 4.0. Even the most modern macOS installs, a more than 15 year old, Bash version 3.2.57 from 2007!!!
bash –version
GNU bash, version 3.2.57(1)-release (x86_64-apple-darwin18)
Copyright (C) 2007 Free Software Foundation, Inc.
To upgrade Bash to the latest version follow the instructions by Daniel Weibel at https://itnext.io/upgrading-bash-on-macos-7138bd1066ba
IMPORTANT!!!
If you use iTerm (zshell) keep /bin/zsh as the last item in the /etc/shells file to make it the default shell when you open iTerm.
...
/usr/local/bin/bash
/bin/zsh
When we execute an AWS CLI command, we need to supply the AWS Region. If it is not specified, we get the error message:
You must specify a region. You can also configure your region by running “
configure”. aws
We can add the region with the –region command line argument, or store it in the ~/.
The format of the ~/.
[default]
 aws_access_key_id = …
 aws_secret_access_key = …

 [my-account]
 aws_access_key_id = …
 aws_secret_access_key = …
The format of the ~/.aws/config file is the following. Make sure to add the word “profile” within the square brackets for every profile you specified in the credentials file, except for the “default” one!!!
[default]
 region = us-east-1
 output = json

 [profile my-account]
 region = us-east-1
 output = json
Display the Software Bill Of Materials ( the content of the image in table format )
docker sbom MY_IMAGE_NAMEExample: docker sbom nginx
docker rm -f $(docker ps -a -q)
docker rmi -f $(docker images -q)
To get the list of supported GOOS (operating system) and GOARCH (architecture) combinations execute
go tool dist list
To specify the GOOS and GOARCH attributes in the Bash command line, build the Golang application with
GOOS=linux GOARCH=amd64 go build -v -o MY_APP cmd/MY_APP/*.go
I have built a Docker container with a Go application that used the Go AWS SDK. When my program tried to access an S3 bucket I got the error message
RequestError: send request failed
caused by: Get https://MY_BUCKET_NAME.s3.amazonaws.com: x509:certificate signed by unknown authority
To solve the problem I had to add the following line to the Dockerfile
On Ubuntu
RUN apt ca-certificates && rm -rf /var/cache/apk/*
On Alpine
RUN apk update && apk add ca-certificates && rm -rf /var/cache/apk/*