Set up your computer
Display the file extensions
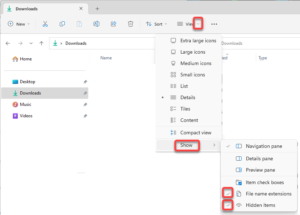
On Windows 11
- Open the File Explorer
- Click the arrow next to View and select Show
- Mark File name extensions and Hidden items
On Windows 10
- Open File Explorer
- On the View tab select
- File name extensions
- Hidden items

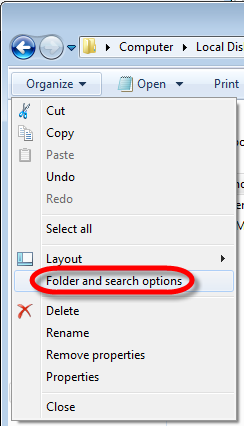
On Windows 7
(if you accidentally run into an ancient machine)
- Open Windows Explorer and select Organize
- Select Folder and search options
- On the View tab
- Select Show hidden files, folders, and drives
- Uncheck Hide extensions for known file types
To disable the Windows key
If you use a Macintosh computer you use the Command key all the time. Unfortunately, on the Windows keyboard you will always hit the Windows key. This can be very frustrating, as pressing the Windows key with any of the cursor keys will resize the window.
To disable the Windows key
- Download the 64 bit version of PowerToys by Microsoft (currently PowerToysSetup-0.68.1-x64.exe) from https://github.com/microsoft/PowerToys/releases/tag/v0.68.1
- Execute the installer file to install the application
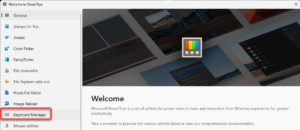
- Start Powertoys
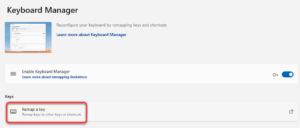
- On the left side select the Keyboard manager
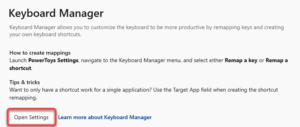
- Click the Open Settings button
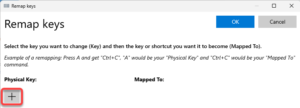
- Select Remap a key
- Click the plus sign
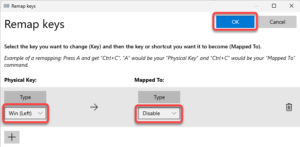
- On the left side select Win (Left), on the right side select Disable and click the OK button.
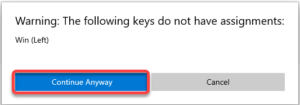
- Click Continue Anyway
Virtual Box
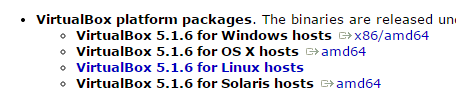
Download Virtual Box from https://www.virtualbox.org/wiki/Downloads and follow the instructions to install it.
At the time of writing, this was the section where the installer files were referenced
Run the downloaded installer file and accept all default values.
The installer starts the Virtual Box application.You can close it, we will use other tools to start it in the future.
To be able to launch 64 bit guest operating systems turn off Hyper-V in Windows Features
- In the Windows search box enter Windows Features and select Turn Windows Features on or off,
- Uncheck Hyper-V and click OK,
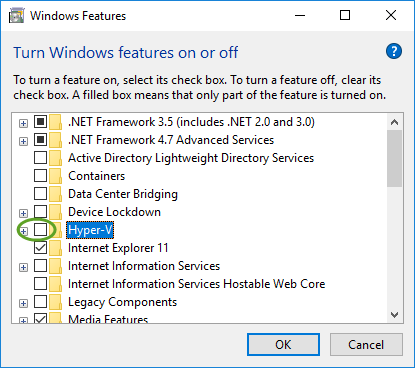
- Reboot the computer for the setting to take effect.
Configure VirtualBox
Networking
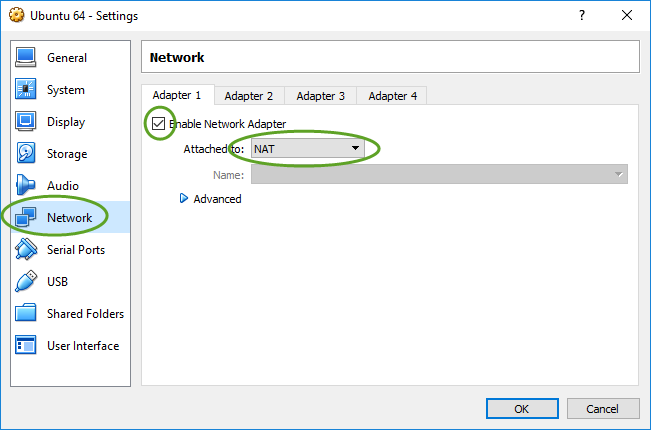
To share the connectivity of the host computer with the virtual machine, mainly if you use VPN
- In Virtual box click Settings
- Select Network
- Attach the network adapter to NAT
Copy and paste
To enable copy and paste between the virtual machine and the host ( your workstation )
- On the General tab of the Settings page select the Bidirectional shared clipboard

Shared Folders
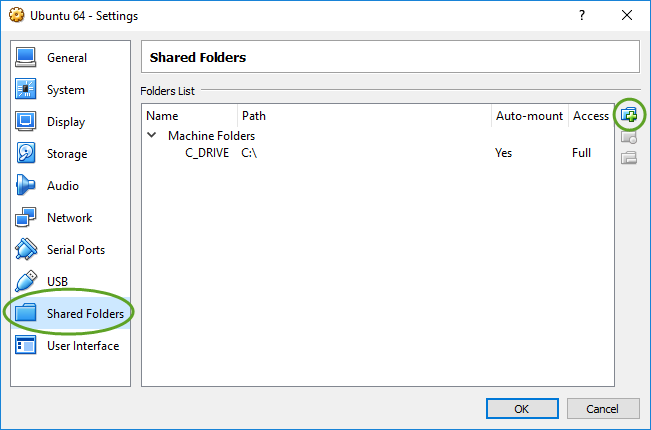
Specify the shared folder on your workstation
- In the VirtualBox menu select Preferences
- On the Shared Folders tab click the + icon
- To share the entire system drive, select the C: drive of your workstation
Enable shared folders on the virtual machines
To enable the shared folders on the virtual machine and other configurations see Virtual machine configuration at VirtualBox
Vagrant
For Vagrant installation see Vagrant.
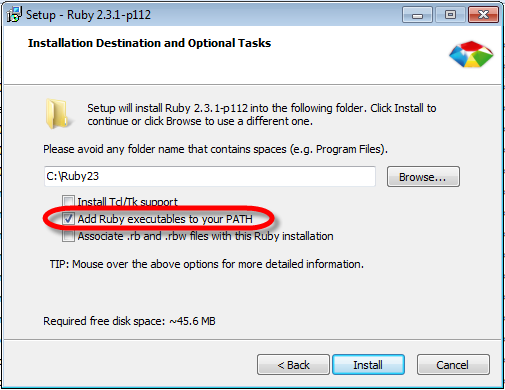
Ruby
- Download Ruby from http://rubyinstaller.org/downloads
- Install the 32 bit version, as the 64 bit version is fairly new and has compatibility issues. Download the latest Ruby installer. Pick the file that does not have the (x64) at the end.
- Accept the default values but check Add Ruby executables to your PATH
Ruby Development Kit
The Ruby Development Kit is need for certain Ruby gems, so install it.
- Download the Ruby Development Kit from the DEVELOPMENT KIT section of http://rubyinstaller.org/downloads
- If you have installed the 32 bit version of Ruby make sure you install the 32 bit version of the DevKit. Select the Development kit that matches the Ruby version you installed. At the time of writing the latest development kit is under “For use with Ruby 2.0 and above (32bits version only)”
- Run the installer to extract it to a permanent location (C:\RubyDevKit)
- Open a command window in the C:\RubyDevKit folder
- Run these commands in the command prompt to install it.
ruby dk.rb initruby dk.rb install
- For more information see http://github.com/oneclick/rubyinstaller/wiki/Development-Kit
Chef Development Kit
- Download the Chef Development Kit from https://downloads.chef.io/chef-dk/
Follow the instructions to install it.
Terraform by Hashicorp
Install it with Chocolatey
- Open a Git Bash window as administrator
- Execute
choco install terraform
or
Manual installation
- Download Terraform from https://www.terraform.io/downloads.html
- Unzip the downloaded package to C:\HashiCorp\Terraform
- Add the Terraform directory to the path of the computer. It is not added automatically on 64 bit Windows.
- In Windows Explorer right-click Computer and select Properties,
- On the left side select Advanced System Settings,
- At the bottom click the Environment Variables… button,
- In the System Variables box select Path and click the Edit… button,
- Add the following to the end of the Variable value. (Don’t forget to start with the semicolon as the separator).
;C:\HashiCorp\Terraform
- To create RDS (Relational Database Service) instances in AWS, install the Amazon Web Services Command Line Interface (See instructions below)
- Configure the GitBash window to run as administrator to be able to execute the “terraform get” command to get local modules during development
- Right click the shortcut of the Bash window you use and select Properties
- On the Compatibility tab check Run this program as an administrator
For more details see https://www.terraform.io/intro/getting-started/install.html
Graphviz
Graphviz is a Dependency Graph Visualization Software. We will use this utility to display the Terraform graphs.
- Download from http://www.graphviz.org/Download..php
There are really two dots in the address :-) - Execute the installer
- You may need to add the location to the Path environment variable. Make sure you use the actual folder name, as it contains the version of the application.
;C:\Program Files (x86)\GraphvizX.XX\bin
AWS CLI
The Amazon Web Services command line interface installation will set up your workstation to launch instances in AWS from Test Kitchen. If you know you will work with AWS, see DevOps Engineering part 3. – Working with AWS for the AWS CLI installation.
Packer
We use Packer to create custom AWS AMIs that contain the fundamental configuration and applications that are common in every instance we launch.
Install with Chocolatey
- Open a Git Bash window as administrator
- Execute
choco install packer
or
Manual Installation
- Download and install packer from https://www.packer.io/docs/installation.html
- Add the Packer executable or installation directory to the system path
Nice to have utilities
WinDirStat
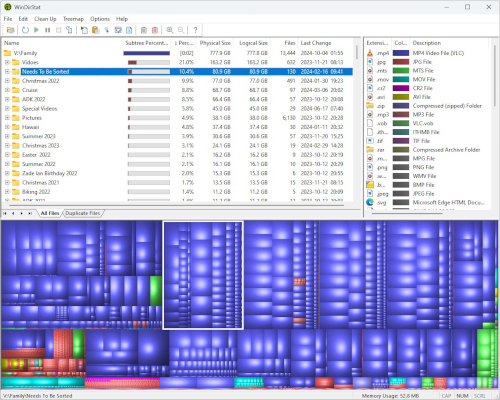
WinDirStat is a disk utility to display the relative size of your files in a graphical interface and provide a tree view to help to find them.
Download it from https://windirstat.net/
Next:
Set up the DevOps development environment in Beginner’s Guide to DevOps Engineering part 2.
Back:
to the Tutorials page