Configure the ASP.NET MVC 5 web application to use an external database for user authentication

When a new ASP.NET web application is created with the authentication set to Individual User Accounts, it automatically creates an SQL Express internal database in the App_Data directory of the application when you register the first user. To create the ASP.NET web application with user authentication see Create an ASP.NET Web Application with user authentication
This is sufficient for a small, proof of concept web application, but enterprise-grade applications should use a secure, backed up database.
To connect an ASP.NET MVC web application to an external database
- Create a new database in the database server
CREATE DATABASE MY_DATABASE_NAME
GO
- Create a user and add it to the database as db_owner
DECLARE @user_name varchar(50)
SET @user_name = 'MY_USER_NAME'

-- Create the user account
CREATE LOGIN MY_USER_NAME
 WITH PASSWORD='MY_PASSWORD'

-- Add the user to the database
USE MY_DATABASE_NAME; EXEC sp_grantdbaccess @user_name; EXEC sp_addrolemember @rolename = 'db_owner', @membername = @user_name;
GO
- Replace the connection string in the Web.config file
<connectionStrings>
    <add name="DefaultConnection"
        connectionString="Data Source=MY_SQL_SERVER_NAME;Initial Catalog=MY_DATABASE_NAME;user id=MY_USER_NAME;password=MY_PASSWORD"
        providerName="System.Data.SqlClient" />
</connectionStrings>
There are two way to generate the user authentication tables
Use the new web application to automatically generate the tables
- Run the ASP.NET MVC 5 web application
- Select Register in the menu of the web application and register a user
- The application will automatically generate the user authentication tables in the database
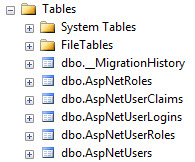
Generate an SQL script to create the database
Delete the existing database
Only delete the existing database if you have no important data or configuration changes in the existing database!
The script generator checks the database for existing tables, so if you have used the web application to automatically create the tables, delete the database, so the generated script will contain all necessary steps to create the entire database.
- Close the tab in Microsoft SQL Server Management Studio that you used to connect to the new database to close the open connection to it
- Open a new tab in Microsoft SQL Server Management Studio and execute
DROP DATABASE MY_DATABASE_NAME
Configure the web application for Code First development.
- In the Tools menu of Visual Studio select NuGet Package Manager, Package Manager Console
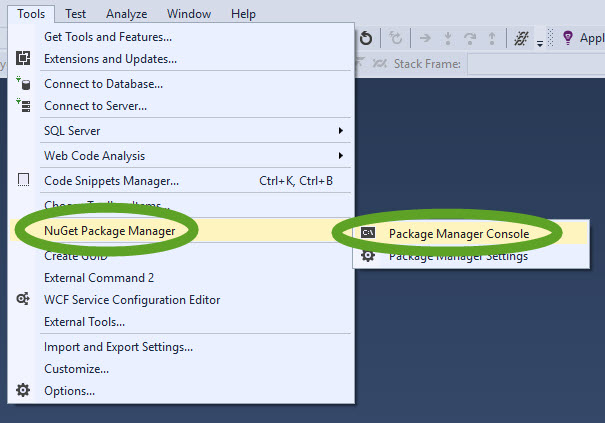
- At the bottom of the screen, the Package Manager Console window opens
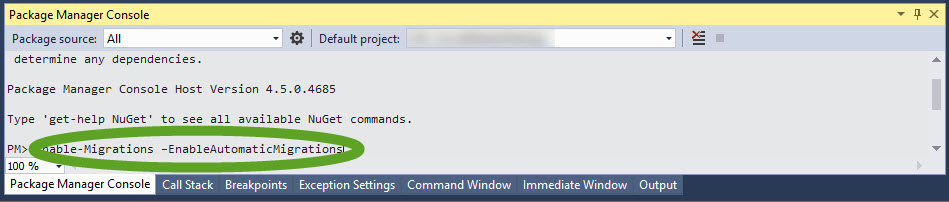
- In the Package Manager Console execute
Enable-Migrations –EnableAutomaticMigrations
PM> Enable-Migrations –EnableAutomaticMigrations
Checking if the context targets an existing database…
Code First Migrations enabled for project USC_SocialMediaWebApp.</blockquote - The command generates the Configuration.cs file in the Migrations folder of your solution.
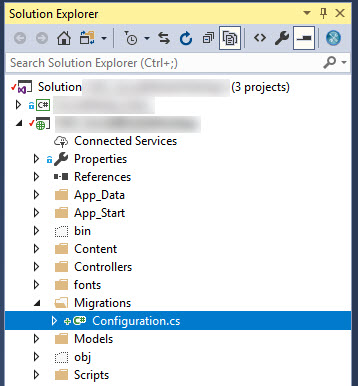
Generate the code to update the database
- In the Package Manager Console execute
Add-Migration Init
PM> Add-Migration Init
Scaffolding migration ‘Init’.
The Designer Code for this migration file includes a snapshot of your current Code First model. This snapshot is used to calculate the changes to your model when you scaffold the next migration. If you make additional changes to your model that you want to include in this migration, then you can re-scaffold it by running ‘Add-Migration Init’ again. - The command generates the necessary code to create the database tables
If you make changes to your models or the seeding script, execute the “Add-Migration Init” command again in the Package Manager Console.
Create the database
The steps above generated the necessary code to create the database. To create the database
-
- For the script to be able to create the database, temporarily replace the “db_owner” user with a username and password of a “dbo” user in the database server. Otherwise, we may get
System.Data.SqlClient.SqlException (0x80131904): CREATE DATABASE permission denied in database ‘master’
…
Error Number:262,State:1,Class:14
CREATE DATABASE permission denied in database ‘master’. - In the Package Manager Console execute
Update-Database -Verbose
The -Verbose option displays the executed SQL commands during the database creation. You can save them to create the production database by executing it.
PM> Update-Database
Specify the ‘-Verbose’ flag to view the SQL statements being applied to the target database.
Applying explicit migrations: [201802120745059_Init].
Applying explicit migration: 201802120745059_Init.
Running Seed method. - Change the username and password back to the “db_owner” user credentials in the Web.config file of the web application.
- Execute this SQL statement in Microsoft SQL Management Studio to add the “db_owner” user to the database
DECLARE @user_name varchar(50)
SET @user_name = 'MY_USER_NAME'

-- Add the user to the database
USE MY_DATABASE_NAME; EXEC sp_grantdbaccess @user_name; EXEC sp_addrolemember @rolename = 'db_owner', @membername = @user_name;
GO
- For the script to be able to create the database, temporarily replace the “db_owner” user with a username and password of a “dbo” user in the database server. Otherwise, we may get
