We will discuss two docking methods:
- A slow, careful approach by repeatedly changing the orbit altitude to first catch up with, and later match the speed of the target. This is easier for beginners, as we gradually approach the target and its speed. It uses more fuel, in real life this method is not used.
- Using a transfer orbit to quickly catch up with the target and slow down just before the intercept. This is a more dynamic process and requires more skills and attention.
The launch, orbit injection, and matching the inclination of the target are the same for both methods, we will start with these.
Install the recommended mods
There are mods for Kerbal Space Program 2 which make space flight much easier. We will not use “cheats”, these mods display the necessary information for easier maneuver node configuration, manual burn execution, and docking. Use CKAN to install the mods. See the CKAN wiki for documentation and installation instructions.
We recommend the following mods:
- Maneuver Node Controller
- Flight Plan
- Docking Alignment
- Micro Engineer
To activate the installed mods
- Click the App Panel and select the mod.
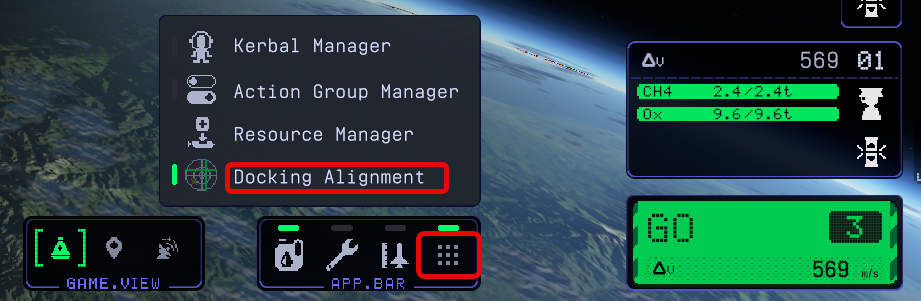
Key bindings
| Key | Action |
| C | Close the cockpit view and return to the normal view |
Build it right
Align the docking ports with the pod of remote control unit
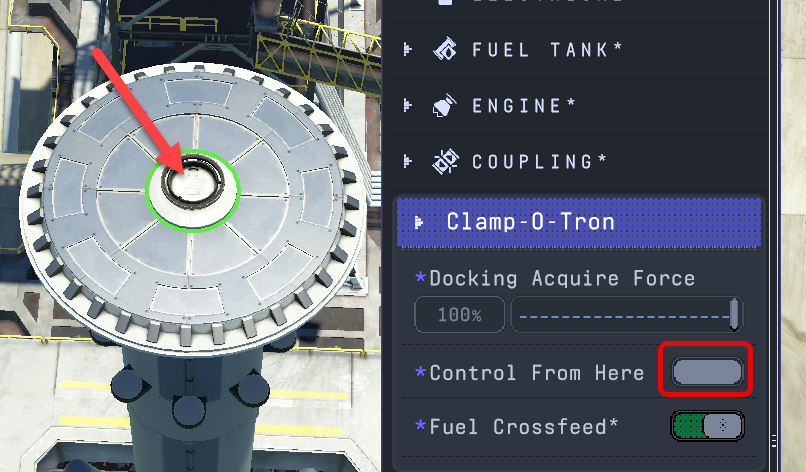
To make sure the rotation angle of the docking ports match the rotation angle of the pod or remote guidance unit, always place those on the vehicle from the viewing direction when the space craft image is visible in the background. This way when you set the Control Form Here on the docking port, the spacecraft controls work the same way as during launch and approach. 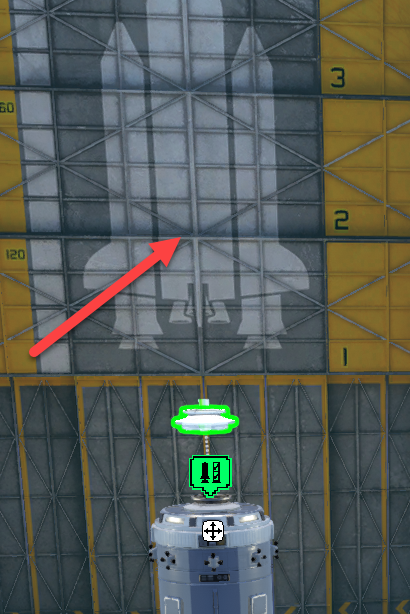
Check the center of mass
Payloads are not always symmetrical, if the center of mass is not aligned with the center of trust, the vehicle will tilt and rotate during launch.
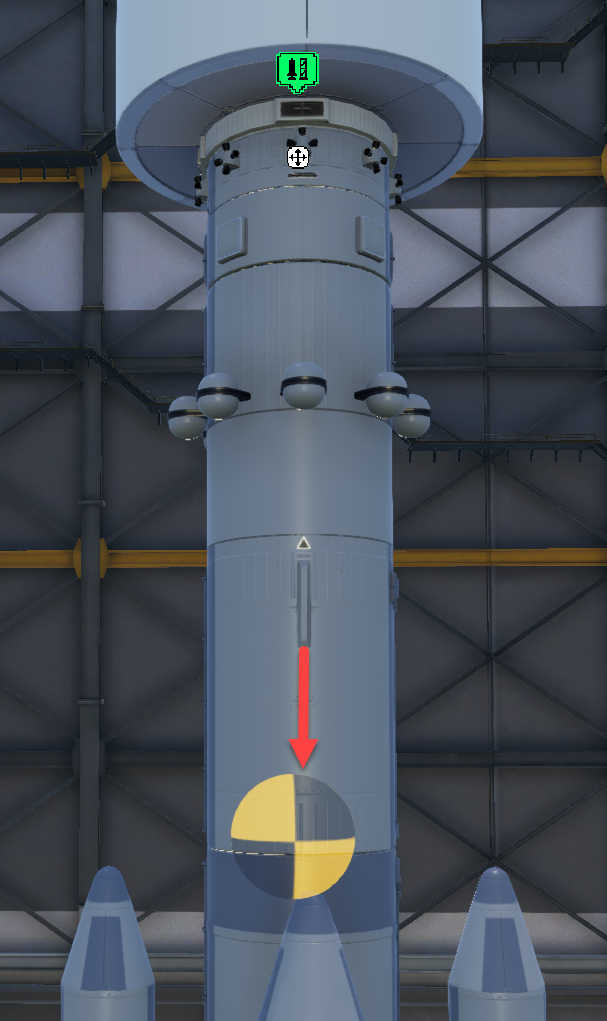
If one of the side of the payload is heavier, rotate it on the launch vehicle, so the heavy part is of the right side, facing the planet when we tilt the craft during launch.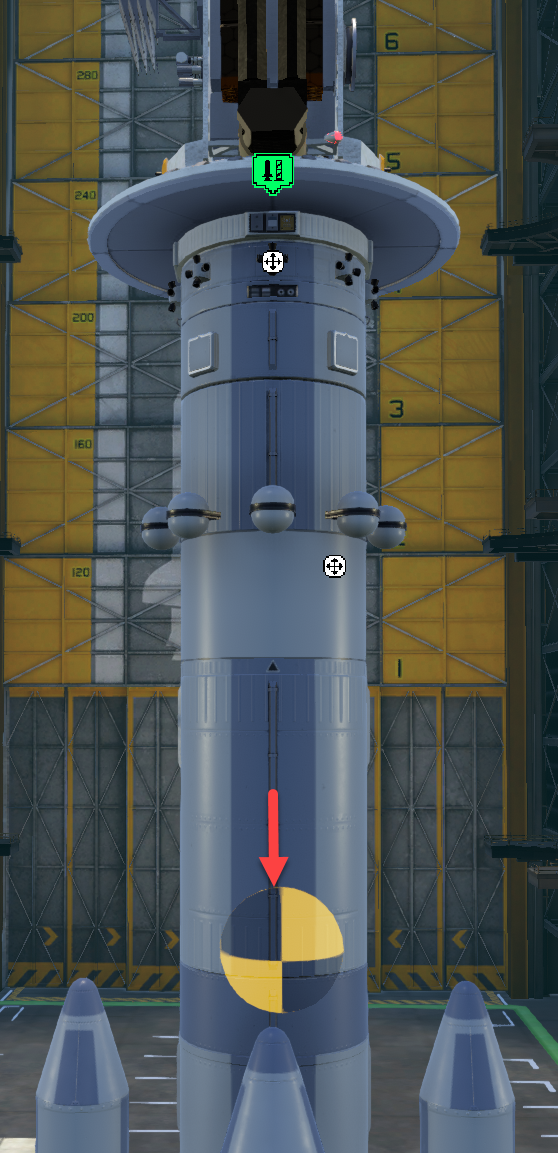
Check the control alignments
Align the docking port with the pod or remote guidance unit. Make sure the control surfaces move in the same direction in response to the QE WS AD buttons when the pod or remote guidance unit and the front docking port is select for “Control from here”.
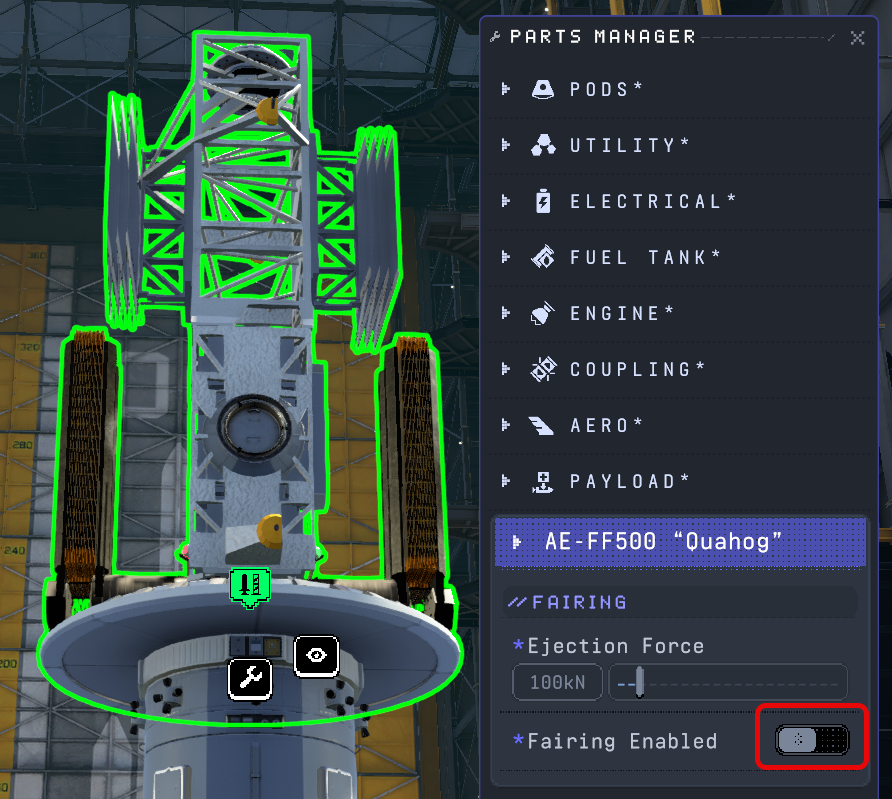
Open the fairing in the VAB
- Right-click the fairing and turn off the Fairing enabled switch
Test the alignment on the launch pad
Check the launch vehicle without the payload
- Place the vehicle on the launch pad without the payload
- Press the QE WS AD buttons to see in which direction the control surfaces move.

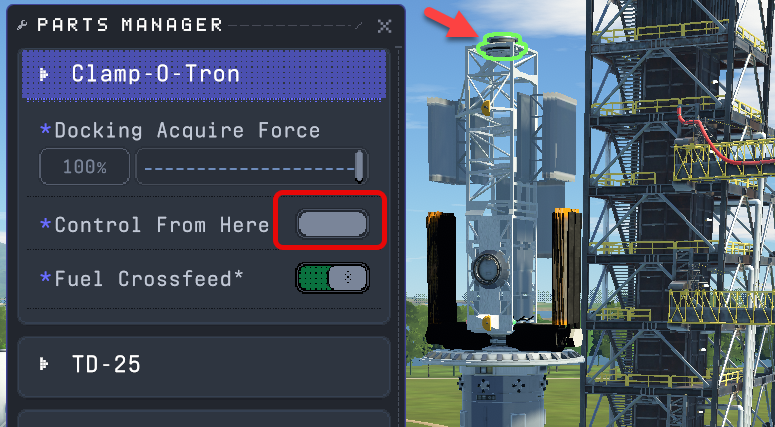
- Right-click the front docking port and click the Control From Here button and test the control surface movement directions
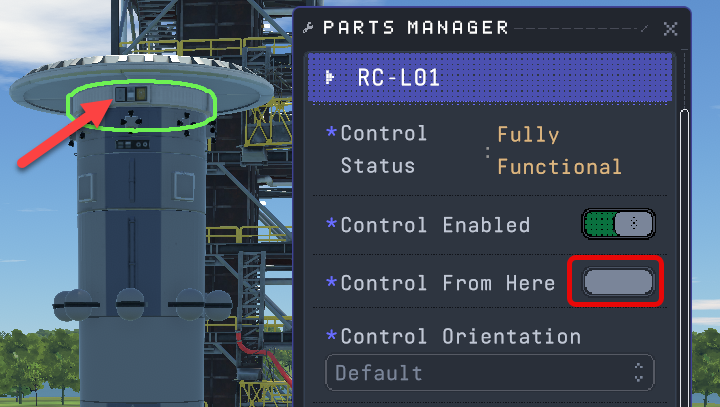
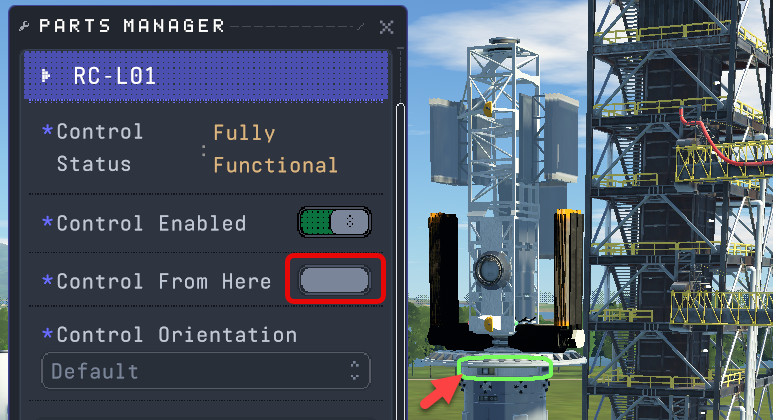
- To switch back to the pod or remote guidance unit, right-click it and click the Control Form Here button
- Revert back to the VAB.
- If the control surface directions did not match, rotate the docking port and test it again.
Check the launch vehicle with the payload
- Place the vehicle on the launch pad without the payload
- Right-click the front docking port and click the Control From Here button
- To switch back to the pod or remote guidance unit, right-click it and click the Control Form Here button
- Revert back to the VAB.
- If the control surface directions did not match, rotate the docking port and test it again.
- Once the directions match, enable the fairing and save the vehicle.

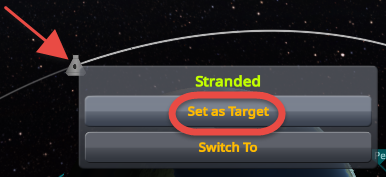
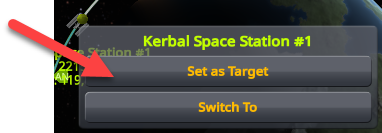
Set the target
- Click the target object and select Set as target
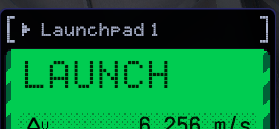
Launch the docking vehicle
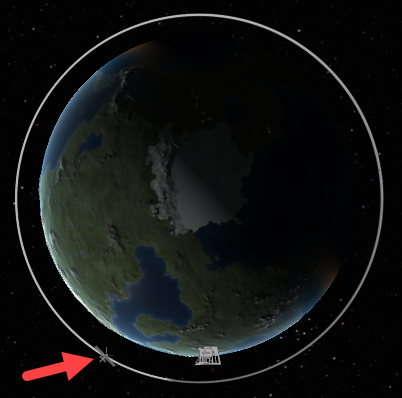
- Launch the docking vehicle before the target will pass the launch pad overhead as the rising vessel needs time to gain altitude and catch up with the target.
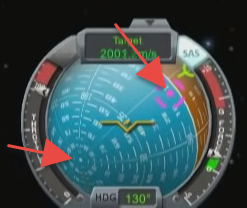
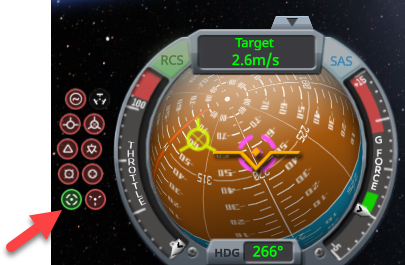
- Set the Nav Ball to Target mode

- Launch the docking vehicle
- At 10 km altitude turn towards the target in a 45 degrees angle between the zenith and the target
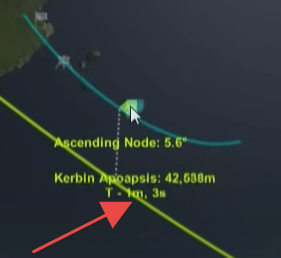
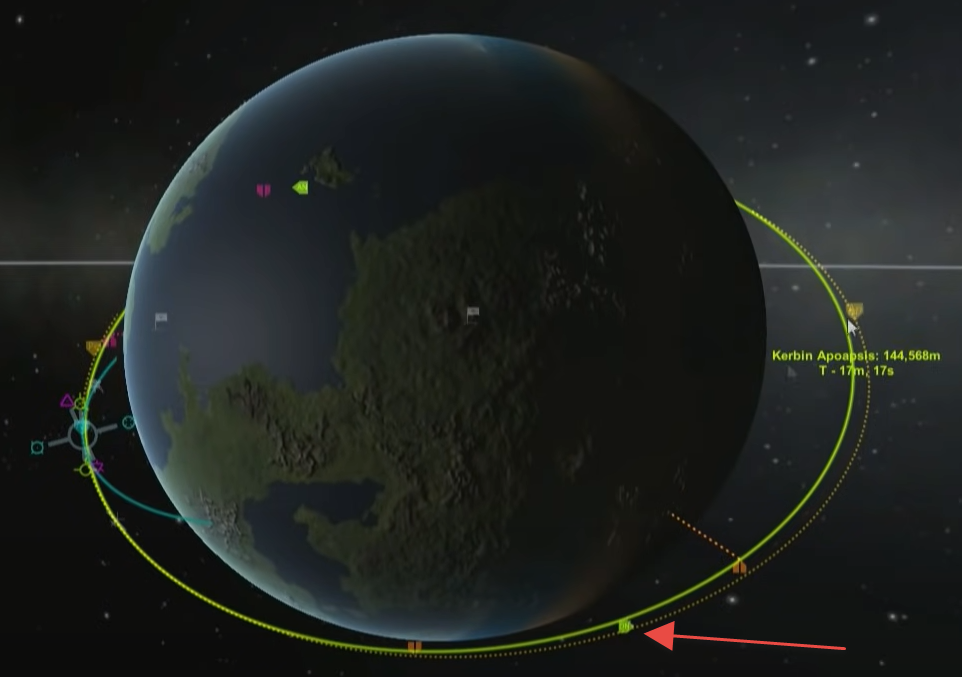
- Right-click the Apoapsis node to keep the values displayed
- When the “T-” of the Apoapsis is over 1-minute, switch the Nav Ball to Orbit mode
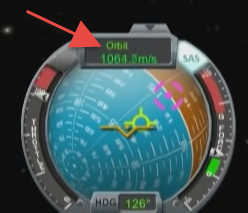
- Aim for the orbital velocity vector (prograde marker)

- Continue to burn until the Apoapsis reaches the altitude of the target orbit
- In the Apoapsis, create a maneuver node to move the Peiapsis to the same altitude to circularize the orbit, and reduce the inclination of the Ascending and Descending nodes. Adjust the Normal and Antinormal vectors to move the Ascending and Descending nodes 90 degrees to the Apoapsis and Periapsis.
- Adjust the Prograde and Retrograde vectors to compensate for the Periapsis and Apoapsis altitude change caused by the Normal and Antinormal vector change.
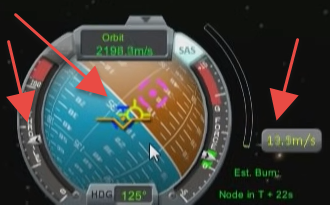
- Select Maneuver in SAS and start the burn. As we get close to the end of the burn duration, the velocity vector will deviate from the maneuver icon, so reduce the throttle and track the blue maneuver icon on the Nav Ball.
Match the inclination of the target
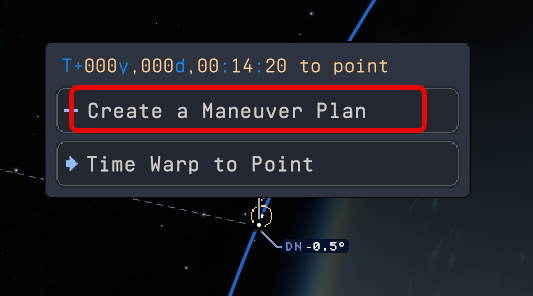
- Right-click the Ascending or Descending node to display the inclination relative to the Target.
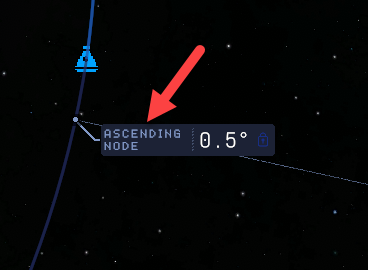
- Create a maneuver in the closest Ascending or Descending node
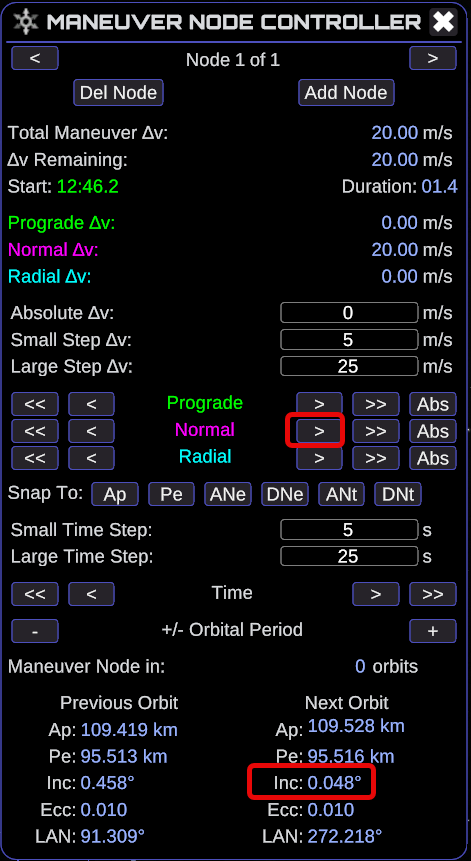
- Open the Maneuver Node Controller and adjust the Normal vector to achieve close to “0” inclination in the Next Orbit column. Try moving the maneuver node itself a bit with the Time arrows to move the number closer to zero.
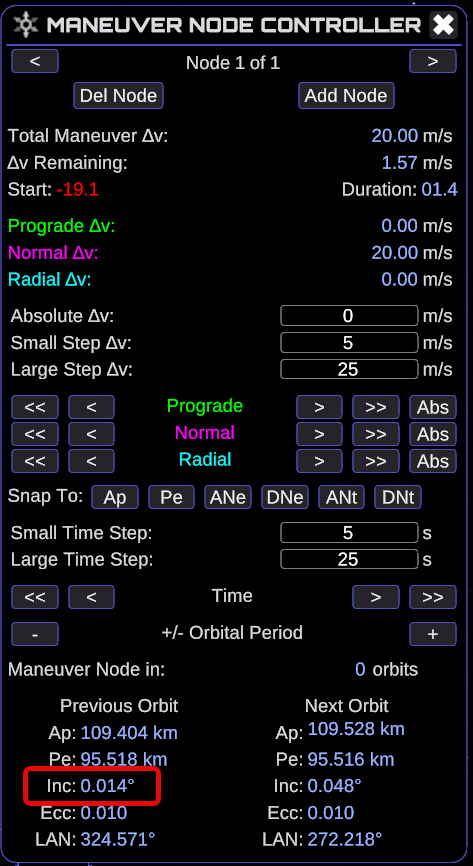
- At the time of the maneuver start the burn and stop the engines when the inclination number reaches the minimum in the Previous Orbit column.
Catch up with the Target
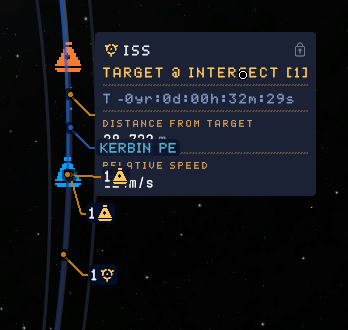
Target information
Micro Engineer mod
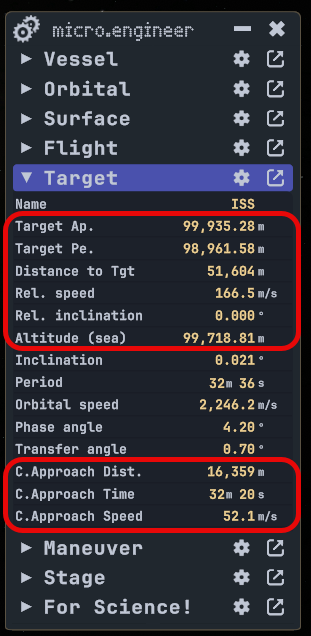
Use the Micro Engineer mod to display values relative to the target.
- Target periapsis
- Target apoapsis
- Distance to target
- Relative speed
- Relative inclination
- Altitude
- Closest approach distance
- Closest approach time
- Closest approach speed
Flight Plan mod
Use the Flight Plan mod to display the altitude and closest approach distance information of the target.
- Target orbit information
- Relative inclination
- Relative velocity
- Separation at closest approach. The minimum distance between the vessels in their current orbits. Change to a closer orbital altitude for less separation.
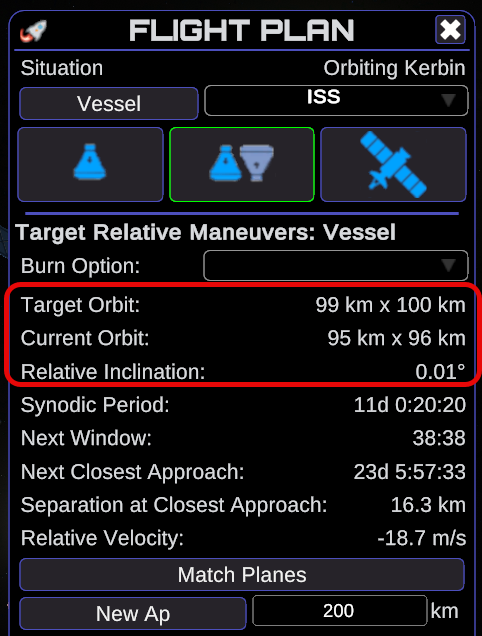
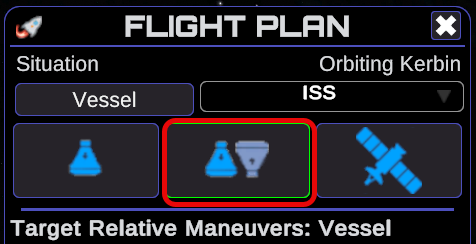
Set the target in the mod
- Click the Target Relative Maneuvers: Vessel button
- Click the upper left button to show Vessel and select the target vessel in the list
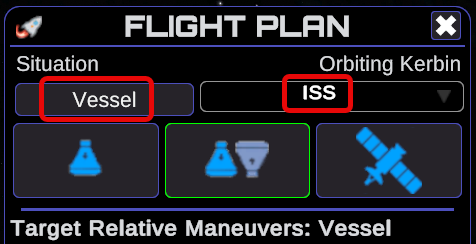
- The target orbit, relative inclination, next closest approach distance and relative velocity information are on the display
There are multiple ways to catch up with the target.
Catch up slowly by gradually changing your orbit
Change your speed by altering the altitude of your orbit
When we want to rendezvous with another spacecraft in orbit, we need to match three values:
- Location
- Speed
- Direction
Match the location
Once the two orbit’s inclinations are close enough, to meet another craft far away in orbit, first, we focus on our angular velocity to “catch up” or “wait” for the other. We want both crafts to be above the same region of the planet.
The orbital and angular velocity of the satellite depends on its altitude above the planet. The nearer to the surface, the faster it has to fly.
- Change the Nav Ball to Orbit mode
- Change your speed to go faster to “catch up” or slow down to “wait” for the target to catch up with you.
- If the target is ahead of you, lower your orbit to go faster
- If the Target is behind you, raise your orbit to go slower.
If your target is in a 120 km orbit, depending on the altitude of your orbit, each full orbit changes the distance:
– in a 110 km orbit: 70 km
– in a 130 km orbit: 80 km
Bring the orbits closer
- Warp ahead until the two spacecraft are at a 200 km distance.
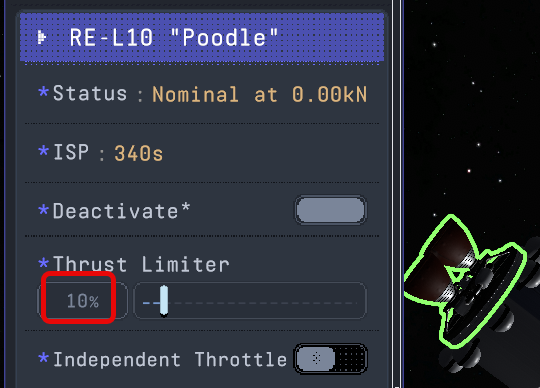
- Set the trust limiter of the main engine to 10% for fine control
- Right-click the engine
- Set the Trust Limiter to 10%
- Change the altitude difference to 5 km
- Create a maneuver in the closest Periapsis or Apoapsis to change the altitude difference to 5 km
- Set the SAS to Maneuver mode
- Burn with the lowest throttle for better control
- Circularize the orbit in the next Apoapsis or Periapsis.
- Warp ahead until the two spacecraft are at a 50 km distance.
- Change the altitude difference to 1 km, it will change the distance change to around 20 km per orbit.
- Create a maneuver in the closest Periapsis or Apoapsis to change the altitude difference to 1 km
- Set the SAS to Maneuver mode
- Burn with the lowest throttle for better control
- Circularize the orbit in the next Apoapsis or Periapsis.
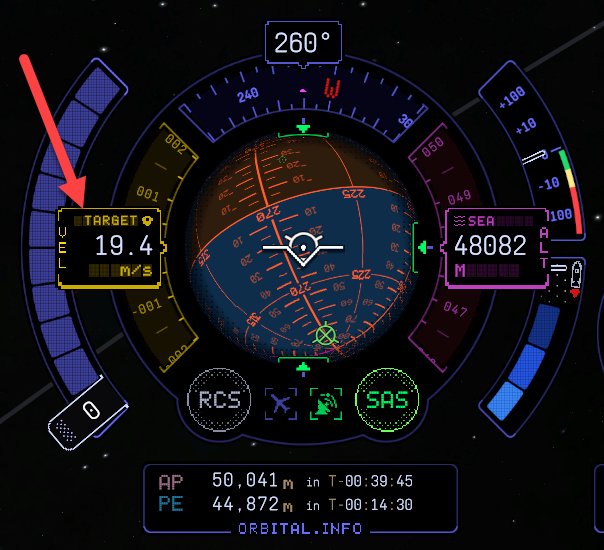
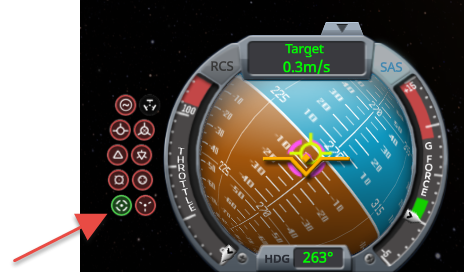
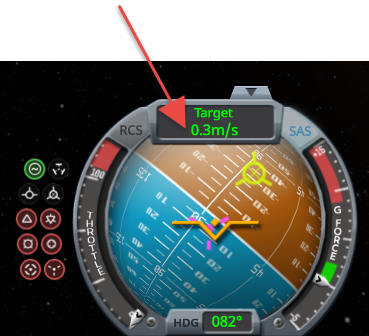
Match the speed
The speed difference between the very close orbits should be below 400 m/s.
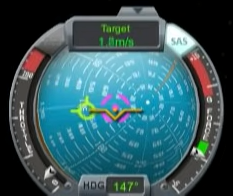
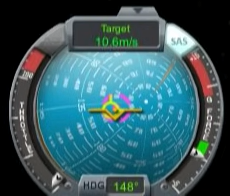
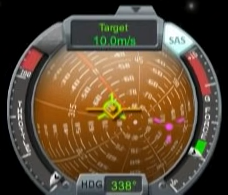
- Click the velocity indicator until it shows TARGET to see the speed difference between your ship and the target.

- Warp ahead to reduce the distance
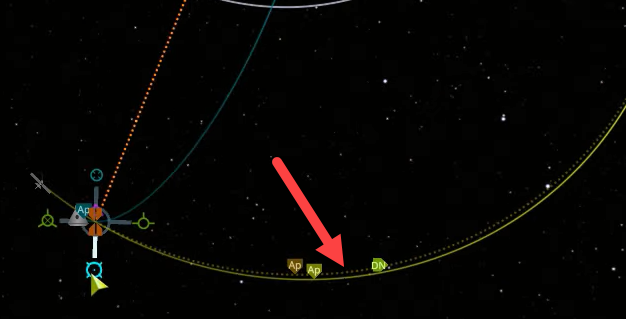
- On the map view hover above the icons to see information about the next intersects.
- Use the Micro Engineer mod to monitor the target distance.
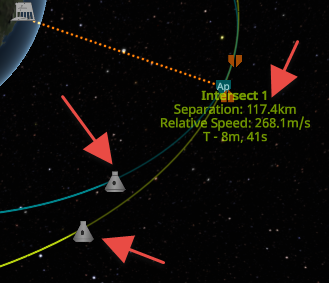
Finding the closest encounter
Warp ahead until Micro Engineer shows a Closest Approach Distance comparable to the orbit altitude difference. In our case around 1 km. On the Map view find the closest encounter indicator. Slowly warp ahead, and before the closest approach point, start to match the orbital altitude and the speed. 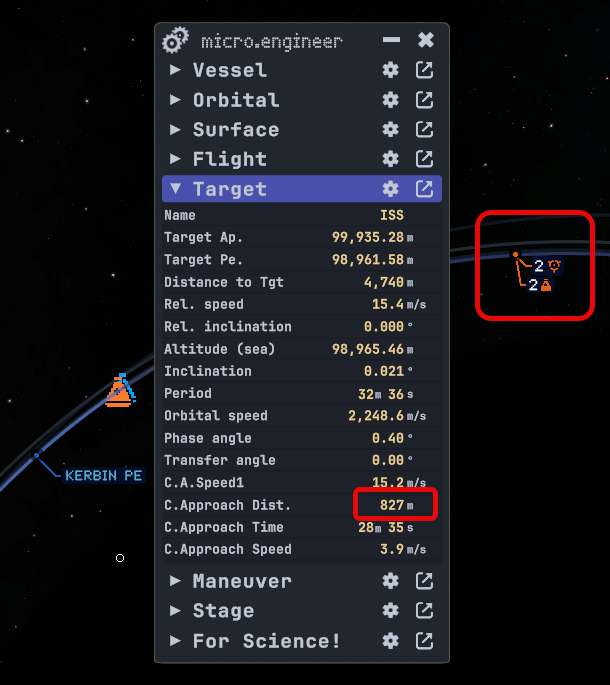
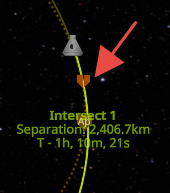
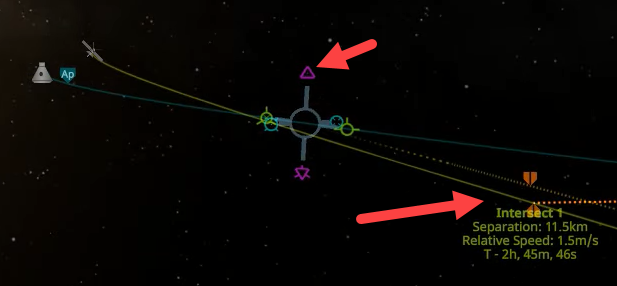
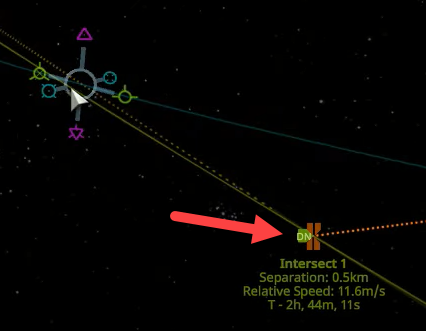
- Hover above the encounter indicator to see the predicted relative distance and speed difference.
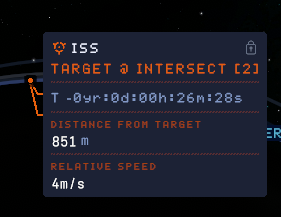
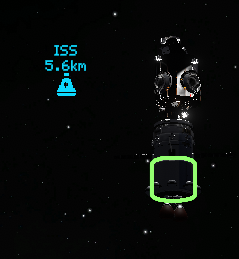
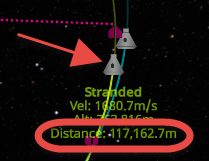
- When the target is visible on the Flight view, the distance is displayed
- When the distance value of Intersect 2 is greater than Intersect 1, the closest encounter will happen between them. It means Intersect 2 will happen after the two vessels already passed each other.
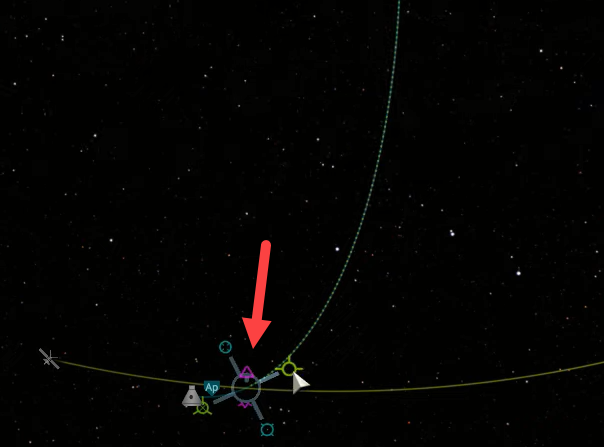
- When the target indicator is 90 degrees from the velocity vector, the two spacecraft are above each other. Kill the speed difference by changing your orbit to match the target.
Align your vessel’s velocity vector to the target’s movement
IMPORTANT!!!
This is crucial, as for successful docking at the moment of contact the two vessels should have close to matching speed and direction. During the final approach, as you adjust the speed of your spacecraft, also continuously adjust your ship’s velocity vector, so in the final moments, the two will hover next to each other without much relative movement.
If arriving from below
If your orbit is below the target, your velocity is higher, so eventually you will be in front of the target.
- Burn prograde to raise your orbit. This will eventually slow you down.
- Orient the spacecraft with the W S A D keys, so when you apply thrust, you pull the Prograde symbol to the Target symbol and move your ship towards the target.
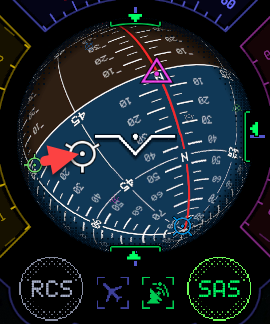
- If the Prograde vector is not visible when you pull it to the target, orient the spacecraft between the Target and the Retrograde vector.
If arriving from above
If your orbit is higher than the target, your velocity is lower, so eventually you will be behind the target.
- Burn retrograde to lower your orbit. This will also speed you up.
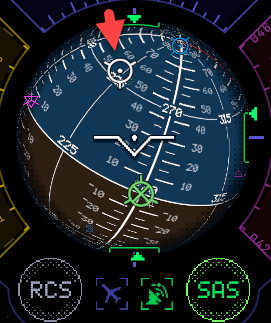
- Orient the spacecraft with the W S A D keys, so when you apply thrust, you push the Retrograde symbol on top of the Anti-Target symbol.
Tip 1
When to push, and when to pull
When we run the engine, we always push the retrograde and pull the prograde symbol (think about pushing the back and pulling the front of the car).
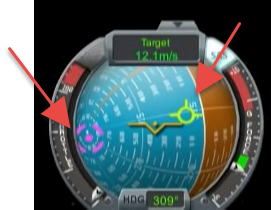
If the appropriate symbols are not visible at the same time, you can still pull or push the velocity vectors. In this example the target and the retrograde symbols are visible, and we want to speed up a little bit. We can still pull the prograde symbol toward the target by aiming between the retrograde and the target and pushing the retrograde symbol to the other side of the ball toward the anti-target symbol.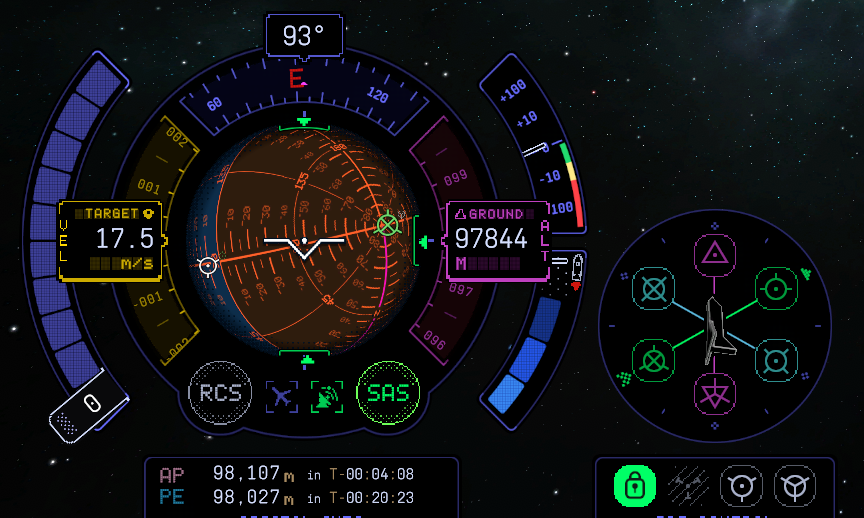
Tip 2
Curved path
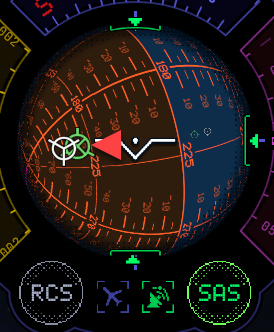
As we are flying on a curved path, the target symbols and the velocity vector symbols (prograde and retrograde) continuously move relative to each other. As we approach the target, and eventually want to slow down, the retrograde vector tends to move toward the horizon. “Pushing” it back towards the target we can keep the velocity vectors of the ships aligned.
Approach the target
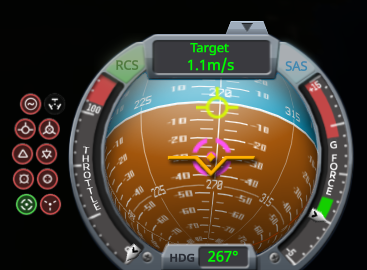
- Make sure the Nav Ball is in Target mode and burn towards the target at 20 m/s speed
- We continue this staggered approach to get closer to the target:
- Catch up with the Target
- If you are ahead of the target in a lower orbit, burn retrograde.
- Catch up with the Target
- If you are behind the target in a higher orbit, burn prograde
- Kill the speed difference
- When the target indicator is 90 degrees from the velocity vector, kill the speed difference by slowing down or speeding up to the speed of the target.
- Turn toward the target and start a burn
- When the target indicator is 90 degrees from the velocity vector, kill the speed difference by slowing down or speeding up to the speed of the target.
- Kill the speed difference
- Cut the engine at 10 m/s speed difference
- Cut the engine at 10 m/s speed difference
- Turn retrograde and prepare to slow down
- Slow down around 60 – 70 meters from the target
Catch up quickly via transfer orbit
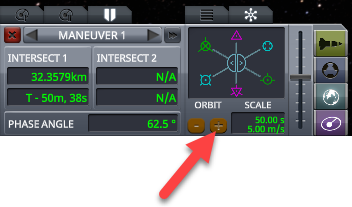
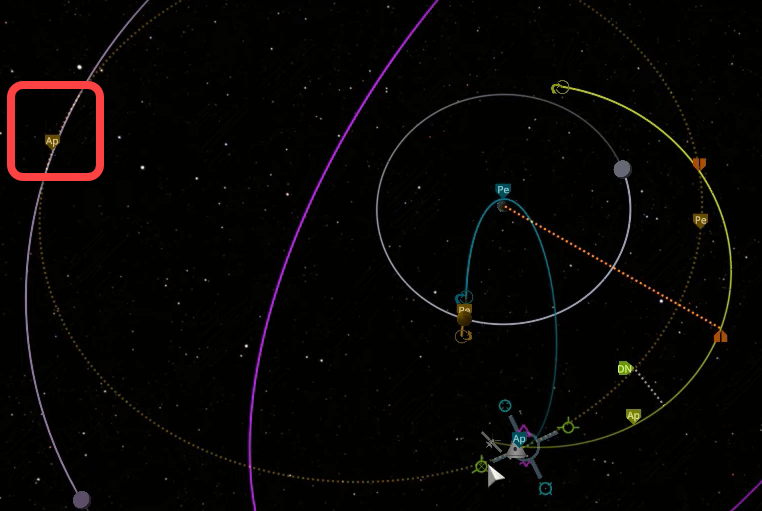
- Create a maneuver to get into the Transfer Orbit. Use the prograde or retrograde marker to reach the orbit of the Target, and move the maneuver to set the distance between the two orange markers below 5 km. If the pink markers appear, your trajectory will cross the target’s orbit and overshoot it. Reduce the burn duration until the pink markers disappear. You may need to select an orbit in the future to be able to burn at the correct time for a close intersect.
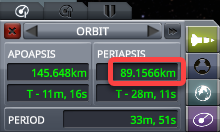
- Make sure the new orbit stays above the 70 km thick atmosphere, otherwise the spacecraft can even burn up at the periapsis.
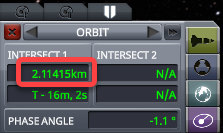
- Set the SAS to Maneuver mode, and stop the burn before the estimated duration. Fine-tune the intersect with short low-throttle burns until the distance reaches the planned amount.
If the orbits are not parallel
If the orbits are just intersecting, we can create a maneuver in the intersecting point and adjust the prograde/retrogarade and radial in/ radial out vectors to bend our orbit to match the target
- Create a a maneuver in the intersection point
- If your Apoapsis or Periapsis is too extreme, dial back the prograde or retrograde vector, and adjust the radial in / radial out vector to bend the curve
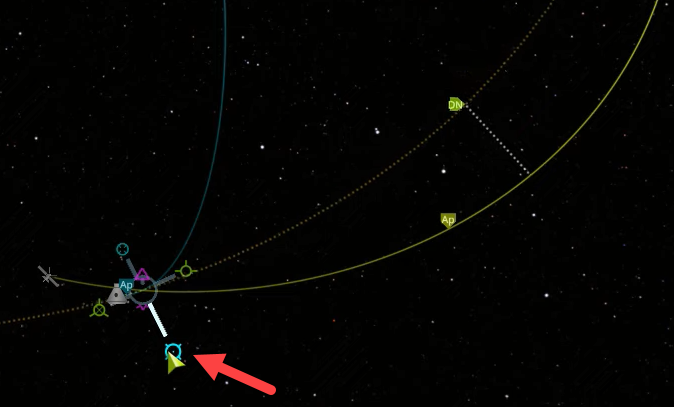
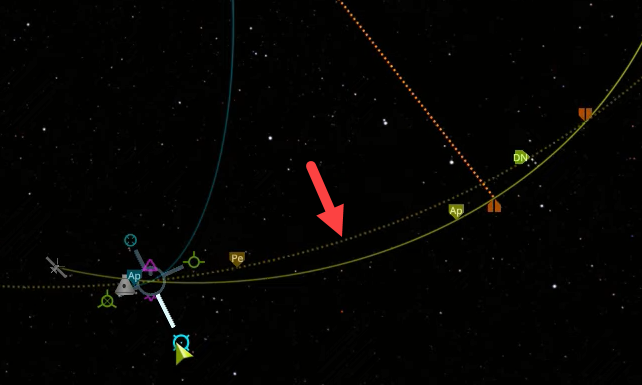
- Adjust the prograde/retrograde and radial in/radial out vectors to match the trajectory of the target
- If there is still a vertical separation between the orbits because of the different inclinations, use the normal/anti-normal vectors to bring the Ascending or Descending node close to the encounter.
Slow down
- Click the speed indicator to switch to Target mode
- Once in Target mode turn to Retrograde
- Warp ahead even through multiple orbits until the two spacecraft reach the intersect point at the same time.
- At 15 km distance from the Target burn until the relative velocity drops below 50 m/s. See Align your vessel’s velocity vector to the target’s movement
Align the docking ports
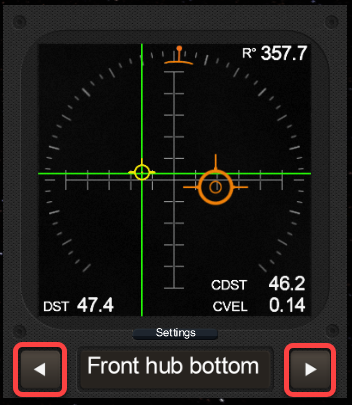
The easiest way to dock is if both vessels actively turn toward each other. We will set up active tracking on both ships. In this example, we will dock “Ship” to “Station”. When the vessels are close to each other you can use the “[” and “]” keys to switch between them.
- Switch to Station
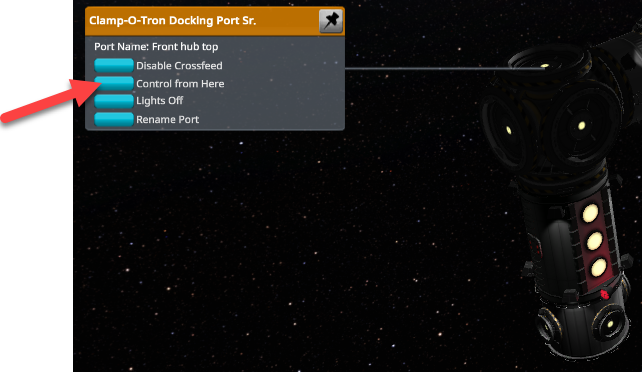
- Right-click the docking port and select Control from Here
- Select Ship as target
- Turn on SAS and point Station to Target
- Switch to Ship
- Right-click the docking port and select Control from Here
- If the docking port rotation is not aligned with the rotation of the pod or controller, right-click the pod and select Control from Here.
- Set Station as target
- Turn on SAS and point Ship to Target
From now on the ports should continuously face each other.
Approach
Rotate the ship “upside up”
Press the V key to switch to Chase view. This will orient the spacecraft to align the RCS response with the keyboard inputs.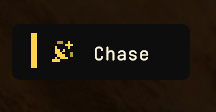
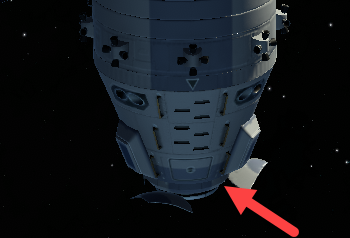
To make it easier to maneuver the ship during docking, rotate the ship, so on the screen the top of the pod points up. There is no good indicator of the top, but the hatch of the pod is at the “bottom”.
- Rotate your ship with the E and Q keys to turn the hatch to the bottom, and the two windows are visible on the top.
In this position use the lateral controls to move the pod. As the first astronauts were fighter pilots, the controls work the same way as you fly an airplane in a flight simulator with the keyboard:
- J – left
- L – right
- K – (pull the pod) up
- I – (push the pod) down
Maneuver to the target
- Turn Retrograde to be able to use the engine to slow down if needed.
- Turn on RCS with “R”
- In Retrograde press the “H” RCS key to slow down, “N” to speed up until the Target speed drops to zero, or use the engine if more power is needed.
- Turn Prograde, “H” is forward, and “N” is backward.
- Use the RCS to approach it with no more then 10 m/s until it is in 100 distance.
- Right-click the target to see its distance
- Set the docking port as the target for a precise approach.
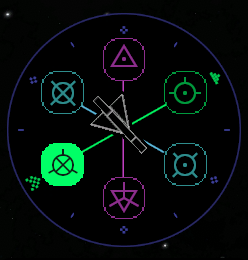
Final approach and docking
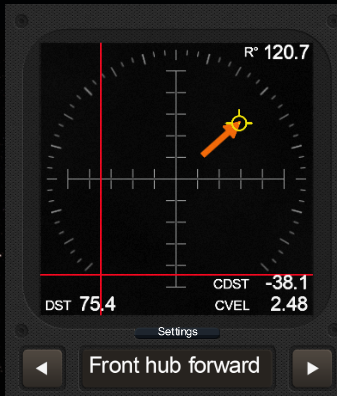
It is important to learn the basics of docking with a visual approach, to understand the steps necessary for success, but there is an excellent mod that provides a user interface to perfectly align the docking ports even in total darkness. Install the Docking Port Alignment Indicator mod (see Recommended mods for details)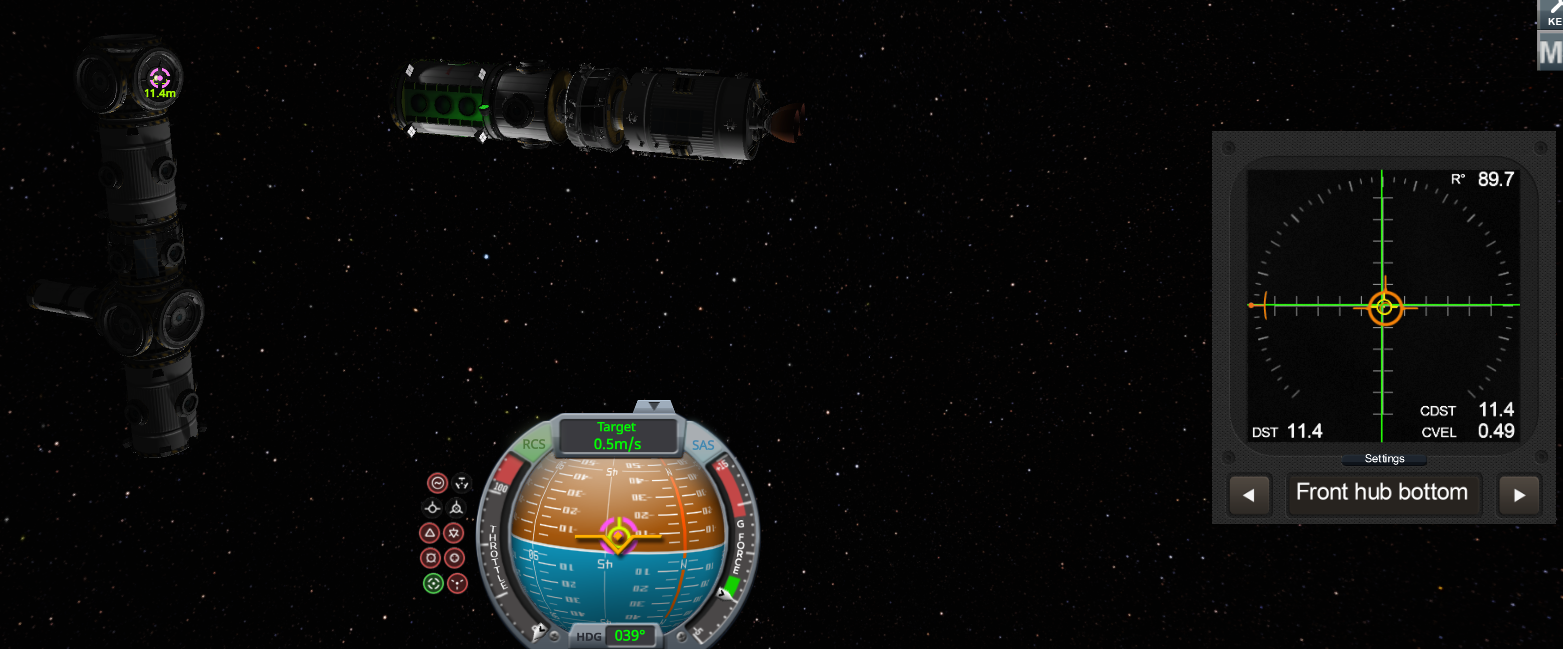
Advantages
- Adds port renaming functionality during construction and flight, so you can later select the target port by name at the bottom of the instrument.
Usage
- In the map view switch to the target vessel

- Right-click the receiving port, and select Control from Here, so the SAS of the approaching vessel can properly track it.
- Switch back to the approaching vessel, and make sure the target vessel is selected. If not, select it in the map view
- Right-click the port on your vessel and select Control from Here

- When you are 2.5 km or closer to the target, select the target port on the Docking Port Alignment Indicator UI.
- During the final approach, the only thing you need to do is to
- set your SAS to track the target
- with your lateral RCS controls (I J K L) keep the green prograde marker on the intersection of the green lines, and control the approach speed with H and N. If you successfully track the green lines, your vessel will slowly line up with the target port. The orange marker at the top of the circle shows the 0° of the port of your vessel. Use Q and E to rotate your craft.
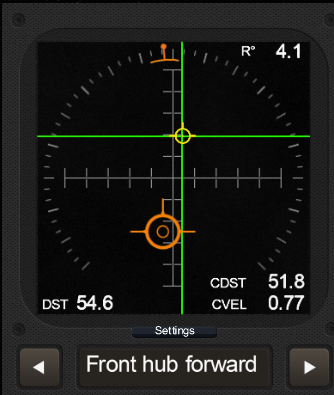
- set your SAS to track the target
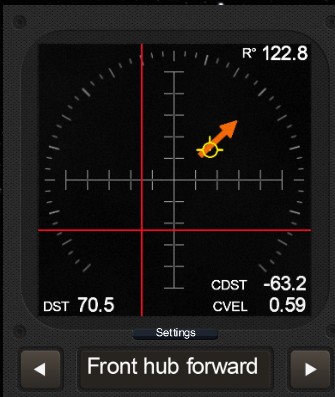
- If the two lines are red, you are approaching the target port in the wrong direction. The orange arrow on the UI shows the direction you should move the prograde or retrograde icon for the correct alignment. If the yellow symbol changes from prograde to retrograde, you are getting farther away from the target.
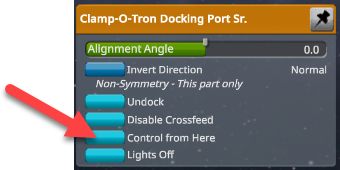
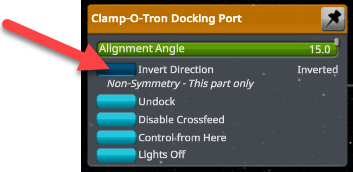
Fine tune the docked module rotation angle
When a module has been docked, you can fine-tune the angle +- 15 degrees using the docking port menu. It looks like the module position is not saved, so when you reload the game all modules turn back to the original angle.
- Right-click the docking port
- Move the Alignment Angle slider to fine-tune the rotation of the docked module

- The Invert Direction button changes the direction of the rotation.
Re-docking
When you just want to re-align a docked module the docking port needs to be reset. When you undock, the magnetic force which attracts the ports is turned off and the port is deactivated to let you leave the vicinity of the port. This prevents quick re-docking the same module. The port is reactivated when the module is moved at least 1.5 meters away, but if you just want to rotate the module sometimes it is not practical.
To quickly re-enable the docking port
- Undock the module
- Press F5 to “quick save” the game scenario
- Hold F9 to reload the last quick save
- Dock again
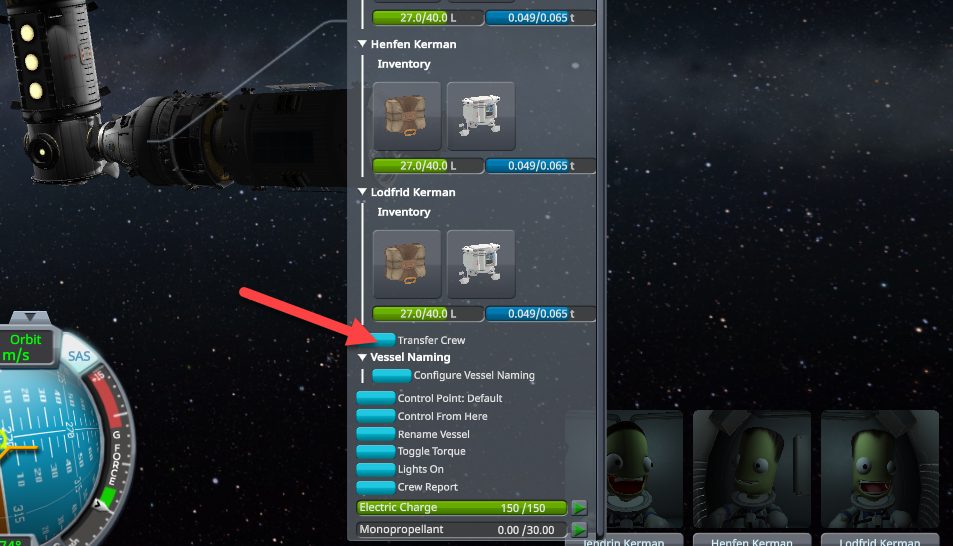
Transfer the crew
To transfer the crew between docked vessels
- Click the hatch, or right-click the module, where the crew member is located and select Transfer Crew
- Click the Transfer button of the crew member to transfer across the docking port
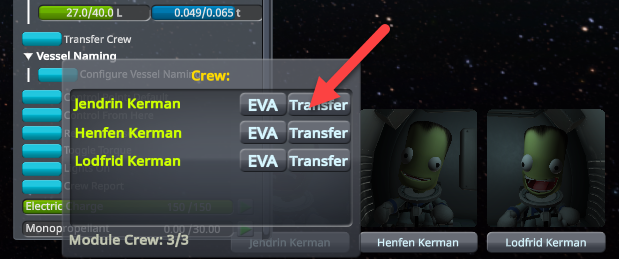
- Click the target module to select it. In a few seconds, after a “tv static” video effect
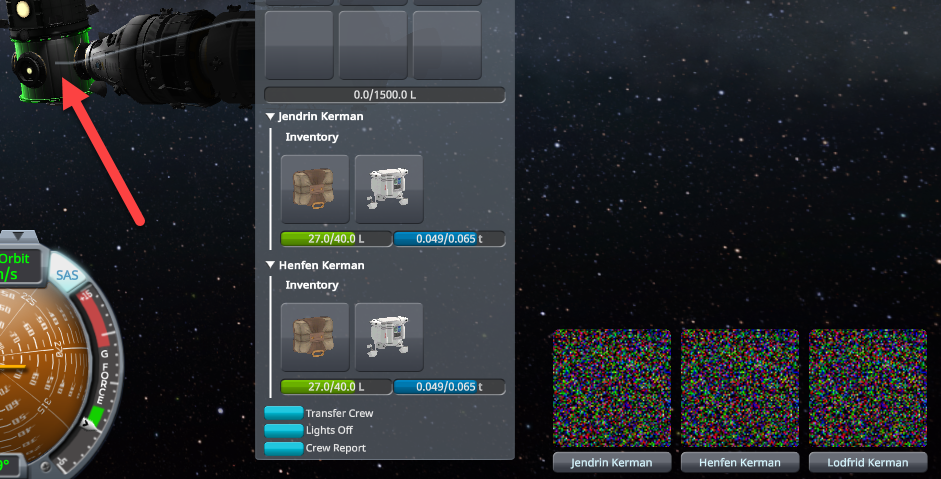
- the crew member will appear in the new environment