To comment out a block of lines in the ASP.NET MVC Razor file, enclose them in @* and *@
@*

Commented out instructions, including HTML and Extension methods

*@
Knowledge Base for IT Professionals, Teachers and Astronauts
To comment out a block of lines in the ASP.NET MVC Razor file, enclose them in @* and *@
@* Commented out instructions, including HTML and Extension methods *@
When you use the Microsoft .NET Entity framework to access a MySql database, the autogenerated code throws an error when you try to insert a row into the database with
context.MY_TABLE.Add(MY_OBJECT);
Server Error in ‘/’ Application.
Procedure or function ‘`…_Insert`’ cannot be found in database ‘`…`’.
Description: An unhandled exception occurred during the execution of the current web request. Please review the stack trace for more information about the error and where it originated in the code.Exception Details: MySql.Data.MySqlClient.MySqlException: Procedure or function ‘`…_Insert`’ cannot be found in database ‘`…`’.
The auto-generated class tries to use stored procedures to update the database. To use the Entity Framework Linq commands, comment out the line that contains “MapToStoredProcedures”
 protected override void OnModelCreating(DbModelBuilder modelBuilder)
 {
     base.OnModelCreating(modelBuilder);
     // modelBuilder.Entity<twitter_keywords>().MapToStoredProcedures();
 }
Two-tier applications separate the presentation layer and the data layer, and all database access related objects are located in the data-tier.
When the application runs, the config file of the main project is read. In web applications, it is the web.config, in console applications the app.config file.
When you get the following runtime exception
Exception thrown: ‘System.InvalidOperationException’ in EntityFramework.dll
An exception of type ‘System.InvalidOperationException’ occurred in EntityFramework.dll but was not handled in user code
No connection string named ‘…Entities’ could be found in the application config file.
<add name="USC_SocialMediaMSSQLEntities" connectionString="metadata=res://*/USC_SocialMedia_MSSQL.csdl|res://*/USC_SocialMedia_MSSQL.ssdl|res://*/USC_SocialMedia_MSSQL.msl;provider=System.Data.SqlClient;provider connection string="data source=MY_SERVER;initial catalog=MY_DATABASE;user id=MY_USER;password=MY_PASWORD;MultipleActiveResultSets=True;App=EntityFramework"" providerName="System.Data.EntityClient" />
2. This is a sample data access class in the data-layer to read data from the aspNetRoles table.
using System.Data.Entity;
using System.Linq;
using System.Text;
using System.Threading.Tasks;

namespace SocialMedia_Data {
	public class SocialMediaData {

		private USC_SocialMediaMSSQLEntities _web;

		public SocialMediaData() {

			// Set up the database connections
			_web = new USC_SocialMediaMSSQLEntities();

		}

		/// Returns the list of Roles
		public List GetRoles() {

			IEnumerable foundRoles = from aspNetRoles in _web.AspNetRoles
						 orderby aspNetRoles.DisplayOrder
						 select aspNetRoles;

			if (null == foundRoles || 0 == foundRoles.Count()) {
				return null;
			}

			return foundRoles.ToList();

		}
	}
}
When you create a file in a script and use an end of file delimiter,
if ...
  cat <<EOF> $chef_dir/attrib.json
    $json
  EOF
fi
and you indent the word EOF to look nicer, you will get the error message
warning: here-document at line … delimited by end-of-file (wanted `EOF’)
STDERR> …: line …: syntax error: unexpected end of file
To correct the script, move the EOF to the beginning of the line
if ...
  cat <<EOF> $chef_dir/attrib.json
    $json
EOF
fi
The Macintosh workstation saves application states in .DS_Store files. When you edit your Chef cookbooks the MacOS leaves these files in many folders.
When the Chef cookbook is executed, the Chef Client reads all files in the attributes folder and tries to extract values from them. If the .DS_Store file is uploaded with the rest of the cookbook to the Chef server, the Chef cookbook execution stops with the error message:
=============================================================
Recipe Compile Error in /var/chef/cache/cookbooks/…/attributes/.DS_Store
=============================================================Chef::Exceptions::AttributeNotFound
———————————–
could not find filename for attribute .DS_Store in cookbook …
When you test your cookbook with Test Kitchen, there is no error, so you cannot detect the existence of the file until the Chef cookbook starts to run on the instance.
Even though the.DS_Store file cannot be seen in Finder, it still can be there. It is a hidden file, and even if you enable the display of hidden files, Finder does not show it.

$ cd attributes
$ ls -a
. .. .DS_Store default.rb
rm .DS_Store
knife cookbook upload MY_COOKBOOK --freeze
In a two-tier web application, the data layer is in a separate project. This allows better separation between the presentation layer and the data layer. This way you can reuse the data project in another application that targets the same database.
To access a MySql database you need to add the MySql.Data and MySql.Data.Entity NuGet packages to the data project.
When you develop a two-tier application that targets a MySql database you may get the runtime error
NotSupportedException: Unable to determine the provider name for provider factory of type ‘MySql.Data.MySqlClient.MySqlClientFactory’. Make sure that the ADO.NET provider is installed or registered in the application config.
Even if all database interaction is handled in the data project, and you added the MySql NuGet packages to it, you need to add the MySql.Data and MySql.Data.Entity NuGet packages to the web project too, because the Web.config file contains the connection string that includes the reference to MySql.Data.MySqlClient.
<add name="MY_CONNECTION_NAME" providerName="MySql.Data.MySqlClient" connectionString="server=localhost;port=3306;database=MY_DATABASE;uid=MY_USERNAME;password=MY_PASSWORD" />
At the time of writing do not use version 6.10.6.0 of the packages, it causes the error
Exception thrown: ‘System.TypeLoadException’ in mscorlib.dll
An exception of type ‘System.TypeLoadException’ occurred in mscorlib.dll but was not handled in user code
Inheritance security rules violated by type: ‘MySql.Data.MySqlClient.MySqlProviderServices’. Derived types must either match the security accessibility of the base type or be less accessible.
Until a new, corrected version is published, install version 6.9.11.0 of both packages in both projects.
For more information on how to connect to a MySql database from Visual Studio see Connect to a MySQL database from Visual Studio 2017
When a new ASP.NET web application is created with the authentication set to Individual User Accounts, it automatically creates an SQL Express internal database in the App_Data directory of the application when you register the first user. To create the ASP.NET web application with user authentication see Create an ASP.NET Web Application with user authentication
This is sufficient for a small, proof of concept web application, but enterprise-grade applications should use a secure, backed up database.
To connect an ASP.NET MVC web application to an external database
CREATE DATABASE MY_DATABASE_NAME
GO
DECLARE @user_name varchar(50)
SET @user_name = 'MY_USER_NAME'

-- Create the user account
CREATE LOGIN MY_USER_NAME
 WITH PASSWORD='MY_PASSWORD'

-- Add the user to the database
USE MY_DATABASE_NAME; EXEC sp_grantdbaccess @user_name; EXEC sp_addrolemember @rolename = 'db_owner', @membername = @user_name;
GO
<connectionStrings>
    <add name="DefaultConnection"
        connectionString="Data Source=MY_SQL_SERVER_NAME;Initial Catalog=MY_DATABASE_NAME;user id=MY_USER_NAME;password=MY_PASSWORD"
        providerName="System.Data.SqlClient" />
</connectionStrings>
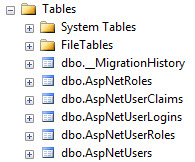
There are two way to generate the user authentication tables
Only delete the existing database if you have no important data or configuration changes in the existing database!
The script generator checks the database for existing tables, so if you have used the web application to automatically create the tables, delete the database, so the generated script will contain all necessary steps to create the entire database.
DROP DATABASE MY_DATABASE_NAME
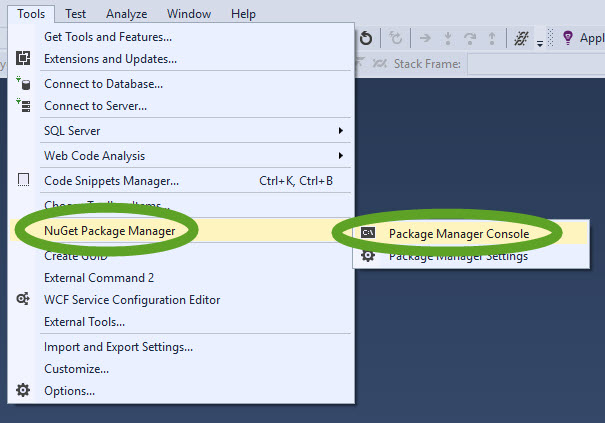

Enable-Migrations –EnableAutomaticMigrations
PM> Enable-Migrations –EnableAutomaticMigrations
Checking if the context targets an existing database…
Code First Migrations enabled for project USC_SocialMediaWebApp.</blockquote
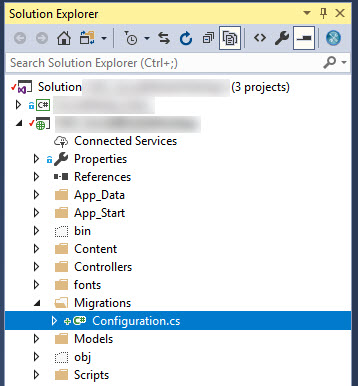
Add-Migration Init
PM> Add-Migration Init
Scaffolding migration ‘Init’.
The Designer Code for this migration file includes a snapshot of your current Code First model. This snapshot is used to calculate the changes to your model when you scaffold the next migration. If you make additional changes to your model that you want to include in this migration, then you can re-scaffold it by running ‘Add-Migration Init’ again.
If you make changes to your models or the seeding script, execute the “Add-Migration Init” command again in the Package Manager Console.
The steps above generated the necessary code to create the database. To create the database
System.Data.SqlClient.SqlException (0x80131904): CREATE DATABASE permission denied in database ‘master’
…
Error Number:262,State:1,Class:14
CREATE DATABASE permission denied in database ‘master’.
Update-Database -Verbose
The -Verbose option displays the executed SQL commands during the database creation. You can save them to create the production database by executing it.
PM> Update-Database
Specify the ‘-Verbose’ flag to view the SQL statements being applied to the target database.
Applying explicit migrations: [201802120745059_Init].
Applying explicit migration: 201802120745059_Init.
Running Seed method.
DECLARE @user_name varchar(50)
SET @user_name = 'MY_USER_NAME'

-- Add the user to the database
USE MY_DATABASE_NAME; EXEC sp_grantdbaccess @user_name; EXEC sp_addrolemember @rolename = 'db_owner', @membername = @user_name;
GO
To create a new ASP .NET MVC web application that contains user authentication code

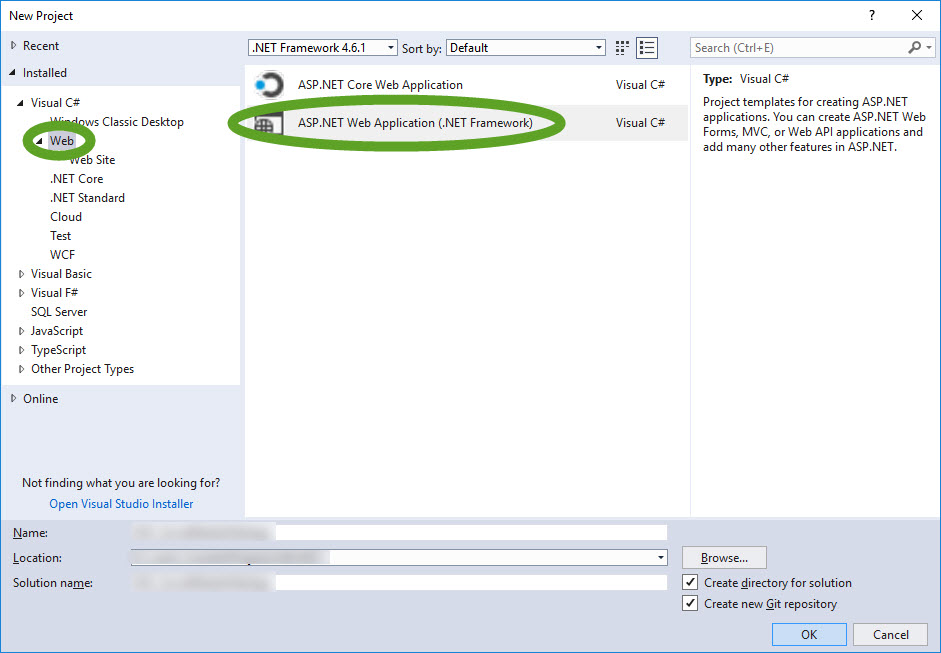
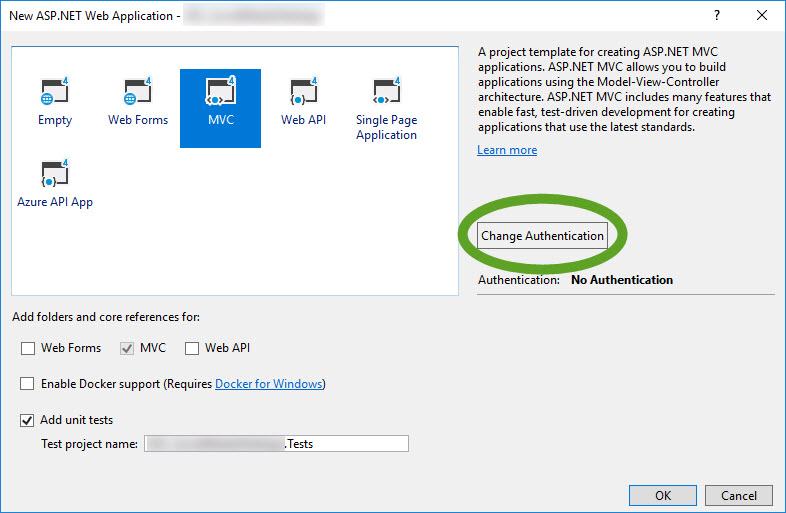
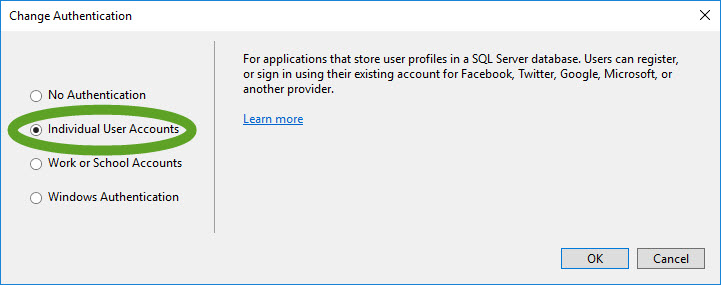
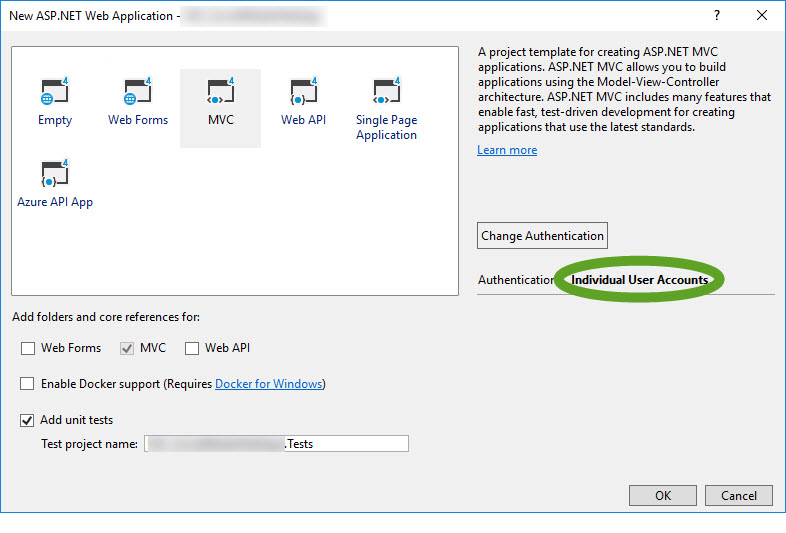
This ASP.NET MVC 5 web application automatically creates an SQL Express internal database in the App_Data directory of the application when you register the first user.
To use an external database for user authentication, see the next post at Configure the ASP.NET MVC 5 web application to use an external database for user authentication
In the US it is not required to make the turn signals visible from the side of the vehicle. Many cars sold in the US have their front turn signals positioned between the headlights, so those are usually not visible from the side. If another car is next to yours, the other driver cannot see your rear turn signals, and because there are no front turn signals on the corner of your vehicle, they cannot see the font signals either. You can mount additional turn signals on the side of your car, but most of the time you need to drill holes into the body of the car, that can open the door for early corrosion of your vehicle.
If your car uses conventional light bulbs for the turn signals and the side markers, it is easy to make the side markers flash too.
The idea came from Daniel Stern at http://www.danielsternlighting.com/tech/markerflash/markerflash.html Read the “Crossfeed method” section for the explanation how it works.
Flashing side marker with lights off
Flashing side marker with lights on
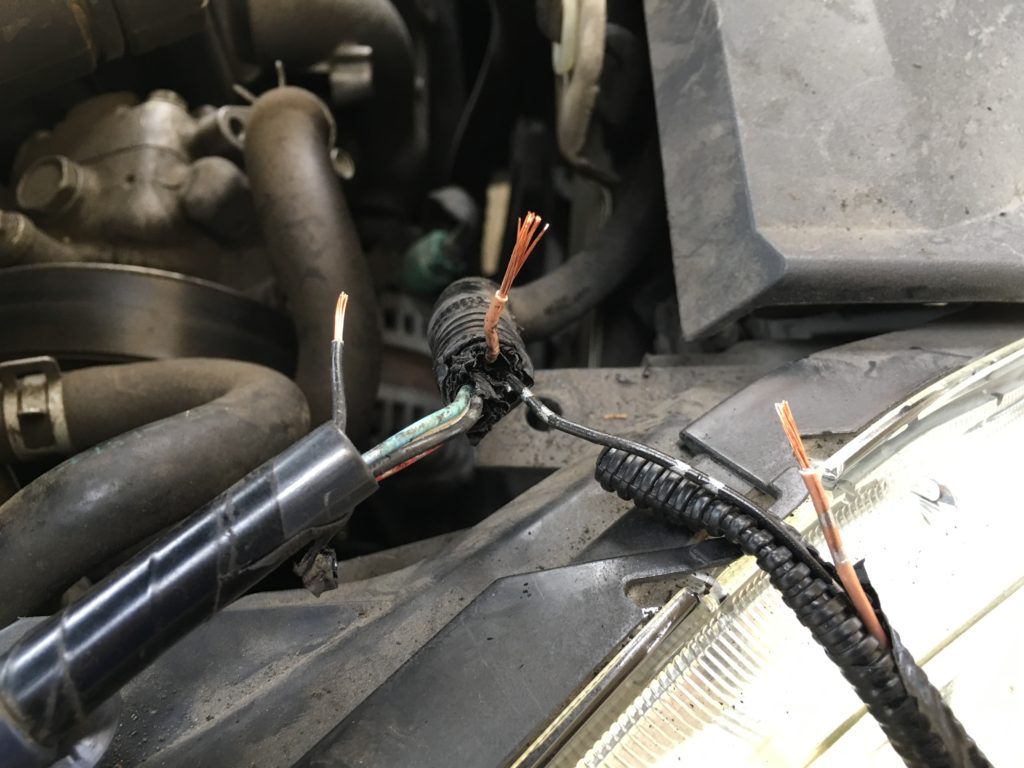
The Honda CR-V has plenty of room under the hood to make this modification easy.


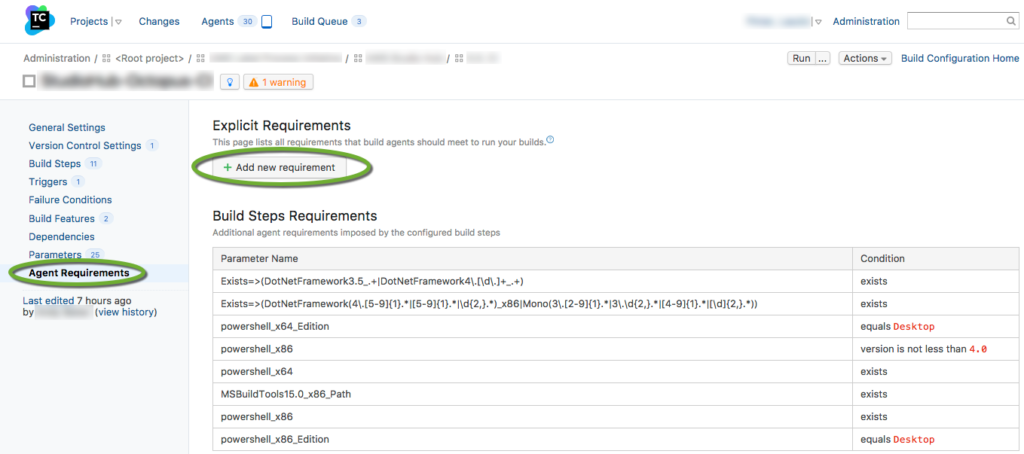
When a TeamCity configuration is created there are requirements the TeamCity Agent has to meet.
The creator of the build configuration can specify Explicit Requirements on the Agent Requirements page of the Build Configuration Settings.
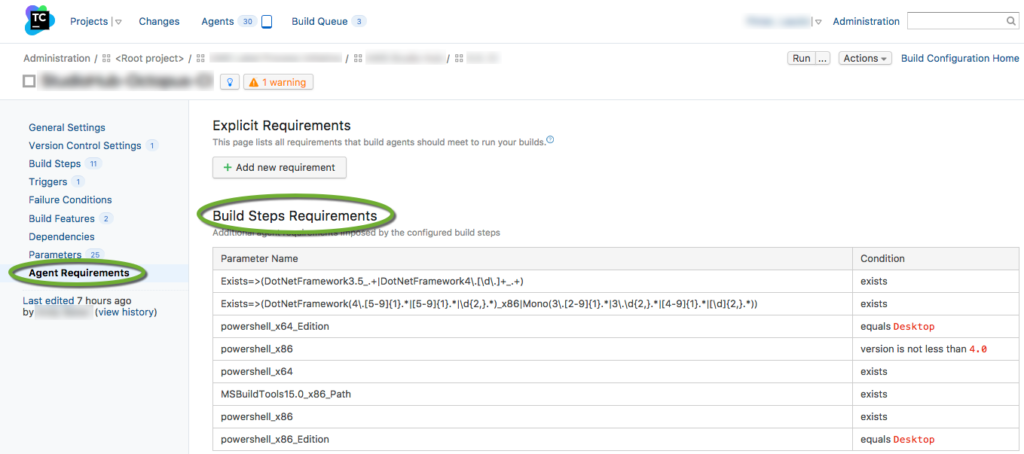
When the build configuration is created, TeamCity automatically adds Build Step Requirements.
The bottom of the same page shows the list of compatible and incompatible agents.
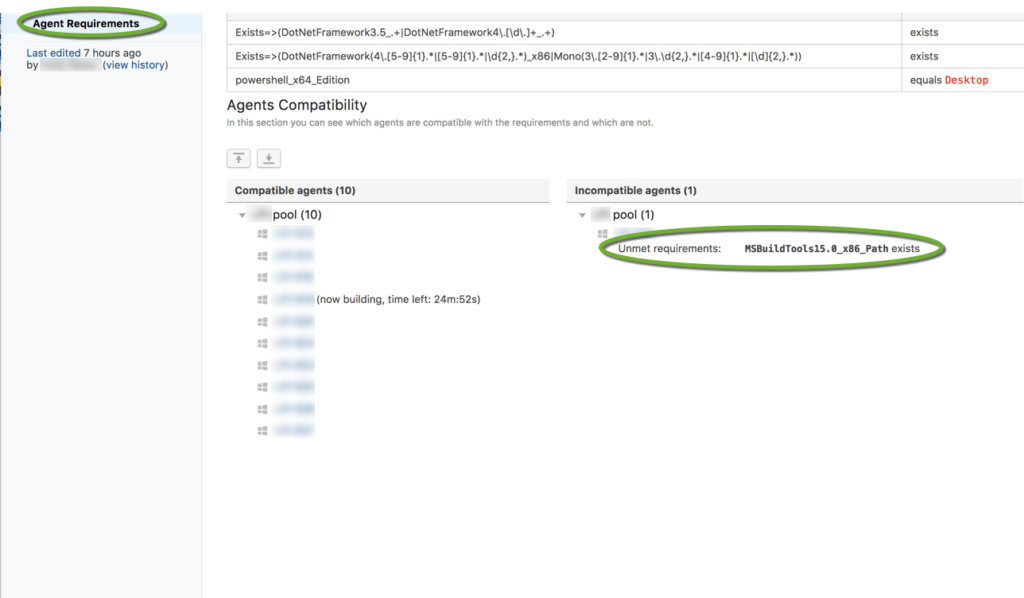
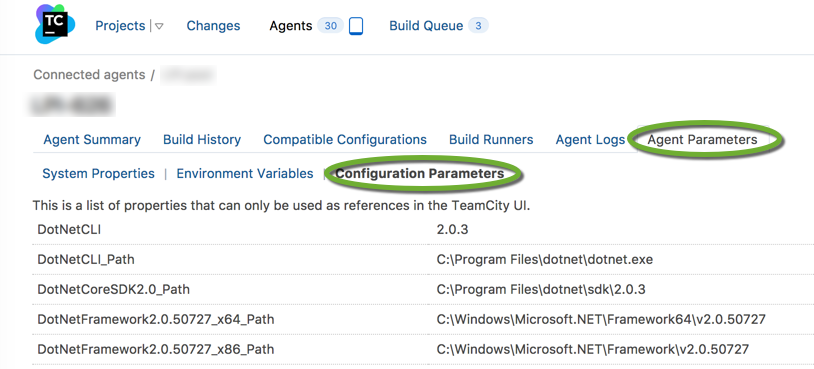
If you visit the incompatible agent, most likely it will not contain the parameter, or the value will be different from the requirement. To see the expected value of the parameter, open the Agent Parameters, Configuration Parameters tab of an agent that satisfies the requirement.
