LM Studio provides an interface to select, configure, and run AI models locally.
Installation
Download the LM studio installer. The AppImage to install the graphical user interface, or the Daemon to use the command line interface from the Terminal.
- Navigate to LM Studio
- Select the Desktop App or the Daemon
- Click the Download button
On Linux (Ubuntu)
Install Fuse
Newer Ubuntu releases do not include FUSE (Filesystem in Userspace) to runAppImages. This causes the error message
dlopen(): error loading libfuse.so.2
AppImages require FUSE to run.
You might still be able to extract the contents of this AppImage
if you run it with the –appimage-extract option.
See https://github.com/AppImage/AppImageKit/wiki/FUSE
for more information
Install FUSE with
sudo apt update
sudo apt install libfuse2t64
Install LM Studio
Make the downloaded file executable. Open the Terminal and execute
cd ~/Downloads
chmod +x ./LM-Studio-*.AppImage
Run LM Studio
./LM-Studio-*.AppImage --no-sandbox
Configuration
Model download and indexing location
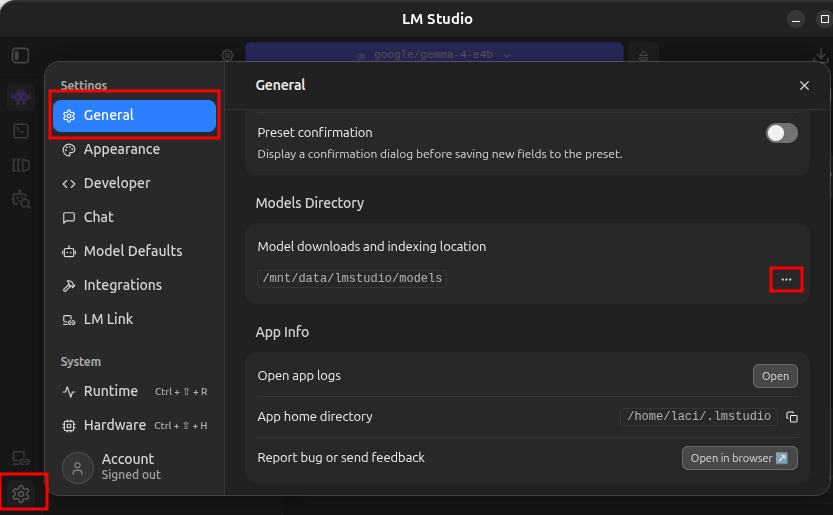
If your computer has multiple hard drives, you can configure LM Studio to load and index models at a custom location.
- In LM Studio click the gear icon in the lower left corner, on the General tab click the ellipses (…) next to Model downloads and indexing location and select the new location.
Expose the models to OpenClaw
To use the local AI models from OpenClaw, we need to expose those from LM Studio
Set the context size
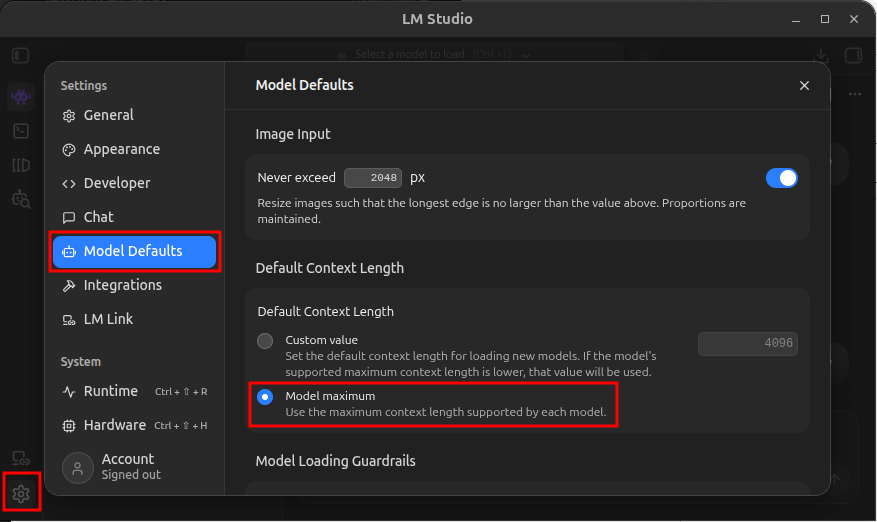
To allow OpenClaw to fully utilize the model context sizes, set the default to the model maximum.
- In LM Studio click the gear icon in the lower left corner, on the Model Defaults tab in the Default Context Length section select Model Maximum
Script the start of the LM Studio AI agent server
To be able to start the server any time, save in the /usr/local/bin/start_lm_studio_server.sh file
#!/bin/bash

# Start the LM Studio service
lms server start --port 1234
Make the file executable with
chmod +x /usr/local/bin/start_lm_studio_server.sh
and execute the file to start the server
start_lm_studio_server.sh
Check the server and the installed model
curl http://localhost:1234/v1/models
An example of the output
{
“data”: [
{
“id”: “google/gemma-4-e4b“,
“object”: “model”,
“owned_by”: “organization_owner”
},
{
“id”: “text-embedding-nomic-embed-text-v1.5”,
“object”: “model”,
“owned_by”: “organization_owner”
}
],
“object”: “list”
Configure OpenClaw to use LM Studio as the model source.
The bold text is the ID of the model from above. Execute
openclaw onboard \
  --non-interactive \
  --accept-risk \
  --auth-choice lmstudio \
  --custom-base-url http://localhost:1234/v1 \
  --lmstudio-api-key "$LM_API_TOKEN" \
  --custom-model-id google/gemma-4-e4b
Configure OpenClaw to use LM Studio as the model provider and restart the OpenClaw gateway
openclaw config set agents.defaults.memorySearch.provider lmstudio
openclaw gateway restart
To automate the LM Studio server start create a systemd service
Create the service file
cd /etc/systemd/system
sudo touch lm_studio_server.service
sudo nano lm_studio_server.service
Save the following in the file
[Unit]
Description=Start LM Studio server
After=network.target

[Service]
ExecStart=start_lm_studio_server.sh
Restart=always

[Install]
WantedBy=multi-user.target
Enable the service
sudo systemctl daemon-reload
sudo systemctl enable lm_studio_server.service