Microsoft releases a new version of Visual Studio every 2-3 years, but most of the enterprise applications have to be operational for years. Many companies developed applications in earlier versions of Microsoft Visual Studio ( VS 2003, VS 2005, VS 2008, VS 2010, or VS 2012 ) and the developers would like to use the new features of the VS 2013 development environment and the .NET 4.5 or higher Framework, but the conversion looks very hard and time consuming. If the application’s lifespan is long, the projects and solutions could be converted multiple times, so it makes sense to prepare your applications for the easiest migration as soon as possible. Preferably set up all projects and solutions during the initial development phase, so later the conversion will be easy and straightforward.
You can set up your new applications and modify the structure of existing projects and solutions for easy conversion, so when the time comes it will be easy to convert them to the new version of Microsoft Visual Studio.
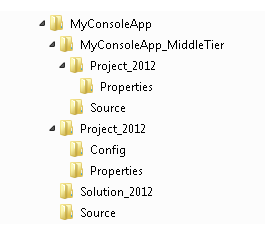
For console applications and Windows services we will create the following folder structure.

If you need to add a middle tier project to the application to handle the business rules follow the structure below:
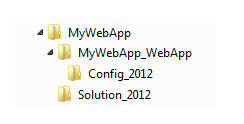
For web applications and web services we will leave the project file in the web application folder, so the folder structure will look like this:
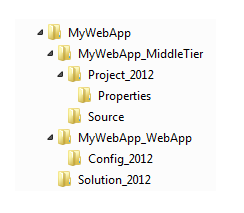
If you need to add a middle tier project to the web application for the business rules:
In the first example we will prepare the My Console App console application for the conversion.
The files of the My Console App solution are distributed the following way:
- The top level “MyConsoleApp” solution level folder contains sub folders for the solution file, and the project files,

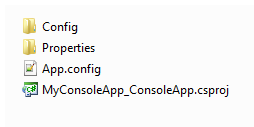
- The “Project_2012″ folder only contains the”Config” and “Properties” folders, the App.config file and the project file
The “Source” folder will contain all the source files.

Create the folder structure in Windows Explorer and in Microsoft Visual Studio 2012 move all source files to the “Source” folder, so multiple projects can reference them:
- Open the VS 2012 solution in Microsoft Visual Studio 2012
- Right click a source file in the solution explorer and select “Remove”
- In TFS (Team Foundation Server) move the just removed source file from the project folder to the “Source” folder. (If you don’t use TFS or any other source control system use Windows Explorer to move the file.)
- Important: In the Solution Explorer select the project and above the name of the solution click the “Refresh” button, otherwise Visual Studio 2012 will not let you add the file back to the project from the “Source” folder.

- Right click the ArchiveCreator project and select “Add”, “Existing Item…”

- Select the source file in the “Source” folder, click the down arrow on the “Add” button and select “Add As Link”. This way the file is not going to be copied back to the project folder, it will stay in the “Source” folder.
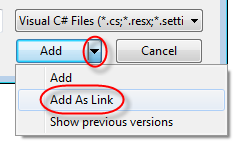
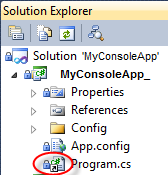
- Repeat the steps above to move all your source files to the “Source” folder and add them to the project as link. A small arrow indicates the the file is added to the project as a link, so multiple projects can reference it.
For Web Applications and Web Services leave the project file in the web application folder, and indicate the Visual Studio version in the file name:

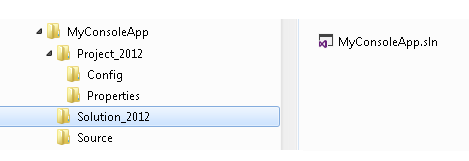
Create a Visual Studio version specific folder for the solution and place the .sln file into it. Indicate the Visual Studio version in the name of the folder.
For console applications and windows services:
For web applications and web services:

Leave a comment