TeamCity Agent Unmet Requirements

When a TeamCity configuration is created there are requirements the TeamCity Agent has to meet.

The creator of the build configuration can specify Explicit Requirements on the Agent Requirements page of the Build Configuration Settings.

When the build configuration is created, TeamCity automatically adds Build Step Requirements.

The bottom of the same page shows the list of compatible and incompatible agents.

If you visit the incompatible agent, most likely it will not contain the parameter, or the value will be different from the requirement. To see the expected value of the parameter, open the Agent ParametersConfiguration Parameters tab of an agent that satisfies the requirement.

Create a Splunk HTTP Event Collector token

To receive HTTP post messages in Splunk, we need to create a Splunk HTTP Collector token.

To create an index for this token see Create a Splunk index

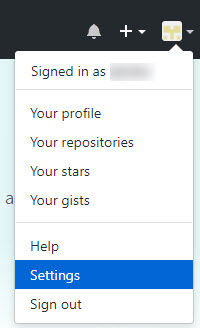
  1. In the Settings menu select Data Inputs
  2. Select the HTTP Event Collector link
  3. Click the New Token button
  4. Enter a name and description for the token and click the Next button
  5. Select the index to store the events in, set it as the default index, and click the Review button
  6. Click the Submit button to create the token
  7. The confirmation screen shows the token. You will be able to see it again on the token list page. Click the Start Searching button to see the search statement to see the events collected by this token.
  8. You can always search for the events with
    source="http:MY_INPUT" (index="MY_INDEX")

  9. The HTTP Event Collector token list shows the token.

Create a Splunk index

Splunk stores the events in separate databases based on index names. It is faster to search for events if the event types are separated into multiple indexes.

To create an index for the event type you want to send to Splunk

  1. In the Settings menu select Indexes
  2. Click the New Index button
  3. Enter the name of the index. You can leave the default settings, and click the Save button.

Enable the HTTP Event Collector in Splunk

To send events to Splunk via HTTP posts, enable the HTTP Event Collector functionality on the Splunk Enterprise server.

If you operate your own Splunk server

  1. Log into the Splunk web interface as an administrator
  2. In the Settings menu select Data inputs
  3. Select the HTTP Event Collector link
  4. In the upper right corner click the Global Settings button
  5. To enable the Splunk HTTP Event Collector, click the Enabled button
  6. To use HTTP instead of HTTPS uncheck the Enable SSL checkbox
  7. Click the Save button to save the changes


How to send an event to the Splunk HTTP Event Collector

The Splunk HTTP Event Collector is the preferred way to send events to Splunk.

The Splunk HTTP Event Collector closes the connection if you don’t use HTTPS when you are sending a POST message.

Recv failure: Connection reset by peer

To send the event from the Macintosh Bash terminal

curl -k https://MY_SPLUNK_SERVER_IP:8088/services/collector -H 'Authorization: Splunk MY_TOKEN' -d '{"sourcetype": "json", "event":"Hello, World!", "host":"MY_HOST_NAME"}'

To send the event from Postman

Turn off the SSL Certificate Validation.

If the Splunk server does not have a trusted SSL certificate, Postman will throw an error if you send the message with the mandatory HTTPS protocol. To tell Postman, you trust the SSL certificate generated by the Splunk server, turn off the SSL certificate validation in Postman.

This option is only available in the standalone version of Postman, not in the Chrome add-on

  1. In the upper right corner of Postman click the wrench
  2. Select Settings
  3. On the General tab turn off SSL certificate verification

Create the post

  1. Add your Splunk token to the header
  2. Add the raw, JSON type body


The given assembly name or codebase was invalid. (Exception from HRESULT: 0x80131047)

When I made changes to the web.config file of an ASP.Net C# application, I have accidentally deleted a comma, and I started to get the runtime error message:

The given assembly name or codebase was invalid. (Exception from HRESULT: 0x80131047)

Make sure all necessary commas are there in the config files, Visual Studio does not check the format of those lines. In my case, the error was in

<provider invariantName="MySql.Data.MySqlClient" type="MySql.Data.MySqlClient.MySqlProviderServices, MySql.Data.Entity.EF6, Version=6.9.10.0, Culture=neutral, PublicKeyToken=c5687fc88969c44d" />

Send Alt-Control-Delete to a Windows server via Remote Desktop

When you log into a Windows server via the Remote Desktop Protocol (RDP) in some cases you need to send the Alt-Control-Delete ( in other notations Alt-Ctrl-Del, Control-Alt-Delete, Ctrl-Alt-Del ) key combination to the remote server.

From a Macintosh laptop

On a Macintosh laptop press the fn+control+option+delete keys to send Alt-Control-Delete to the server.

From a Windows workstation

If the Remote Desktop window is not in full-screen mode, Alt+Control+Delete will control your own Windows workstation.

On a Windows workstation press the Alt+Control+End keys to send Alt-Control-Delete to the remote server.


Connect to a MySQL database from Visual Studio 2017

As of today weI can connect to a MySQL database, but cannot generate the Entity Data Model from a MySQL database in Visual Studio 2017

To access a MySQL database from Visual Studio 2017

IMPORTANT: First install MySQL for Visual Studio, and after that install MySQL Connector/Net.

If MySQL Connector/Net is already installed on your workstation, uninstall it before installing MySQL for Visual Studio and reinstall MySQL Connector/Net.

Install MySQL for Visual Studio

Available version information is at https://dev.mysql.com/doc/visual-studio/en/visual-studio-intro.html

  1. Close all instances of Visual Studio,
  2. Download the installer from https://dev.mysql.com/downloads/windows/visualstudio/
  3. Start the installer
  4. Click the Complete button,
  5. If you select Typical, make sure the Visual Studio 2017 components are selected


Install the MySql Connector/Net the fully-managed ADO.NET driver for MySQL

  1. Download the installer from https://dev.mysql.com/downloads/connector/net/
  2. Download version 6.9.10, because version 6.10.5 throws the

    Inheritance security rules violated by type: ‘MySql.Data.Entity.MySqlEFConfiguration’. Derived types must either match the security accessibility of the base type or be less accessible

    error. More info at https://stackoverflow.com/questions/47227495/inheritance-security-rules-violated-by-type-mysql-data-entity-mysqlefconfigura

  3. Select version 6.9.10, your operating system and click the Download button
  4. If you don’t want to create an Oracle account, click the No thanks… link
  5. Start the downloaded installer
  6. Click the Complete button

Install the NuGet packages

Make sure to install the same version of the NuGet packages as the MySql Connector/Net

Generate Entity Framework Entity Data Model in Visual Studio 2017

Visual Studio 2017 has many project type options, and not all of them support the Entity Framework user interface to generate the Entity Framework Data Model (EDMX) file. If you create an ASP.NET Web Application(.NET Framework) you can add the EDMX file to it. The .NET Core projects do not support the Entity Framework Data Model creation.

For more complex web applications it is good practice to separate the data access layer from the presentation layer. You can even reference the data access project from another solution if that also needs access to the same data.

To be able to use the graphical user interface to generate the Entity Framework Entity Data Model

  1. Add a new Class Library (.NET Framework) type project to the solution,
  2. Right-click the new project and select Add -> New Item
  3. In the Data section select the ADO.NET Entity Data Model
  4. Select EF Designer from database
  5. Continue the process to create the database connection and generate the data model.

Generate the Entity Classes

  1. Open the EDMX file
  2. Right-click the background and select Add Code Generation Item
  3. Select the latest EF DbContext Generator
  4. When the classes have been generated, close the solution and open it again, otherwise, the newly created classes cannot be referenced.

{“error”:”Entity type ‘AspNetUserRoles’ has composite primary key defined with data annotations. To set composite primary key, use fluent API.”}

When a database table has composite keys (multiple columns are in the key) you cannot use the usual key definition

[Key]
[Display(Name = “UserId”)]
public string UserId { get; set; }

[Key]
[Display(Name = “RoleId”)]
public string RoleId { get; set; }

When you run the application you get the error message:

{“error”:”Entity type ‘AspNetUserRoles’ has composite primary key defined with data annotations. To set composite primary key, use fluent API.”}

To declare composite keys, in the fluent API format

In the model declare the keys

public class AspNetUserRoles {

    // Composite primary keys
    // Initialized in ApplicationDbContext.OnModelCreating()
    public object UserId { get; internal set; }
    public object RoleId { get; internal set; }
    ...

In the ApplicationDbContext file add the lines to the OnModelCreating(ModelBuilder builder) method

// Composite primary key
builder.Entity().HasKey(table => new {
   table.UserId,
   table.RoleId
});