
GitHub Copilot is a ChatGPT based AI pair programmer extension for Visual Studio Code, Visual Studio, JetBrains IDE, and Neovim. It is most effective in Python, JavaScript, TypeScript, Ruby, Go, C# and C++.
Installation
GitHub Copilot has personal and business subscription models. Start your free trial at https://github.com/features/copilot
- Install the extension in Visual Studio Code or Visual Studio, see https://docs.github.com/en/copilot/quickstart
Configuration
See GitHub Copilot Configuration settings
Ask for suggestions
- Create a file with the standard file extension of the language to indicate the preferred programming language to the AI.
- Start to create a function with the name that describes its purpose (in this example we will use the JavaScript syntax)
function getDaysInMonth(month, year) {
(If your IDE automatically adds the closing curly brace, remove it, otherwise Copilot does not offer solutions)
or - Create a comment to describe the functionality
// Express server on port 3000 and return the current date
Select the suggestion
- Use the Alt-[ and Alt-] on Windows, Option-[ and Option-] on Mac to cycle through the suggested solutions and press Tab to accept it, or Esc to reject all of them.
See all suggestions in a new tab
- Press Ctrl-Enter to open a new tab, and a few seconds later all suggestions will be listed in the new tab.
- Click the Accept Solution link above the suggestion to insert it into your file.
For more information see the documentation
To activate and deactivate the GitHub Copilot
- In the lower right corner of the editor click the Copilot icon

- Select the scope to disable GitHub Copilot: for all languages, or for a specific language only.

Tutorials
There are GitHub repositories to learn to use GitHub Copilot. The Tutorials for GitHub Copilot page lists all of them. These are interactive repositories to learn the skills using real code:
- skills-getting-started-with-github-copilot – The basics of using GitHub Copilot
- skills-expand-your-team-with-copilot – How to use GitHub AI agents to do complex tasks in your repository
Interaction modes
GitHub Copilot has two main modes: Ask mode and Agent mode
Ask is an interactive communication mode, where the Copilot is a chat companion to give you information on the inner workings of the code, and give you brainstorming ideas.
Agent mode can make autonomous edits across multiple files in the project.
GitHub copilot Cheat Sheets
UI specific commands to enhance the work with Chat and Agent at GitHub Copilot Chat cheat sheet
The Visual Studio specific commands are:
Chat participants
Chat participants are like domain experts with specialty knowledge. Specify the chat participant with the @ symbol in your prompt. Most common chat participants are
| Variable | Specialty |
| @azure | Azure services – Service deployment and management. – App deployment to Azure. |
| @github | GitHub – GitHub specific skills. |
| @terminal | Visual Studio Code Terminal – To create and debug Terminal commands |
| @vscode | Visual Studio Code – Commands and features |
| @workspace | The current workspace – Project structure – Code parts interaction – Design patterns |
For more information see Chat participants
Chat variables
Chat variables give specific context in the prompt. The chat variables are
| Variable | Description |
|---|---|
#block | Includes the current block of code in the prompt. |
#class | Includes the current class in the prompt. |
#comment | Includes the current comment in the prompt. |
#file | Includes the current file’s content in the prompt. |
#function | Includes the current function or method in the prompt. |
#line | Includes the current line of code in the prompt. |
#path | Includes the file path in the prompt. |
#project | Includes the project context in the prompt. |
#selection | Includes the currently selected text in the prompt. |
#sym | Includes the current symbol in the prompt |
For more information see Chat variables
Slash commands
Slash commands are frequently used instructions:
| Command | Description |
|---|---|
/clear | Start a new chat session. |
/explain | Explain how the code in your active editor works. |
/fix | Propose a fix for problems in the selected code. |
/fixTestFailure | Find and fix a failing test. |
/help | Quick reference and basics of using GitHub Copilot. |
/new | Create a new project. |
/tests | Generate unit tests for the selected code. |
For more visit Slash commands
Tools in chat
Type the # sign in the chat prompt to display the list of tools. The list contains the list of files referenced in the current chat, and the available tools.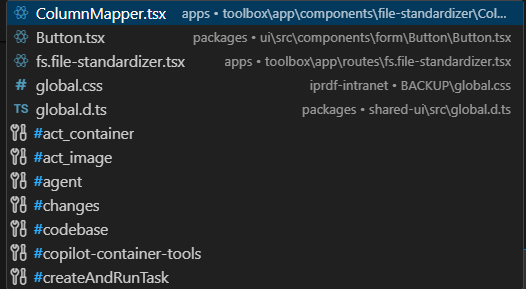
For more about tools see Use tools in chat
MCP Servers
To enable the MCP gallery in the Visual Studio Code extension explorer
- Open Visual Studio Code settings
- Search for chat.mcp.gallery.enabled
- Select the checkbox
Some of the MCP server registries are
- GitHub MCP server registry The Visual Studio Code Extensions view provides access to it.
- MCP’s official server repository
- Visual Studio Marketplace
Starting MVP servers as Docker containers
When using Docker with stdio servers, don’t use the detach option (-d). The server must run in the foreground to communicate with VS Code.
For more on MCP Servers see Use MCP servers in VS Code
Inline Chat
Inline chat can help you with fast responses related to a particular line in the code. To invoke it move the cursor to the line and press Ctrl-I (Cmd-I on Mac), or right-click the line and select Copilot, Editor Inline Chat. If you want the AI to insert lines in to your code, like generating test data by adding elements to an array, place the cursor where the lines should go.
