Search Terms: see Searching in Splunk
Commands: tell Splunk what we want to do with the search result
- Charts
- Computing statistics
- Formatting
Functions: explain how we want to chart, compute and evaluate the results
Arguments: variables we apply to the functions
Clauses: grouping and definition of results
Separator
Use pipes (|) to separate the components of the search language. The result of the component on the left is passed to the next component, no more data is read.
sourcetype=access_combined | top age | fields name
Editor features
- Color coding
- orange: Boolean operators and command modifiers
- blue: commands
- green: command arguments
- purple: functions
- If the cursor id behind a parenthesis, the matching parenthesis is highlighted
- Hotkeys
- Move each pipe to a new line: ⌘-\ (Mac) , ctrl-\ (Windows)
Commands
fields
Include and exclude fields from the search result. Separate the fields with space or comma.
- Include fields. Happens before field extraction, can improve performance.
sourcetype=access_combined | fields status, clientip
- Exclude fields (use negative sign after the word fields). It only affects the displayed result, no benefit to performance.
sourcetype=access_combined | fields - status, clientip
table
Retains the data in a tabulated format. Separate the fields with a comma.
- Field names are the table column headers.
sourcetype=access_combined | table status, clientip
rename
Renames table fields fo display. Use space to separate the fields.
- Wrap the name in quotes if the name contains space,
sourcetype=access_combined
| table status, clientip
| rename clientip as "IP Address"
status as "Status"
- In subsequent components, we need to use the new name of the field, because that is passed forward by the pipe separator.
sourcetype=access_combined
| table status, clientip
| rename clientip as "IP Address"
| fields - "IP Address"
dedup
Removes duplicate events that share common values. Separate the fields with space.
sourcetype=access_combined
| dedup first_name last_name
| table first_name last_name
sort
Ascending or descending order of the results.
- Ascending order. The default order is ascending, the plus sign (+) also causes ascending sort.
sourcetype=access_combined
| table first_name last_name
| sort first_name last_name
- Descending order
- If there is a space between the minus sign and the field name, the descending order applies to all specified fields:
sourcetype=access_combined
| table first_name last_name
| sort - age wage
- If there is no space between the minus sign and the field name, the descending order only applies to that field:
sourcetype=access_combined
| table first_name last_name
| sort -age wage
- If there is a space between the minus sign and the field name, the descending order applies to all specified fields:
limit argument
To limit the number of events returned, use the limit argument.
sourcetype=access_combined
| table first_name last_name
| sort -age wage limit=10
top
Finds the most common values of the given fields in the result set. Used to render the result in graphs.
sourcetype=vendor_sales
| top Vendor
Automatically provides the data in tabular form and displays the count and percent columns, and limits the results to 10.

limit clause
- Set the desired number or results.
sourcetype=vendor_sales
| top Vendor limit=20
- To get all results, use limit=0
sourcetype=vendor_sales
| top Vendor limit=0
- You can add more fields to the list separated by space or comma.
index=main sourcetype=access_combined_wcookie
| top JSESSIONID, file
- Change the title of the count and percentage columns.
index=main sourcetype=access_combined_wcookie
| top JSESSIONID file countfield = "Product count" percentfield = "Product percent"
- Control the visibility of the count and percent fields.
index=main sourcetype=access_combined_wcookie
| top JSESSIONID file showcount = True/False showperc = True/False
Add count and percent numbers for not within the limit.
index=main sourcetype=access_combined_wcookie
| top JSESSIONID file useother = True/False

- Specify the display value of the OTHER row:
index=main sourcetype=access_combined_wcookie
| top JSESSIONID file otherstr = "Total count"

by clause
Top three product sold by each vendor
sourcetype=vendor_sales
| top product_name by Vendor limit=3
rare
Shows the least common values of the field set.
Has the same options as the top command.
stats
Produces statistics of the search results.
Stats functions
count
- The number of events matching the search criteria.
index=main sourcetype=access_combined_wcookie
| stats

- To rename the “count” header us “as”
index=main sourcetype=access_combined_wcookie
| stats count as "Total files"
- Use “by” to group the result
index=main sourcetype=access_combined_wcookie
| stats count as "Total files" by file

- Add more fields with comma
index=main sourcetype=access_combined_wcookie
| stats count as "Total files" by file, productId

- Add a field to the count function to count events where the field is present
index=main sourcetype=access_combined_wcookie
| stats count(file) as "Total files"

- Compare the count to the total number of events
index=main sourcetype=access_combined_wcookie
| stats count(file) as "Total files", count as "Total events"

distinct_count or dc
Count of unique values for a field.
index=main sourcetype=access_combined_wcookie
| stats distinct_count(file) as "Total files"

index=main sourcetype=access_combined_wcookie
| stats distinct_count(file) as "Total files" by productId

sum
Returns the sum of the numerical values.
index=main sourcetype=access_combined_wcookie
| stats sum(bytes)

- Count the events and sum the value
index=main sourcetype=access_combined_wcookie
| stats count(file) as "Total files" sum(bytes)

- Group the sum and count values by a field. These must be within the same pipe to work on the same set of data.
index=main sourcetype=access_combined_wcookie
| stats count(file) as "Total files" sum(bytes) by productId

avg
Returns the average of numerical values.
index=main sourcetype=access_combined_wcookie
| stats avg(bytes) as "Average bytes"

- Group the values by a field
index=main sourcetype=access_combined_wcookie
| stats avg(bytes) as "Average bytes" by productId

- Add count to the table
index=main sourcetype=access_combined_wcookie
| stats count as "Number of files" avg(bytes) as "Average bytes" by productId

list
Lists all values of a given field.
index=main sourcetype=access_combined_wcookie
| stats list(file) as "Files"
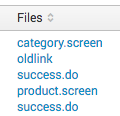
- Group the list of values by another field, but lists all repeated values.
index=main sourcetype=access_combined_wcookie
| stats list(file) as "Files" by productId

values
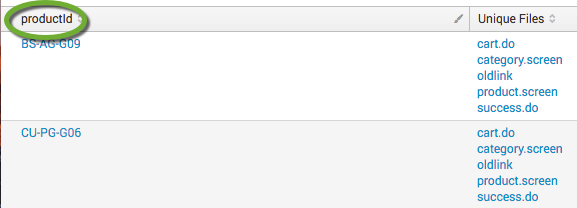
Works like the list function, but returns the unique values of a given field.
index=main sourcetype=access_combined_wcookie
| stats values(file) as "Unique Files"
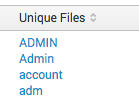
- Group the unique values by another field
index=main sourcetype=access_combined_wcookie
| stats values(file) as "Unique Files" by productId
